ReFS Volume Repair Was Not Successful
The Resilient File System (ReFS) is Microsoft’s latest file system, designed to optimize data availability, scale efficiently with large data sets across various workloads, and ensure data integrity with resilience against corruption.
However, some people report receiving an error message “ReFS volume repair was not successful” on their computers. When this error occurs, users can run into these issues easily:
- ReFS volumes appear as RAW
- Cannot mount ReFS volumes or drive not showing
After searching for the “ReFS volume repair was not successful” error on the Internet, I find that the error can mainly be triggered by these reasons: disk failure, software bugs, configuration errors, file system corruption, etc. If you encounter the same error, please keep reading to find solutions.
Do a Preparation
Before you start to fix the “ReFS volume repair was not successful” error on your PC, you’d better recover all data to a safe location to avoid data loss. To do that, I recommend MiniTool Partition Wizard to help you.
It offers the Data Recovery feature to help you recover files from various devices with ease. Besides, this feature-rich tool can also help you format SD card FAT32, check disks for errors, convert MBR to GPT, rebuild MBR, format USB to FAT32, change cluster size, etc.
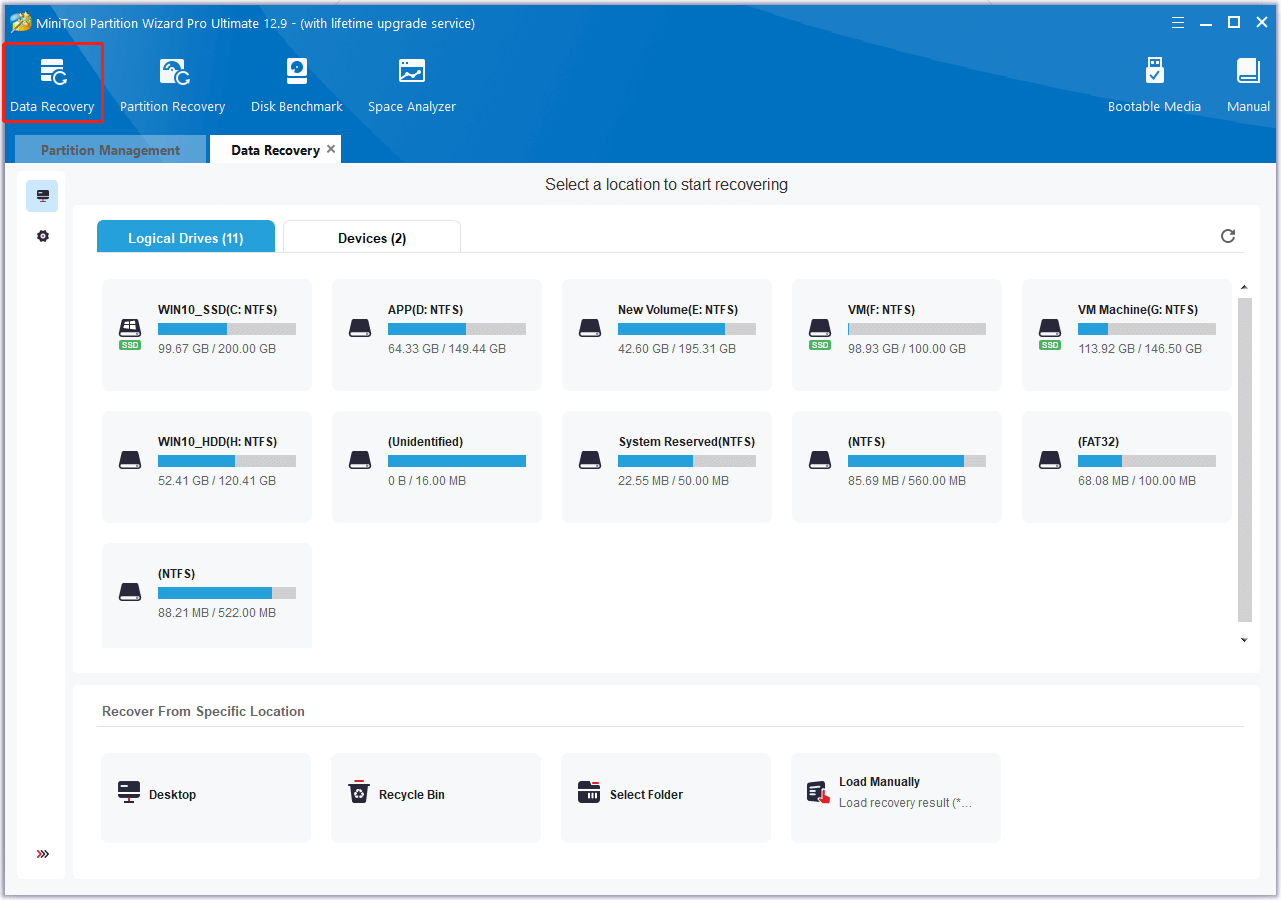
Here’s how to use the Data Recovery feature:
MiniTool Partition Wizard DemoClick to Download100%Clean & Safe
- Download and install MiniTool Partition Wizard.
- Launch this app to enter its main interface.
- Click Data Recovery from the top toolbar.
- Select a partition and click Scan.
- Once the scanning process is complete, check the files you want to recover and click Save.
- Choose a safe location and click OK to confirm.

How to Fix the “ReFS Volume Repair Was Not Successful” Error?
How to fix the “ReFS volume repair was not successful” error? In this section, I summarize some effective solutions.
Way 1. Use Windows PowerShell Commands
You can fix the “ReFS volume repair was not successful” error with the following steps:
Step 1. Press the Win + X keys simultaneously to open the Quick Link menu, and select Windows PowerShell (Admin) from the menu.
Step 2. Type the command “Repair-Volume -DriveLetter E -OfflineScanAndFix”and press Enter to offline E: drive volume and attempt to correct the existing errors through OfflineScanAndFix.
Step 3. Once the process is finished, the volume is automatically online.
Step4. It’s possible to fix multiple volumes at one time as well. For example, you can run the following command to scan and fix errors on G, H, and I drive at one time:
Repair-Volume -DriveLetter GHI -Scan -SpotFix
Way 2. Allow or Enable File Integrity Streams
Although ReFS uses an integrity scrubber mechanism to track and repair data corruption automatically, you can run into issues occasionally. Therefore, you can enable File Integrity Streams to decrease the opportunity of data loss. Here’s how to do that:
- Open the Quick Link menu.
- Select Windows PowerShell from the menu.
- Type “C:\> Set-FileIntegrity H:\ -Enable $True” and press Enter.
Way 3. Use ReFSutil
Besides, you can also use ReFSutil to detect damages in ReFS volumes. To do that, you can just open Windows PowerShell (Admin) and run this command “refsutil salvage -QA D: C:\Temp C:\Recovery”. Note that make sure running the Volume Shadow Copy service during this process.
Way 4. Run CHKDSK
Although ReFS has self-healing capabilities, you can also run CHKDSK to fix the “ReFS volume repair was not successful” error. To do that, you just need to type the command “chkdsk /f /r D:” in the command window and press Enter.
Way 5. Try Some Other Tips
If none of the above ways can help you fix the “ReFS volume repair was not successful” error, you can try some other tips to fix the error.
- Perform the “Repair-Volume -DriveLetter” command
- Check the health of the entire storage pool
- Rebuild the Drive
- Consult Microsoft Support
Wrapping Things Up
How to fix the “ReFS volume repair was not successful” error? After reading this post, you may already know the answers. It provides several useful ways to help you troubleshoot the error.


User Comments :