The randgrid.sys BSOD error in Windows 10/11 is a frustrating blue screen issue. It often occurs when you attempt to launch/play Call of Duty: Modern Warfare II or other games of Call of Duty. Multiple factors can cause this error, including malware infections, faulty device drivers, corrupted system files, etc.
In this post, we summarize several feasible solutions to the randgrid sys BSOD Windows 10/11 error. You can try them one by one until you get rid of this error.
MiniTool Partition Wizard DemoClick to Download100%Clean & Safe
Method 1: Delete the Corrupt File
When the Windows 10/11 randgrid.sys error happens, you can try to fix it by deleting the problematic file. To do this, follow the steps below.
Step 1: Press Windows + E to open File Explorer.
Step 2: Navigate to either of the following paths according to your situation:
- C:\SteamLibrary\steamapps\common\Call of Duty HQ
- C:\ProgramData\Battle.net_components\randgridauks
Step 3: Locate and right-click the randgrid.sys file. Then select Delete to remove it.
Method 2: Scan for Viruses or Malware
Sometimes viruses may attack your system and cause the Windows randgrid.sys BSOD error. In this case, you can perform a full antivirus scan. You can do this with the following steps.
Step 1: Open Settings by pressing Windows + I. Then select Update & Security.
Step 2: Switch to Windows Security and then click Virus & threat protection from the right side.
Step 3: In the next window, click Scan options.
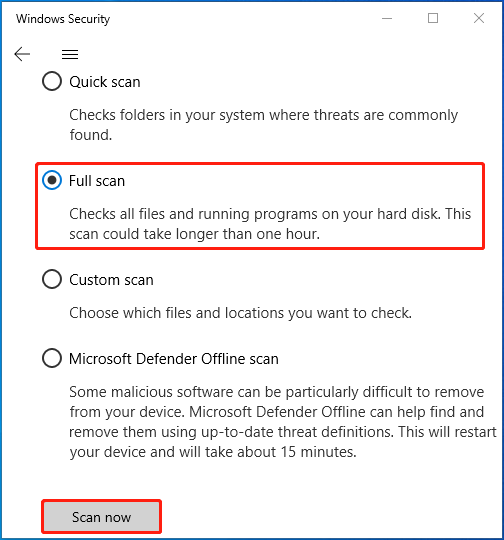
Step 4: Choose Full scan and then click Scan now to detect potential viruses or malware in your system.

Method 3: Run SFC and DISM Scans
Corrupted or missing system files may be another possible reason for the randgrid sys BSOD Windows 10/11 error. To fix it, you can utilize the SFC and DISM utilities.
Step 1: Right-click the Start icon and select Run.
Step 2: Type cmd in the Run dialog box and then press Ctrl + Shift + Enter to run Command Prompt as an administrator.
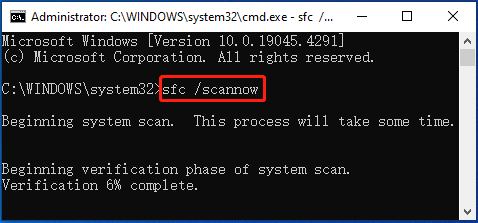
Step 3: Type sfc /scannow in Command Prompt and press Enter.

Step 4: Once the process ends, type the following commands and press Enter after each.
- DISM /Online /Cleanup-Image /CheckHealth
- DISM /Online /Cleanup-Image /ScanHealth
- DISM /Online /Cleanup-Image /RestoreHealth
Step 5: After the scan completes, restart your computer to check whether the randgrid.sys error disappears.
Method 4: Uninstall Recently Installed Updates
If you encounter the Windows 10/11 randgrid.sys BSOD error after you update Windows, you may be able to fix it by uninstalling recently installed updates. Here’s how to do that.
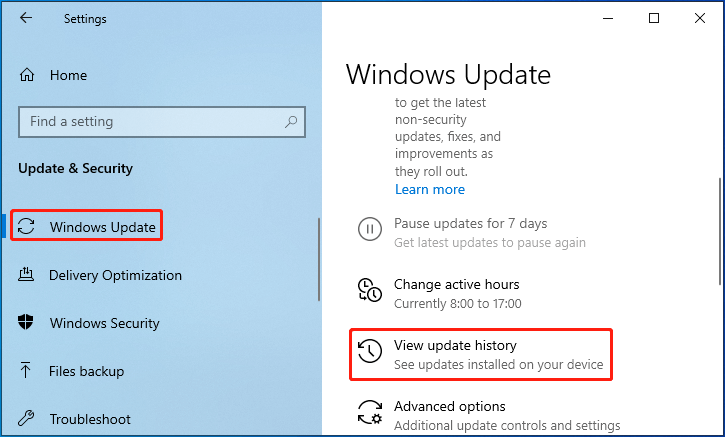
Step 1: Open Settings and then go to Update & Security > Windows Update.
Step 2: From the right panel, click View update history.

Step 3: In the next window, click Uninstall updates to continue.
Step 4: In the Uninstall an update window, right-click the latest update you installed and select Uninstall.
Method 5: Install All the Pending Windows Updates
If your Windows is out of date, you can also try to update Windows to the newest version. By doing so, you are likely to resolve the randgrid.sys BSOD error as well. You need to go to Settings > Update & Security > Windows Update > Check for updates. If any updates are available, click Download & install to install them.
All these methods mentioned in this post are workable. You can give them a try when you suffer from the Windows 10/11 randgrid.sys BSOD error.


User Comments :