To avoid data loss due to unexpected errors like processor thermal trip error, you’d better make a Windows backup via PC cloning software like MiniTool Partition Wizard. It helps you clone the whole system disk with ease. Besides, this multifunctional partition manager also allows you to convert MBR to GPT, migrate Windows 10, wipe disks, recover missing partitions/data, etc.
MiniTool Partition Wizard DemoClick to Download100%Clean & Safe
If you are suffering from processor thermal trip error on Windows 10, try the methods below to get it solved.
- Check the ventilation fans
- Check thermal paste and heat sink
- Disable overclocking
- Disable background processes
- Increase RAM
Solution 1: Check the Ventilation Fans
When the processor thermal trip error occurs, the first thing you should do is check if the ventilation fans are overheating. If it gets overheating, cool down by taking some measures. For instance, remove any obstructions near the fans to get enough airflow.
Wipe the dust off the ventilation fans to make sure that the fans work properly. Besides, put the computer in a place that is not too hot or humid.
Solution 2: Check Thermal Paste and Heat Sink
Insufficient thermal paste between the CPU and its heat sink may trigger the processor thermal trip error in Windows 10/11 too. The thermal paste acts as a cooling agent, which can drastically cool down your system through the fan.
However, if the thermal paste is not applied properly, it won’t do its job and then your processor will get overheating. Hence, it is vital to check the thermal paste and heat sink on your computer. To do that, please follow the steps below.
- Turn off the computer and then remove the fan on the top of the processor by unscrewing the bolts with care.
- Apply the thermal paste on the top of the processor.
- Screw the fan again in its place.
- After some time, reboot the PC.
Solution 3: Disable Overclocking
Overclocking boosts the processor clock rate for a short time period, but it also increases the temperature sharply. If overclocking doesn’t stop in time, the processor thermal trip error will occur. So, disable overclocking after you meet this error. Here’s the step-by-step guide.
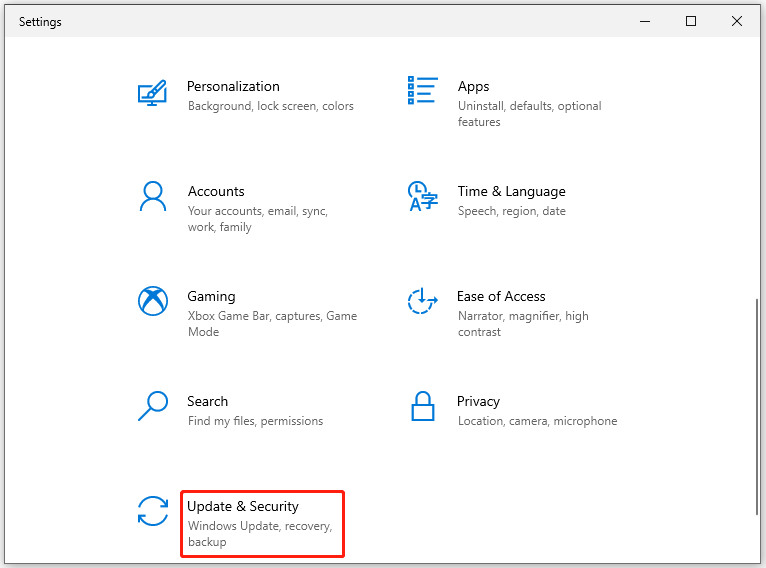
Step 1: Open the Settings app and then click Update & Security.
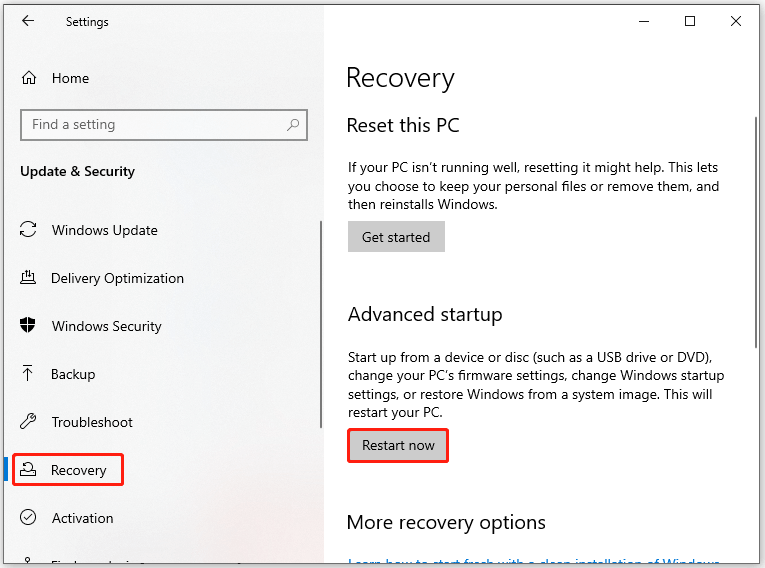
Step 2: Tap on Recovery in the left panel.
Step 3: Then click on the Restart now button on the right side of the window.
Step 4: After your computer restarts, click Troubleshoot > Advanced options > UEFI Firmware Settings > Restart.
Step 5: Then your computer will restart and open BIOS automatically.
Step 6: Click on the Advanced tab in it and then tap Performance and choose Overclocking.
Step 7: Now, disable the Overclocking option.
Step 8: Press the F10 and Enter keys to confirm and execute the changes.
Also read: 2 Simple Methods to Enable or Disable Dev Drive Protection
Solution 4: Disable Background Processes
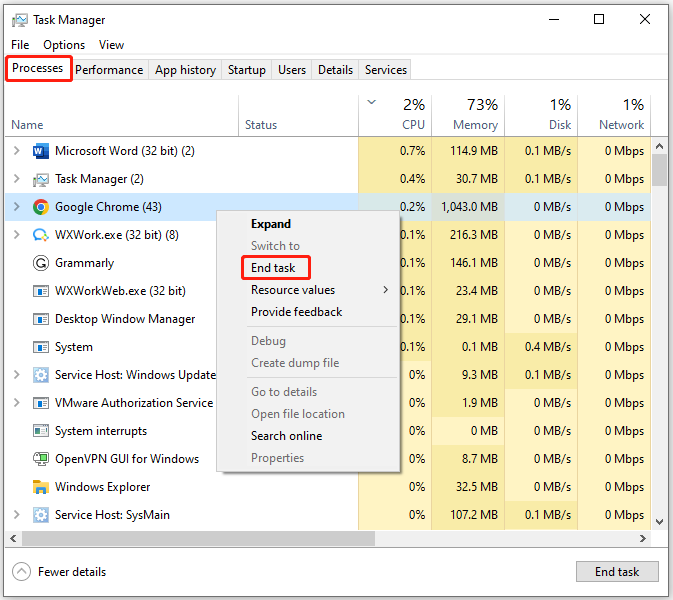
Step 1: Right-click on the Windows icon to open the Start menu. Then click Task Manager from the menu.
Step 2: In the Task Manager window, tap on the Processes tab and then find the processes that have high CPU usage.
Step 3: Right-click on the process with high CPU usage and then click End task. Repeat this operation to close all CPU-consuming processes.
Solution 5: Increase RAM
If RAM on the computer is not enough and requires more space due to less memory, it can cause the system to slow down, freeze, or overheat. Then you may receive the processor thermal trip error on Windows 10. To get rid of the processor thermal trip error in Windows 10/11, you need to increase RAM on your computer. If you don’t know how to do that, simply follow this tutorial: How to Get More RAM on Laptop – Free up RAM or Upgrade RAM

User Comments :