About PowerShell Clone Disk
Cloning a hard disk is a great option if you want to create a backup of the specific disk, transfer data to another device, or upgrade to a larger disk. It will copy everything from one disk to another, including files and folders, partition tables, etc. After cloning, the cloned disk can work the same as the original one.
There are various disk cloning tools available. In this post, we mainly discuss about PowerShell clone disk and its alternative – MiniTool Partition Wizard. Simply keep reading to get the details.
How to Clone Disk Using PowerShell
This post offers two PowerShell clone disk command lines to help you clone a disk. You can pick one according to your preference.
Way 1: Via XCOPY command
As a Windows built-in utility, the XCOPY command can transfer files and directories from one location to another. You can use it in PowerShell to copy files and folders on your disk easily. The following are detailed steps.
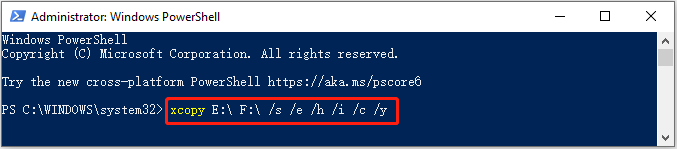
Step 1: Right-click the Start icon and select Windows PowerShell (Admin).
Step 2: After opening PowerShell as an administrator, type xcopy E:\ F:\ /s /e /h /i /c /y and press Enter. This command copies all the files and folders from the E drive to the F drive.
Tip: E represents the source drive you want to clone while F is the destination drive to store the cloned files and folders. You can replace them with the drive letters of your hard drives.
To learn more about the XCOPY command like the meaning of its parameters, you can read this post: How to Make Use of XCOPY Command to Copy Files and Folders?
Way 2: Via the Copy Command
The Copy command is another PowerShell clone disk command line you can try. To run it, follow the steps below.
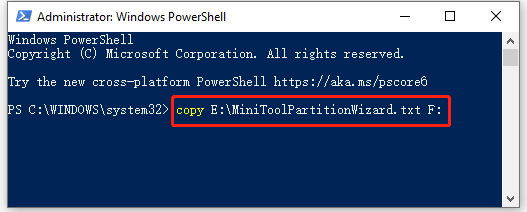
Step 1: Run Windows PowerShell as an administrator.
Step 2: In the prompted window, type copy E:\MiniToolPartitionWizard.txt F: and press Enter to copy the “MiniToolPartitionWizard.txt” file from E drive to F drive.
Step 3: If you want to copy files with the same file extension from one drive to another, type copy E:\*.txt F: and press Enter. Replace “.txt” with the desired file extension, like “.doc”, “.jpg”, and so on.
The Alternative to PowerShell Clone Disk: MiniTool Partition Wizard
If you are not familiar with PowerShell, it might be a little complex for you to copy the disk with either of the above PowerShell clone disk command lines. As for this, we’d like to recommend you make use of MiniTool Partition Wizard, an alternative to the PowerShell clone disk commands.
Compared with PowerShell, MiniTool Partition Wizard is easier to use. With it, you just need a few clicks to clone an entire disk to another. Besides, it offers lots of additional features related to partition/disk management. For instance, you can use it to partition hard drive, format/resize/delete partitions, convert MBR to GPT and vice versa, etc.
Simply download and install MiniTool Partition Wizard on your PC. Then refer to the clone hard drive guide to copy your disk with the tool.
MiniTool Partition Wizard FreeClick to Download100%Clean & Safe
Bottom Line
This post shows you two ways to clone disk using PowerShell. You can choose one according to your needs. Also, you can turn to the alternative to the PowerShell clone disk commands – MiniTool Partition Wizard.
User Comments :