The nvoglv32.dll crash or application error can occur due to multiple reasons. Here, Partition Magic summarizes possible reasons for it and collects several available fixes. You can try these methods if it occurs to you.
Nvoglv32.dll is a file developed by NVIDIA associate with the driver of graphics adapter and OpenGL. You can receive nvoglv32.dll crash or application error due to DLL file corruption, corrupt or incompatible graphics driver, improper app/game installation, virus block, etc.
MiniTool Partition Wizard DemoClick to Download100%Clean & Safe
What to do if nvoglv32.dll causing app crashes? I collect several fixes for the issue. You can have a try!
Fix 1: Add or Replace the Nvoglv32.dll File
The first way you should try is to add or replace the nvoglv32.dll file in the designated folder. Copy the nvoglv32.dll file from another computer (running the same Windows iteration and architecture). Then paste it to the connected USB drive, connect the USB drive to the affected PC, move nvoglv32.dll to its location.
By default, the nvoglv32.dll file is located in one of the following paths.
- C:\WINDOWS\System32\DriverStore\FileRepository\nv_dispi.inf_amd64_dfe0347ef8af4743
- C:\WINDOWS\SysWow64
Fix 2: Update NVIDIA Drivers
It’s recommended to update NVIDIA drivers because the nvoglv32.dll crash or application error can be caused by corrupt or incompatible NVIDIA driver. Here’s the tutorial on how to update NVIDIA drivers.
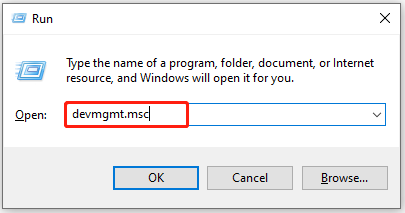
Step 1: Open the Run window by pressing Windows and R keys.
Step 2: Type devmgmt.msc in the Run window and hit Enter to open Device Manager.
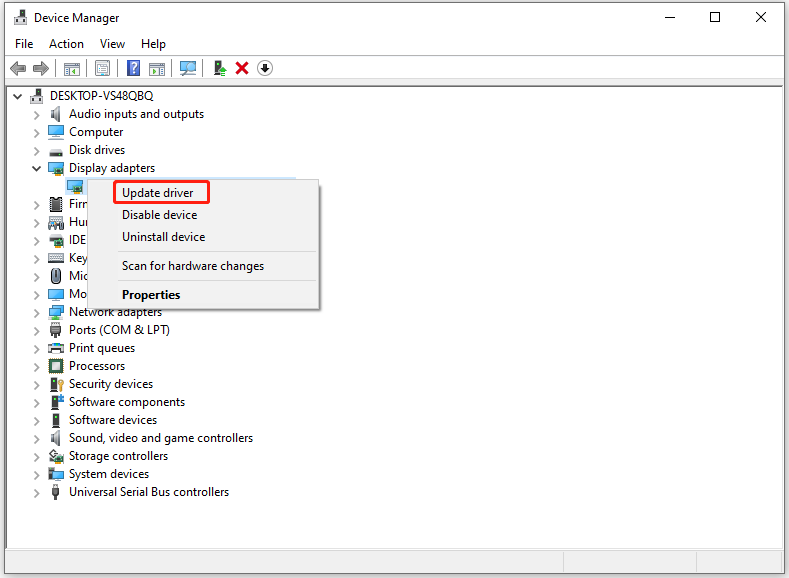
Step 3: Double-click Display adapters to expand the category. Then right-click on the NVIDIA driver and choose Update driver.
Step 4: To let the Windows install the driver automatically, click on Search automatically for drivers.
Step 5: After the update process ends, restart the computer.
Fix 3: Reinstall NVIDIA Drivers
According to user reports, reinstalling NVIDIA drivers is also useful. If nvoglv32.dll causing app crashes, you can uninstall the NVIDIA driver and then reinstall it again.
Step 1: Open Device Manager and locate the NVIDIA driver.
Step 2: Right-click the NVIDIA driver and hit Uninstall device.
Step 3: In the elevated window, click Uninstall to confirm the operation.
Step 4: Once the uninstallation process ends, restart the computer. Windows will automatically install the driver after it restarts.
Fix 4: Whitelist Nvoglv32.dll from Windows Security
If nvoglv32.dll is blocked by antivirus, you can encounter nvoglv32.dll crash or application error Windows 10. Given that fact, you should whitelist nvoglv32.dll from antivirus.
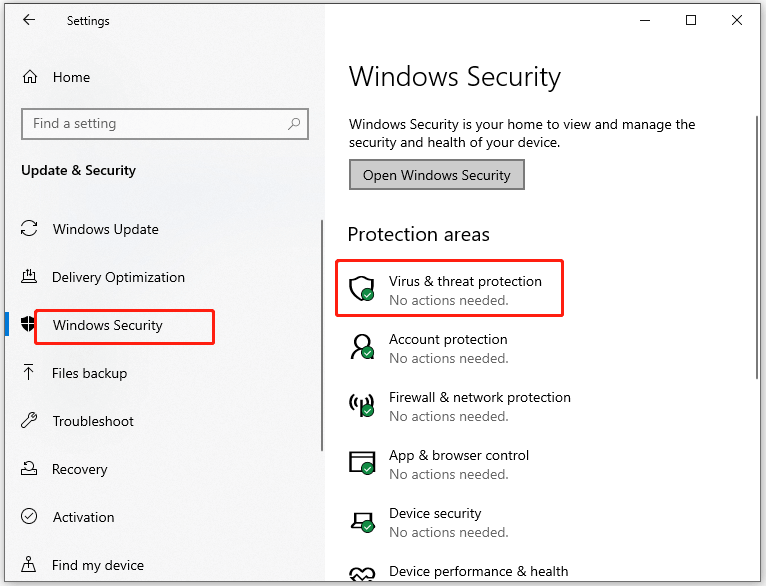
Step 1: Open the Start menu and click on Settings.
Step 2: Hit Update & Security > Windows Security > Virus & threat protection one after another.
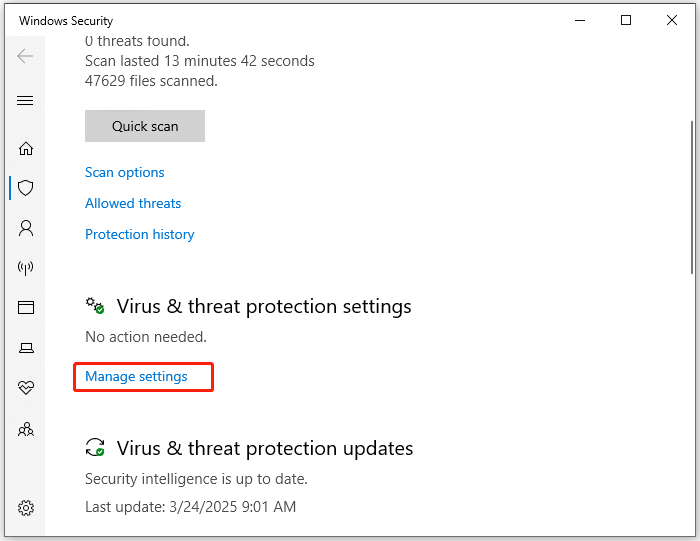
Step 3: Click Manage settings to continue.
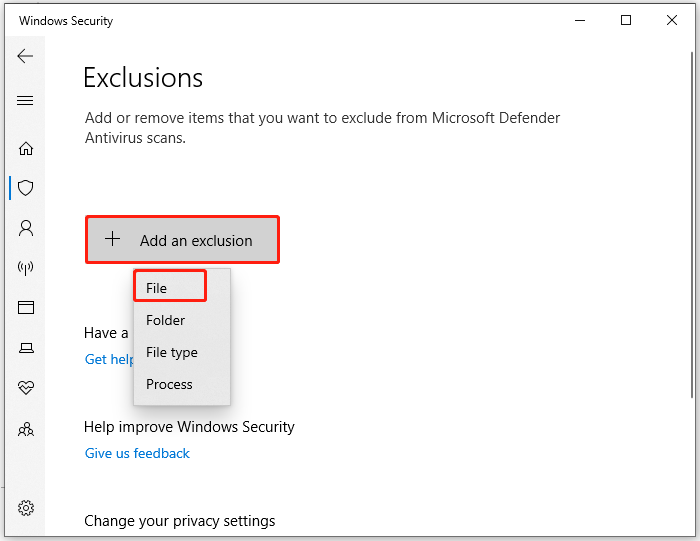
Step 4: In the next window, locate and click Add or remove exclusions.
Step 5: Click Add an exclusion and choose File from the drop-down menu. In the elevated window, locate the nvoglv32.dll file, click on it, and click the Open button.
Step 6: Restart the computer and check if nvoglv32.dll crash or application error is fixed.
Fix 5: Reinstall the Affected App
Due to an incomplete or improper installation, nvoglv32.dll causing app crashes. If so, reinstalling the affected app or program is an effective solution.
Step 1: Open Control Panel and head to Programs and Features.
Step 2: From the installed programs list, find and right-click on the affected program, and click Uninstall.
Step 3: Hit Uninstall again to confirm the operation.
Step 4: Once the uninstallation process ends, download the program from its official website and then install it by following the prompted instructions.
The End
Is nvoglv32.dll causing app crashes? This post collects 5 solutions for the issue. If you receive nvoglv32.dll crash or application error, use these methods to troubleshoot it.
About The Author

Position: Columnist
Having writing articles about computer tech for a long time, I am rather experienced especially on the aspect of computer optimization, PC enhancement, as well as tech terms explanation. The habit of looking through tech forums makes me a great computer issues collector. And then, many articles related to these issues are released, which benefit plenty of users. Professional, effective, and innovative are always the pursuit of an editing worker.
User Comments :