This post collects several methods to fix NVIDIA NodeJS Launcher high CPU usage. If you are suffering from the issue, pay attention to this post immediately. Try the methods offered by MiniTool Partition Wizard to resolve it.
NodeJS Launcher high CPU usage and application error takes place when the NodeJS Launcher process connected to NVIDIA graphics drivers consumes a lot of CPU. Once this error occurs, the computer won’t work properly, the fan makes more noise, and some programs aren’t stable.
Therefore, it is urgent to solve the problem. Well, this post offers 4 methods to solve NVIDIA NodeJS Launcher high CPU usage. If you are confused about the issue, try these fixes now!
MiniTool Partition Wizard DemoClick to Download100%Clean & Safe
Method 1: Update NVIDIA Drivers
When you experience NVIDIA NodeJS Launcher high CPU usage, the first thing you do is to update NVIDIA drivers. Here are the steps for you.
Step 1: Open the GeForce Experience app and click on the Drivers tab.
Step 2: Download the latest version of the driver if it’s available.
Step 3: After the download process ends, click Express Installation.
Step 4: Follow the on-screen instructions to finish the process.
Alternatively, you can also update the driver automatically in Device Manager.
Step 1: Press the Windows and X keys to open the Start menu.
Step 2: Click on Device Manager to continue.
Step 3: Expand Display adapters by double-clicking on this category.
Step 4: Right-click on your NVIDIA driver and click Update driver.
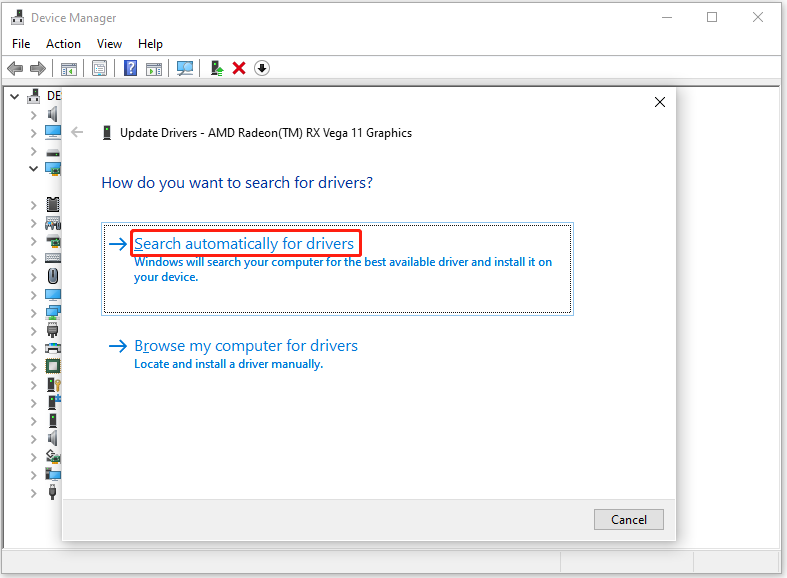
Step 5: In the next window, click Search automatically for drivers. Follow the prompted instructions to complete the process.
Method 2: Rollback NVIDIA Graphics Drivers
If the issue still persists after updating or there’s no available update, roll back the driver to a previous version with these steps.
Step 1: Open the Device Manager from the Start menu.
Step 2: Expand Display adapters, right-click on the NVIDIA driver, and choose Properties.
Step 3: In the Properties window, go to the Drivers tab and click the Roll Back Driver button.
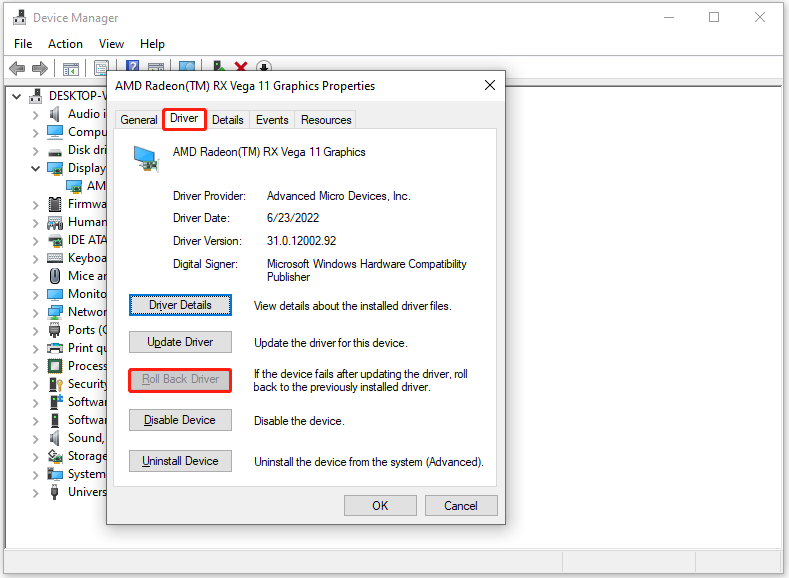
Step 4: Wait for the finish of the operation.
Method 3: Update NodeJS and NPM
You should ensure that NodeJS and NPM are updated to the latest version for performance improvements and bug fixes. When NodeJS Launcher high CPU usage and application error occurs, check if NodeJS and NPM are up-to-date. If not, update them with the instructions below.
Open your terminal and run the following commands.
- Run: npm install -g n
- Run: n latest
Method 4: Reinstall NVIDIA Graphics Drivers
If none of the above methods work, reinstall NVIDIA graphics drivers to troubleshoot NVIDIA NodeJS Launcher high CPU issue.
Step 1: Open Device Manager and expand Display adapters.
Step 2: Right-click on your NVIDIA driver and choose Uninstall device.
Step 3: In the pop-up window, click Uninstall to confirm the operation.
Step 4: Wait for the finish of the uninstallation process.
Step 5: Reboot your computer and the new NVIDIA driver will be installed. Alternatively, navigate to NVIDIA’s official website and download the driver. Then finish the installation process.
Are you bothered by the NodeJS Launcher high CPU usage and application error? If so, this post is what you need. It provides you with 4 solutions.

User Comments :