How can the “Nvidia LocalSystem Container stopped working” issue be fixed? If you are curious about this question, you come to the right place. Here, Partition Magic provides some helpful methods to get rid of the issue.
Nvidia LocalSystem Container is an important service on Windows PC with Nvidia graphics hardware. It operates in the background, managing communication between your computer’s software and hardware to assist with tasks such as updating drivers and monitoring system performance.
However, some people report that they encounter the “NVDisplay.Container.exe stopped working” issue on their PCs. Have you also encountered the same issue? Do you know how to fix the “Nvidia LocalSystem Container stopped working” issue? Continue reading to get solutions.
Fix 1. Check for Windows updates
Outdated Windows may encounter compatibility issues and then cause the “Nvidia LocalSystem Container stopped working” issue. So, you can try updating Windows to fix the issue. Here’s the way:
- Press the Win + I keys simultaneously to open the Settings window.
- Go to Update & Security > Windows Update.
- Click Check for updates and wait.
- If there are optional updates available, install them as well.
- After updating, restart your computer.
Fix 2. Update/Reinstall Nvidia Drivers
The “Nvidia LocalSystem Container stopped working” issue can caused by the outdated or corrupted driver. So, you can try updating or reinstalling the Nvidia drivers to fix the issue. There are several ways that can help you achieve that, such as downloading from the Nvidia website, using GeForce Experience, or a driver management tool. Here I will use the Device Manager as a sample:
Step 1. Press the Win + X keys simultaneously to open the Quick Link menu, and then select Device Manager from the menu.
Step 2. In the Device Manager window, expand the Display adapters section.
Step 3. To update the Nvidia driver, you should do as follows:
- Right-click on your graphics card and select Update driver.
- Select Search automatically for drivers.
- If there are updates, install them.
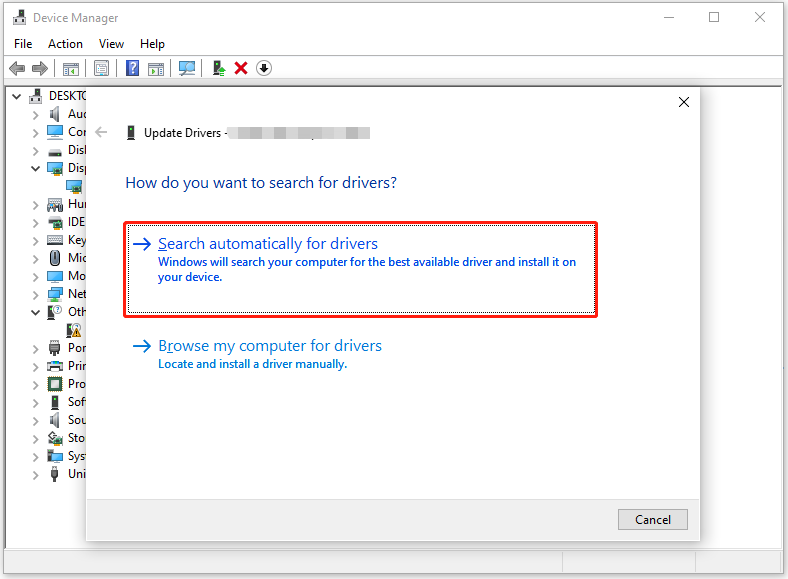
Step 5. Restart your computer after updating the driver. If not, you can try reinstalling Nvidia driver with the following steps:
- Right-click the driver and select Uninstall device.
- Check the box of Delete the driver software for this device.
- Then, click Uninstall.
- Once done, restart your PC and check if the issue has been resolved.
Fix 3. Perform a Clean Boot
Performing a clean boot can start Windows with minimal drivers and startup programs, which can help identify if background software is causing the issue. So, you can also try performing a clean boot with the following steps to fix the “Nvidia LocalSystem Container stopped working” issue:
Step 1. Press the Win + R keys simultaneously to open the Run dialog, type “msconfig” in the box, and hit Enter.
Step 2. In the System Configuration window, go to the Services tab, and tick the Hide all Microsoft services checkbox. Then, select Disable all.
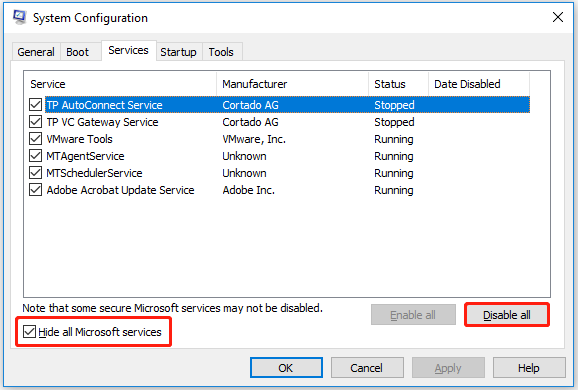
Step 3. Go to the Startup tab and click Open Task Manager.
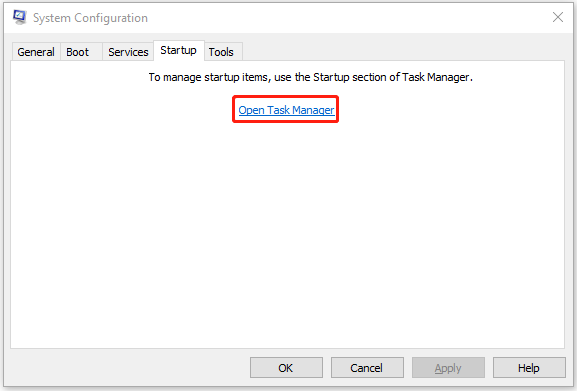
Step 4. In the Task Manager window, right-click on each of the non-Windows entries and select Disable. After that, close the Task Manager window.
Step 5. Back to the System Configuration window, go to the Boot tab, and tick the Safe boot option.
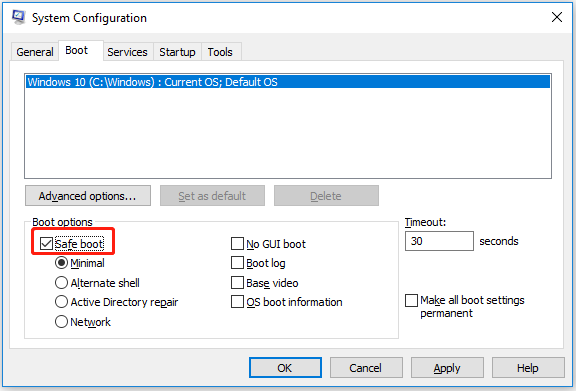
Step 6. Next, click Apply and OK to confirm the changes.
Step 7. After that, restart your computer. Test to see if the “Nvidia LocalSystem Container stopped working” issue is fixed. If it does, one of the disabled items was causing the issue.
Step 8. To identify the culprit, re-enable services and startup items one at a time or in small groups, then restart your computer after each change to check for errors.
Fix 4. Check Relevant Services
You can also check if there is anything wrong with the Nvidia relevant services. Here’s the way:
- Open the Run window, type “services.msc”, and hit Enter.
- Find all services starting with NVIDIA.
- Right-click on each and select Restart if they are running.
- If they aren’t running, double-click to open Properties.
- Under Startup type, pick Automatic from the drop-down menu, then click OK.
- After restarting all NVIDIA services, go to check if the “Nvidia LocalSystem Container stopped working” issue is fixed.
Fix 5. Scan for malware
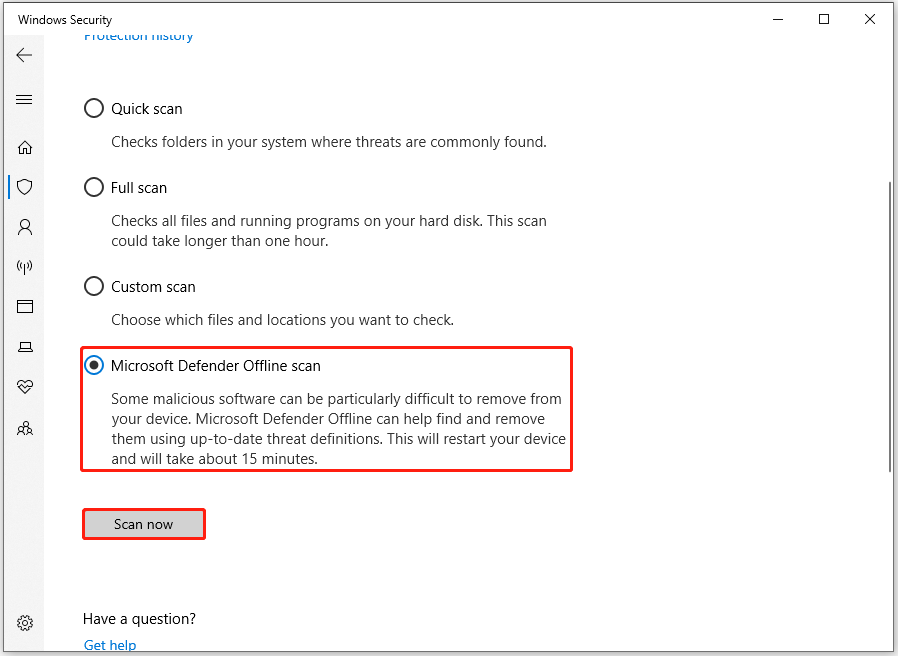
Malware or virus infection may also cause the “Nvidia LocalSystem Container stopped working” issue. In this situation, you can try performing a full virus scan on your computer to fix the issue. Here are the detailed steps for how to use Windows Defender to scan viruses:
- Type “Windows Security” in the Search bar and hit Enter.
- Select Virus & threat protection.
- Click Scan options.
- Choose Microsoft Defender Offline scan and click Scan now.
- After that, your computer will immediately restart to begin a deep scan.
Further Reading:
If you lose your data after fixing the “Nvidia LocalSystem Container stopped working” issue, you can use MiniTool Partition Wizard to recover the lost files. It provides the Data Recovery feature to help you do SSD data recovery, SD card recovery, hard drive recovery, USB flash drive recovery, and external hard drive recovery, with ease.
In addition, it can also help you convert MBR to GPT, check disk for errors, format SD card FAT32, change cluster size, format USB to FAT32, rebuild MBR, partition hard drive, and more.
MiniTool Partition Wizard DemoClick to Download100%Clean & Safe
In Conclusion
How to fix the “Nvidia LocalSystem Container stopped working” issue? After reading this post, you may already know the answers. This post provides some useful solutions to fix the “NVDisplay.Container.exe stopped working” issue. You can try these mentioned solutions one by one until the issue gets fixed.

![[Solved] How to Fix the Windows Update Error 0xc1900106?](https://images.minitool.com/partitionwizard.com/images/uploads/2024/08/0xc1900106-thumbnail.png)
User Comments :