Sometimes when you boot into BIOS for NVMe devices, you may run into the “no NVME device found” issue. Why is the NVMe drive not showing up in BIOS and how to fix it? In this post, MiniTool Partition Wizard provides several methods that may help with this issue. You can have a try.
About No NVME Device Found
Many users installing MVMe drives on their PC report that they encounter the “NVME configuration no NVME device found” issue in BIOS. This issue can occur due to various reasons. Below we explore some possible reasons for the issue.
- Improper NVME installation.
- Misconfigured BIOS settings.
- The outdated driver.
- A damaged NVMe drive.
- …
Fixes for No NVME Device Found
If you experience the “NVME configuration no NVME device found” issue like others, you can try to fix it with the following methods.
Fix 1: Connect the NVMe Drive to Another PC
If you have another PC that runs well, you can connect the NVMe drive to this PC to check if it works properly. If it does, it may indicate there is something wrong with the previous computer. Then you should contact the PC’s manufacturer for help. If the drive fails to work on a different PC, you can move to the fixes listed below.
Fix 2: Reinstall the NVMe drive
When receiving the error message saying no NVME device found in BIOS, the first thing you should do is reinstall the drive. By doing so, you are able to solve potential connection problems. You can finish installing the NVMe SSD with the help of this guide: How to Install SSD in PC? A Detailed Guide Is Here for You!
Fix 3: Modify the BIOS Settings
Misconfigured BIOS settings may lead to the “NVME Configuration no NVME device found” issue as well. In this case, you can try to fix it by changing the settings in BIOS. To do this, you need to boot into BIOS and then go to Advanced to enable M.2_2 PCIE Storage RAID Support.
If necessary, you can also try disabling the CSM support and Secure Boot and configuring SATA as IDE.
Fix 4: Install the NVME Driver
If the NVMe driver you installed in your system is faulty or outdated, you may also encounter the “no NVME device found in BIOS” issue. As for this, you can try reinstalling the correct driver to see if this issue can be solved. You can learn how to install the driver from this post: How to Download and Install Drivers for Windows 10 – 5 Ways.
What If NVME Drive Not Showing Up in File Explorer
In this section, we discuss how to handle the “no NVMe drive detected in File Explorer” issue after you insert one into your computer.
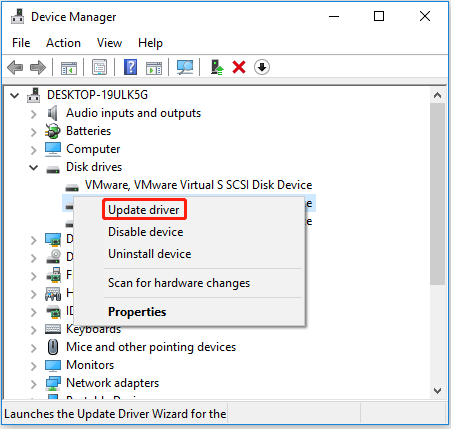
Fix 1: Update the NVMe Driver
You can try to fix the “no NVMe drive detected in File Explorer” issue by updating the NVMe driver to the latest version.
- Right-click the Start icon and select Device Manager.
- Double-click the Disk drives category to expand it.
- Right-click the NVMe driver and select Update driver.
- Select Search automatically for drivers.

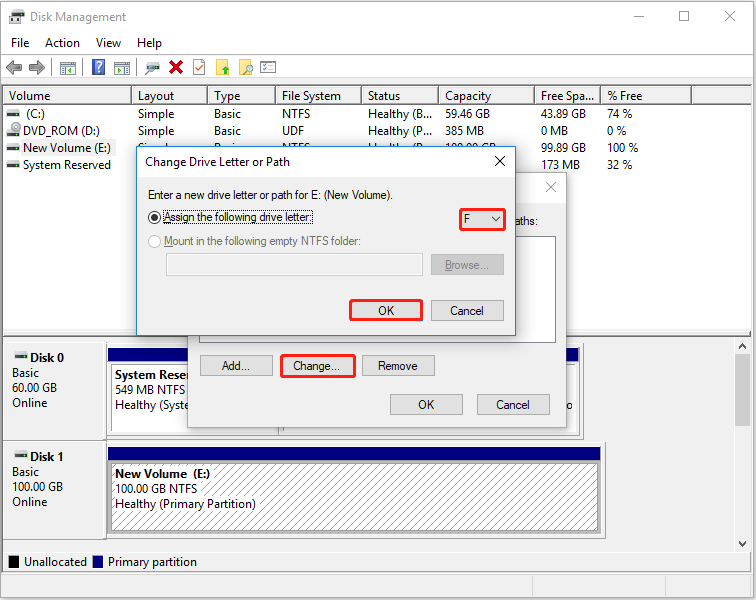
Fix 2: Assign a New Drive Letter
If the NVMe drive shares the same drive letter with another drive, the “NVMe drive not showing up in File Explorer” issue may happen. To fix it, you can try assigning a new drive letter to the NVMe drive.
- Right-click the Start icon and select Disk Management.
- Right-click the partition on NVMe drive and select Change Drive Letter and Paths.
- Click the Change button and then choose an available drive letter from the drop-down menu.
- Click OK to save the change.

Further reading:
If you get stuck in the “Disk Management not loading” issue, we recommend you turn to MiniTool Partition Wizard to change the drive letter. It’s a comprehensive partition manager that enables you to partition/resize/wipe/clone hard drive, change drive letter/cluster size, convert MBR to GPT, recover data from hard drive, and more.
MiniTool Partition Wizard FreeClick to Download100%Clean & Safe
Fix 3: Format the NVMe Drive
Reformatting the NVMe drive is another possible solution to the “no NVMe drive detected” issue in File Explorer. The following post guides you to complete the process in 3 ways:
This post collects effective ways to fix the “no NVME device found” issue. When you meet the same issue, you can follow the mentioned methods to fix it. If you have any problems with this issue, you can leave a message in our comment part below.


User Comments :