How to make MSI boot from USB? If you have this need, you come to the right place. In this post, Partition Magic shows you how to do that step by step. You can have a try.
Why Do You Need to Boot from USB?
MSI laptops are products of the famous multinational information technology company Micro-Star International Co., Ltd. The company produces many laptop series, such as GS series, GT series, GE series, GP series, GL series, GF series, etc.
In daily life, you usually boot your MSI laptop from a local disk. However, in some cases, you may need to boot from a USB drive. A bootable USB drive contains a bootable operating system, which is usually used for system management, data recovery, etc. More specifically, you may need it in the following cases:
- Want to install or upgrade to a new Windows using Windows installation media.
- Run a different operating system on USB.
- Manage system disks.
- Recover data from a laptop that won’t boot.
How to Make MSI Boot from USB?
To make MSI boot from USB, you need to create a bootable USB at first, and then boot MSI laptop from it.
Move One: Preparation for MSI Boot from USB
#1. Prepare a Suitable USB
First, you should prepare a suitable USB drive. For that, prepare enough free space on the USB and format the USB to FAT32 file system.
If you want to format a larger than 32GB USB drive to FAT32, you can try MiniTool Partition Wizard to do that, which the Windows built-in tools cannot complete.
In addition, it’s a professional partition manager that enables you partition/clone hard drive, convert MBR to GPT, recover data from hard drive, etc.
MiniTool Partition Wizard FreeClick to Download100%Clean & Safe
- Launch MiniTool Partition Wizard on your PC to get its main interface.
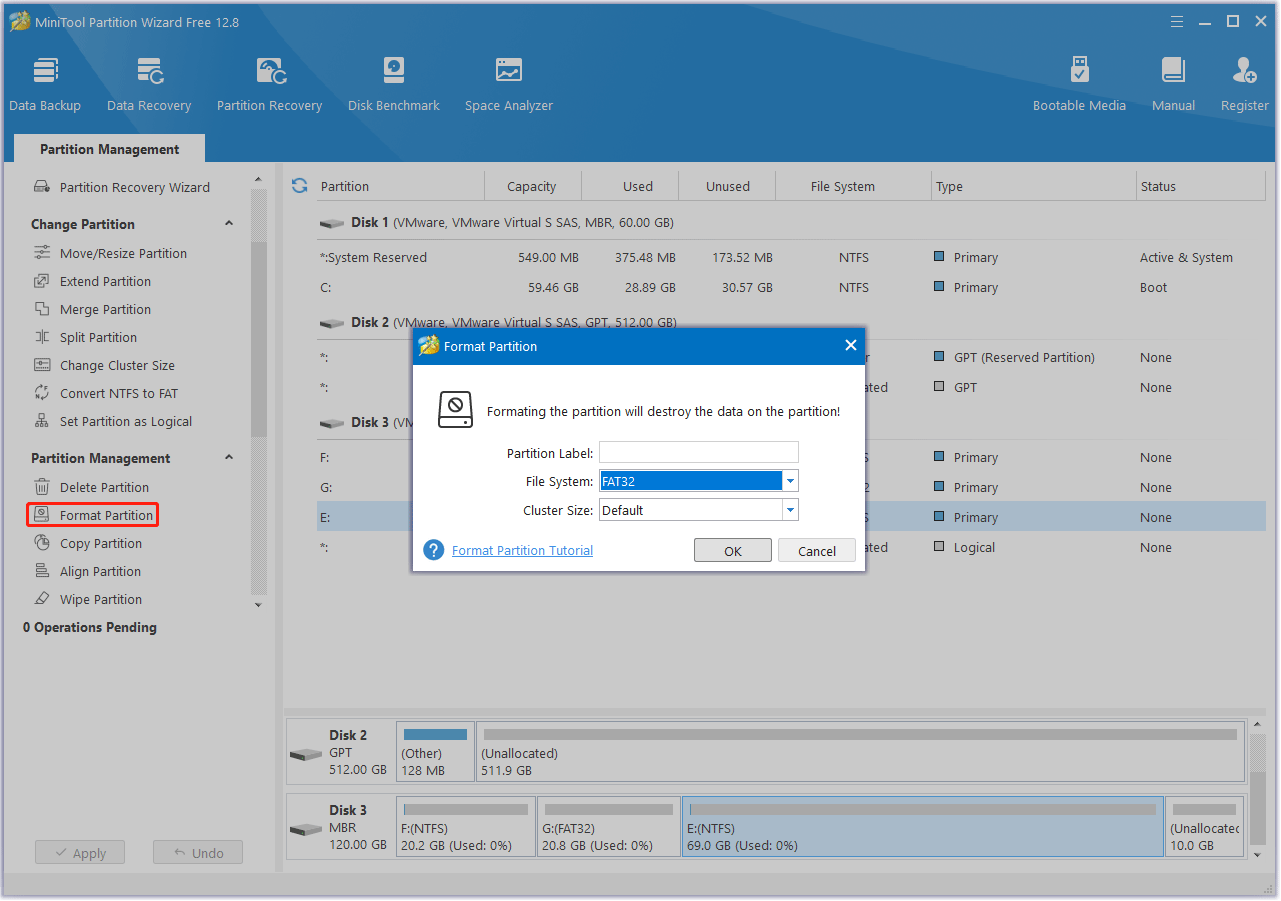
- Right-click the USB drive and then click Format in the context menu. Alternatively, click the USB drive and tap Format Partition in the left panel.
- In the pop-up window, select FAT32 from the File System drop-down menu and click OK to confirm it.
- Finally, click Apply to execute the pending operation.

#2. Make a Bootable USB
- Connect the USB to your MSI laptop and visit the official Microsoft website to download the Windows 10 Installation Media Tool.
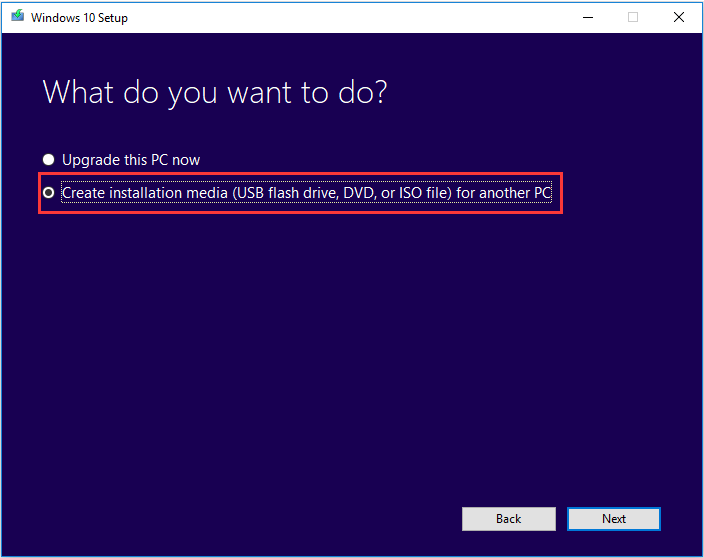
- Run the Windows 10 installation media tool and accept the applicable notices and license terms. Then select Create installation media (USB flash drive, DVD, or ISO file) for another PC and click Next to continue.
- Select the language, architecture, and version. Then select your USB flash drive and wait patiently during the process of creating the bootable USB drive.

Once the operation is completed, you will get a bootable USB drive containing Windows installation files. Then you can proceed to the next step.
Move Two: Boot MSI from USB
After making a bootable USB drive successfully, you can boot MSI from USB. Here’s the guide:
- Turn off your MSI laptop and connect the bootable USB drive.
- Turn on the laptop. When you see the MSI logo on the screen, press the F11 key to go to the boot menu.
- Find the boot options and select your USB drive to boot from it.
How to Recover Data from Unbootable MSI Laptop?
If your MSI laptop cannot boot normally, we’d like to recommend you boot it from USB with MiniTool Partition Wizard. Here are detailed steps:
MiniTool Partition Wizard DemoClick to Download100%Clean & Safe
Step 1: Make a bootable USB drive on a working computer.
Step 2: Boot your PC from the bootable USB drive.
Step 3: Recover data from the unbootable MSI laptop.
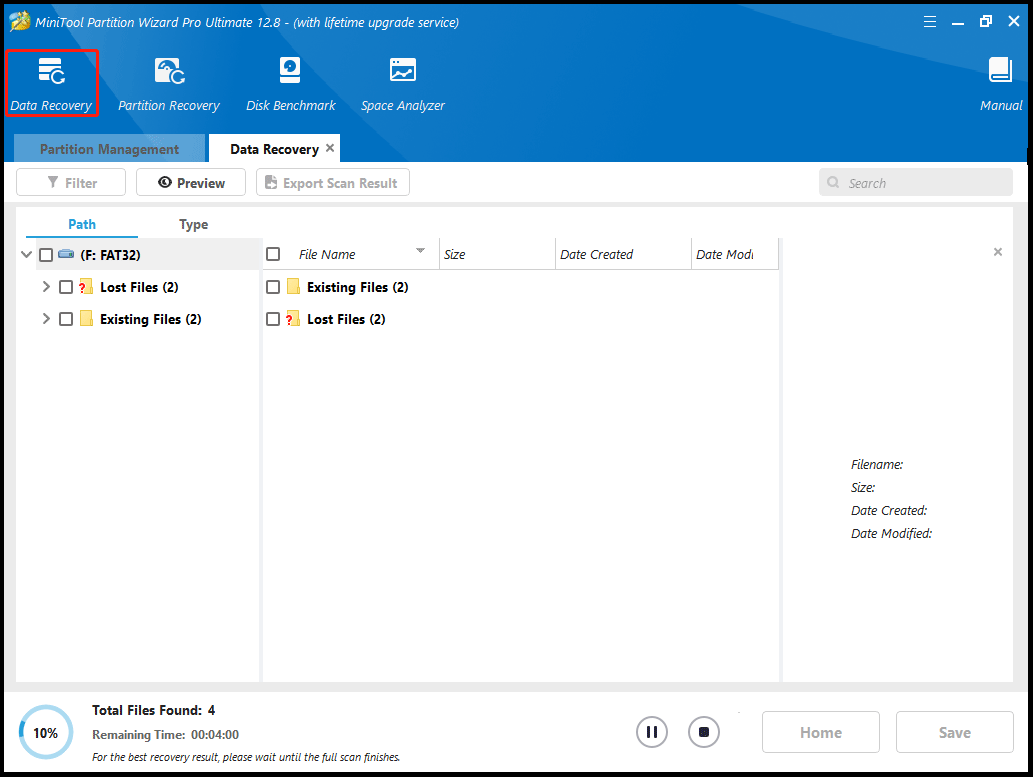
- In the main interface, click Data Recovery.
- Move the cursor to a target partition and click Scan.
- After completing the scan, check all the needed files and click on Save.
- Choose a directory to store the selected files and click OK.

What If Cannot Boot MSI from the Bootable USB?
What to do if you can’t get your MSI laptop to boot from USB? This problem can be caused by a variety of reasons, such as incorrect boot order, incompatible or damaged USB drive, and more.
For more solutions to boot problems, check out this post: What If Your PC Can’t Boot from USB? Follow These Methods!
Bottom Line
Hope you can make MSI boot from USB successfully by following this guide. And MiniTool Partition Wizard is a great choice for you to manage your disks/partitions.


User Comments :