A lot of users reported that they ran into the “MSCONFIG won’t save changes” problem when using MSCONFIG to do some operations. If you are also trying to fix this error, this post from MiniTool Partition Wizard is what you need.
MSCONFIG Won’t Save Changes
MSCONFIG (System Configuration) is a very handy system utility included in all versions of the Windows operating system and designed to change the Microsoft Windows startup process.
MSCONFIG is the best option for Windows users who want to have Windows boot into Safe Mode or have Windows start with one or more specific services or startup items within Windows disabled. Just press the Win + R key to open the Run dialog, type msconfig in the Run dialog and press Enter to start MSCONFIG.
However, unfortunately, quite a few Windows 10 users have reported MSCONFIG won’t save changes issues like “System Configuration cannot save the original boot configuration for later restoration, Boot Changes will be reverted, The handle is invalid” error. This issue prevents users from making changes to the system configuration.
The exact cause of this problem is unknown. Thankfully, however, here are some of the most effective solutions you can use to try to get rid of this problem and get MSCONFIG to start saving your changes to it again.
Solutions to MSCONFIG Won’t Save Changes
Here we summarize several solutions for this issue. You can try them one by one until the error gets fixed.
Solution 1. Run MSCONFIG in Safe Mode
Some users reported that running MSCONFIG in Safe Mode could solve the problem. So, you can try to run MSCONFIG in Safe Mode. The steps are as follows:
Step 1: Press Win + X and then click Shut down or sign out. Then press Shift and click Restart to enter Windows Recovery Environment (WinRE).
Step 2: When you are in WinRE, navigate to Troubleshoot > Advanced options > Startup Settings > Restart.
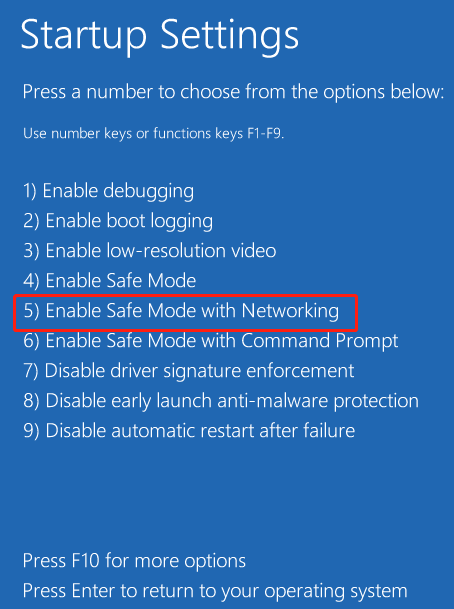
Step 3: After the computer restarts, there is a list of options. Press the F5 key to choose the Enable Safe Mode with Networking option.

Step 4: Once the computer boots up, press the Win + R key to open the Run dialog box. Then type msconfig in it and press Enter.
Step 5: In the System Configuration window, make all of your desired changes to MSCONFIG and click Apply > OK. Then click Restart.
Once your computer boots up, you can check if the Windows cannot find MSCONFIG problem is resolved and if the changes made to MSCONFIG persist.
Solution 2. Create a New Administrator Account
You can try to create a new administrator account to solve the MSCONFIG not saving changes problem. To create a new administrator account, you can follow the steps below.
Step 1: Press Win + I to open Windows Settings app.
Step 2: Go to Accounts category > Family & other users > Add someone else to this PC.
Step 3: Click I don’t have this person’s sign-in information in the pop-up window.
Step 4: Click Add a user without a Microsoft account.
Step 5: Enter a username for the new account and assign a password as your needs. Click Next to continue.
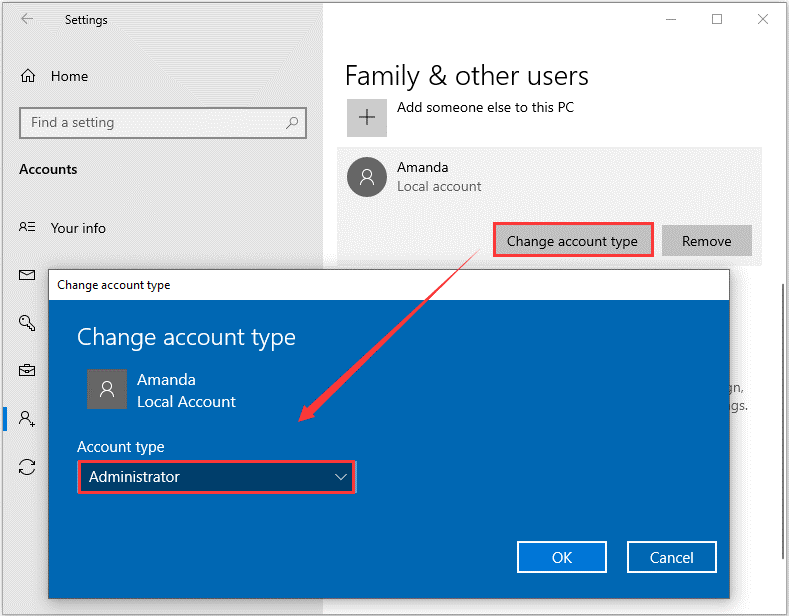
Step 6: Now, you need to set the account to administrator type, because any new account is created as a standard one by default. To do that, click Change account type and choose Administrator from the list of Account type. Click OK to save the changes.

Solution 3. Uninstall the Third-party Security Program
If a third-party security program (such as antivirus, firewall, or antimalware application) is installed on the affected computer, it may be the cause of this issue. Since this is the case, you should uninstall all third-party security programs from the affected computer, restart it and check if doing so gets the job done.
Solution 4. Check the Hard Drive for Errors
This “MSCONFIG won’t save changes” error can be caused by any error on the hard drive. Although CHKDSK can be used to check the hard drive, this tool often runs into various issues like CHKDSK being write-protected, CHKDSK getting stuck, etc. So, it’s highly recommended you use a powerful disk manager – MiniTool Partition Wizard. It can help you check bad sectors easily and quickly.
While using the Surface Test of this software, try making changes in MSCONFIG and try saving them to see if that fixes the problem.
MiniTool Partition Wizard FreeClick to Download100%Clean & Safe
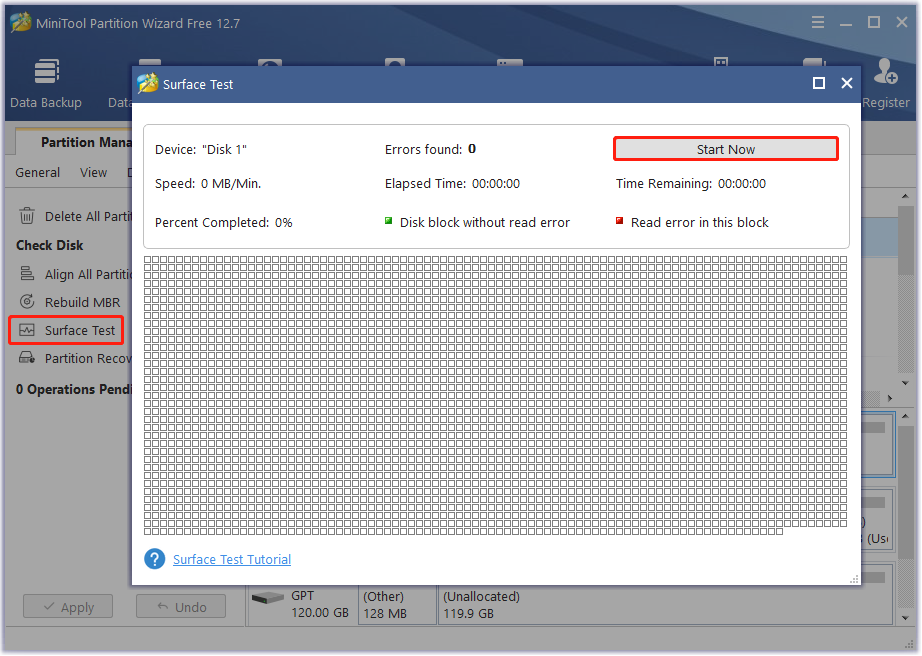
Step 1: Download and install this software on your PC. Then launch it to get its main interface, and then select the target drive and click on Surface Test from the left pane.
Step 2:Click on the Start Now button in the pop-up window. After that, this tool will scan the whole drive immediately and show you the test result.

Step 3: When the hard drive error test process is completed, the bad sectors on the hard drive will be marked with red color. In this case, you can either use this bad sector repair guide or consider replacing it with a new one.

![The IO Operation Failed Due to a Hardware Error? [Solved]](https://images.minitool.com/partitionwizard.com/images/uploads/2023/07/io-operation-at-logical-block-address-failed-hardware-error-thumbnail.png)

![[Solved] WD SES Device USB Device Driver Not Found Windows 10](https://images.minitool.com/partitionwizard.com/images/uploads/2023/07/wd-ses-usb-device-driver-not-found-thumbnail.png)
![[Solved] Secure Boot Is Enabled But Not Active in Windows 11](https://images.minitool.com/partitionwizard.com/images/uploads/2023/07/secure-boot-enabled-but-not-active-thumbnail.png)
User Comments :