Marvel Rivals is a newly released PvP hero shooter game. Some people say they have encountered the Marvel Rivals server connection failed issue when launching the game. This post from Partition Magic offers the solutions.
Marvel Rivals is a 6v6 player-versus-player, third-person hero shooter title. This game is free to play. Heroes, maps, and so on would be free, but you can purchase cosmetic items like skins.
The game was released for PlayStation 5, Windows, and Xbox Series X/S on December 6, 2024. On Steam, it received mostly positive reviews. However, you may encounter the Marvel Rivals server connection failed issue these days. Then, the following solutions may help you.
Way 1. Run the Game as Admin
Running a program as an admin can solve many issues. You can try it first if you failed to connect to the server on Marvel Rivals,. You need to open up Steam or Epic as administrator, then open the Marvel Rivals file location, and start marvelrivals_launcher as administrator, too.
Way 2. Clear Local Configuration Files
When you encounter the Marvel Rivals server connection failed issue, you can try clearing local configuration files to solve it. This method is very simple. You just need to launch the game on Steam/Epic, and then click on “Clear Local Configuration Files” when the Marvel Rivals Launcher pops up.
MiniTool Partition Wizard DemoClick to Download100%Clean & Safe
Way 3. Enable Inbound Rule for Marvel Rivals
Windows has inbound and outbound rules. The outbound rule allows you to access the external network and the inbound rule allows the external network to access you.
In most cases, an online app will enable the inbound rule by default. If the inbound rule is not enabled for this app, the server connection failed issue may occur.
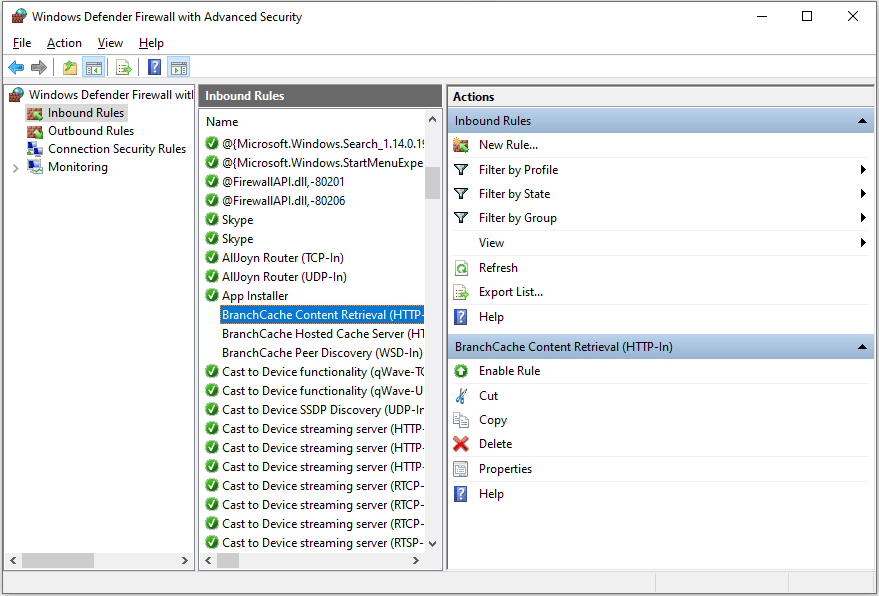
How to enable the inbound rule for Marvel Rivals? Here is the guide:
- In the search tab, type Control Panel and open the best-matched app.
- Select System and Security > Windows Defender Firewall and then click Advanced Settings in the left section.
- On the pop-up window, select Inbound Rules on the left pane.
- On the middle pane, scroll down and select Marvel Rivals.
- On the pane that opens on the right, select Enable Rule. You need to repeat this operation for any additional instances of Marvel Rivals that appear under Inbound Rules.

Way 4. Troubleshoot the Network Issues
In most cases, if you failed to connect to the server, the reason is your network settings. Then, you can try the following methods to solve it.
#1. Change to WiFi, log in, and then switch back to Ethernet.
#2. Set DNS to Cloudflares 1.1.1.1
- Right-click the network icon in the bottom right corner of the PC and then click Open Network & Internet settings.
- On the pop-up window, under Advanced network settings, click Change adapter options.
- In the Network Connections window, right-click your Ethernet and click Properties.
- Select Internet Protocol Version 4 (TCP/IPv4) and click Properties.
- Select Use the following DNS server addresses option and then change the DNS servers to 1.1.1.1 and 1.0.0.1.
- Then, click OK to save changes.
#3. Turn on IPv6
- Open Network Connections window and then the Properties of your Ethernet.
- Check the box next to Internet Protocol Version 6 (TCP/IPv6).
- Click OK to save changes.
Way 5. Use Phone Hotspot or VPN
If the above methods don’t work, you can try using your phone hotspot or a VPN to run the game. If this way also fails to solve the issue, you can contact Marvel Rivals support. Sometimes, the issue is related to your account. They will help you.
Besides, if the issue is related to their game files, they may release a hotfix in the next update.
Bottom Line
Failed to connect to the server in Marvel Rivals? This post offers you 5 solutions. You can have a try.

User Comments :