How to fix the “mapped drive is disconnected after reboot” issue? If you are searching for an answer to this issue, you come to the right place. This post of MiniTool Partition Wizard provides several effective ways to troubleshoot the issue.
The “mapped drive is disconnected after reboot” issue is common to occur on the Windows operating system. Many people encounter this issue repeatedly on their computers. After investigating extensive user reports and posts, I find that the issue can mainly be caused by these reasons:
- Power issues. In this case, you can try to replace the faulty power supply unit to fix the issue.
- A bad hard drive. In this situation, you can try to back up data on the original hard drive, and then replace it with a new hard drive.
- Networking issues. If you suspect the issue on your PC is caused by a networking issue, you can check your network connection and replace the bad devices.
- Faulty network adapter. In this case, you need to ensure the update the drivers for that network device are fully updated.
- Wrongly setting on Windows OS. In this situation, you need to do with the following advanced ways
MiniTool Partition Wizard DemoClick to Download100%Clean & Safe
Have you also encountered the same issue? Do you know how to fix the “mapped drive is disconnected after reboot” issue? Don’t worry! This post provides 6 practical ways to help you get rid of it. You can try them one by one until the issue gets fixed.
Way 1. Disable Offline Files for Your System
If there is a syncing glitch, offline copies of the network shares may cause the “mapped drive is disconnected after reboot” issue. In this case, disabling offline files for your system may fix the error. Here’s the guide:
Step 1. Press the Win + S keys to open the Search window, type “control panel” and then select Control Panel under Best Match.
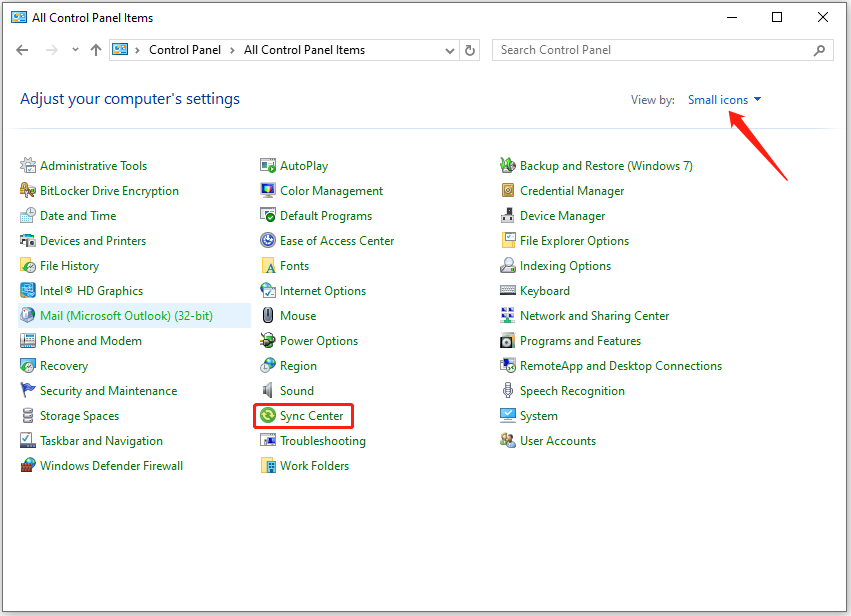
Step 2. Set View by as Small icons and then select Sync Center.

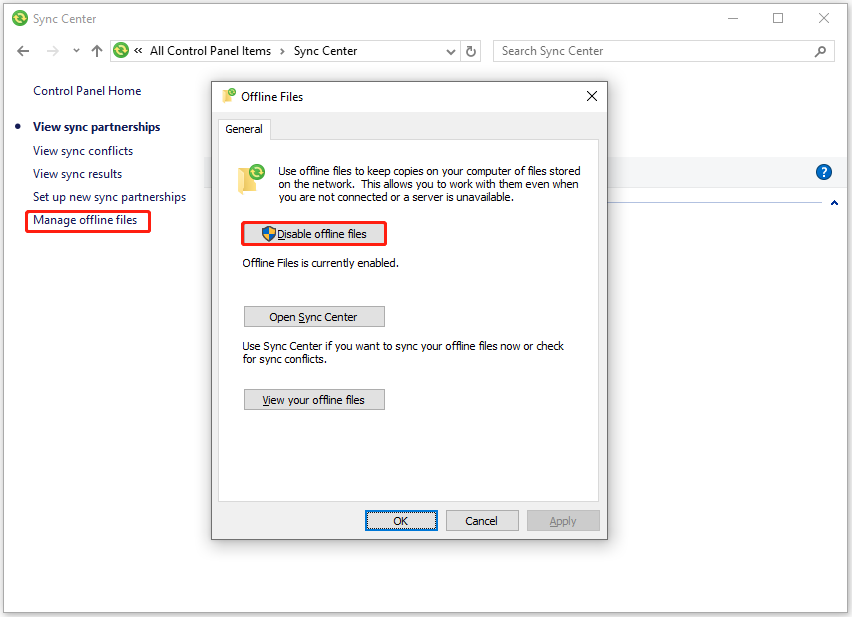
Step 3. Click the Manage offline files link from the left pane. Then, in the Offline Files window, click the Disable offline files button.

Step 4. Next, click Apply and OK to execute the changes.
Step 5. Restart your PC and check if the mapped drives are working fine.
Step 6. Once you have successfully opened the drive, then right-click on the mapped drive in the File Explorer and choose Always Available Offline.
Step 7. After that, right-click on the network share and uncheck the Always Available Offline option. Next, reboot your PC to check if the mapped drive issue is resolved.
Way 2. Remove and Re-add the Network Credentials to Windows Credential Manager
If the network credentials on Windows Credential Manager are corrupted, you can also encounter the network drive disconnected issue. In this situation, you can try removing and re-adding the network credentials to Windows Credential Manager to fix the issue. Here are the detailed steps:
Step 1. Open the File Explorer window, and right-click the mapped drive under This PC from the left pane.
Step 2. Select Disconnect and press the Win + S keys to open the Search window.
Step 3. Type “credential manager”, and then select Credential Manager from the search result.
Step 4. Now click on Windows Credentials and then remove the credential linked to your mapped network drive.
Step 5. After that, restart your computer, open the Credential Manager again, and then go to the Windows Credentials tab.
Step 6. Click on Add a Windows Credentials and enter your network credentials.
Step 7. Now map the network share and reboot your system to check if it is working fine. (Check-mark the option of Reconnect at Sign-in option and use a different drive letter than the previous.)
Way 3. Disable Fast Startup of Your System
Some people report that disabling the fast startup of the system helps them fix the “mapped drive is disconnected after reboot” issue. You can also have a try. Here’s the guide:
- Open the Search window, type “choose a power plan” and press Enter.
- Click the Choose what the power buttons do link from the left pane.
- Next, click Change settings that are currently unavailable.
- Uncheck the box of Turn on fast startup (recommended).
- Click Save changes.
- After that, restart your PC and check if the error is fixed.
Way 4. Change the Network Card Options
If your network card is not configured properly, your mapped drive may also disconnect after reboot. In this case, you can try changing the network card options with the following steps to fix the error:
Step 1. Press the Win + X keys to open the Quick Link menu, and then select Device Manager from the menu.
Step 2. Expand the Network adapters category, and double-click your network card to open the Properties window.
Step 3. Go to the Power Management tab and uncheck the box of Allow the computer to turn off this device to save power. Then, click OK and check if the mapped drive is working fine.
Step 4. If not, open the elevated Command Prompt window and execute the following command (you may have to repeat the same on the host as well):
net config server /autodisconnect:-1
Step 5. Once done, restart your PC and check if the mapped drive issue is fixed.
If the issue still exists, you can do as follows:
- Repeat the first two steps to open the network card’s Properties window.
- Navigate to the Advanced tab.
- Select Wait for Link from the Property box, and change the Value to On.
- Click OK to save the changes.
- Restart PC to check if the issue is fixed.
- If not, right-click the network icon in the System Tray and select Open Network & Internet settings.
- Click Network and Sharing Center.
- Then click your network and write down your network speed.
- Next, back to the network card’s Properties window.
- Select Speed & Duplex from the Property box and choose a speed that matches the speed of your network in the Value’s drop-down menu.
- After that, click OK and restart your PC to check if the issue has been resolved.
Way 5. Use the Group Policy Editor
You can also edit the Group Policy Editor to fix the “mapped drive is disconnected after reboot” issue. Here’s the way:
Step 1. Open the Search window, type “group policy” and select Edit group policy.
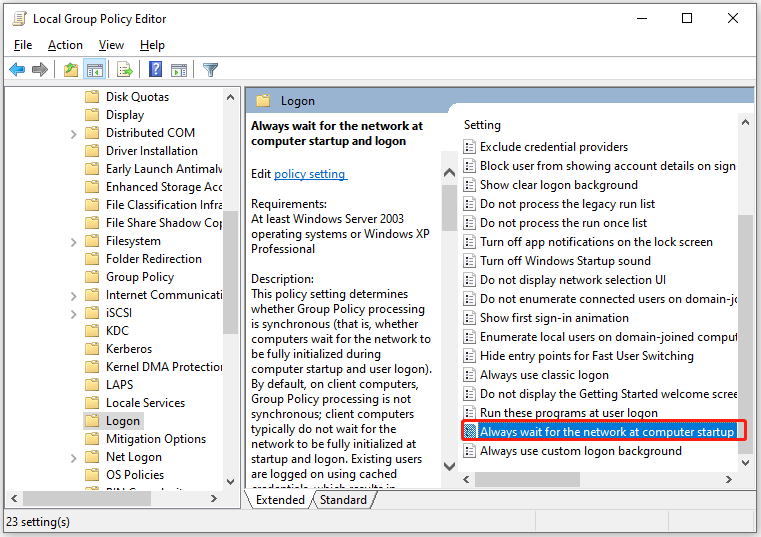
Step 2. Navigate to this path: Computer Configuration > Administrative Templates > System > Logon and double-click on Always Wait for the Network at Computer Startup and Logon.

Step 3. Then, select Enabled. Then, click Apply and OK to save the changes.
As changing this setting may cause you quite lengthy login times, you can do the following steps to avoid this:
Step 1. Launch the Registry Editor as Administrator and navigate to the following path:
Computer\HKEY_LOCAL_MACHINE\SOFTWARE\Microsoft\Windows NT\CurrentVersion\Winlogon
Step 2. Right-click the right panel and select New > DWORD (32-bit) value.
Step 3. Name it GpNetworkStartTimeoutPolicyValue, and then double-click it and change its Value to 0x3C(60).
On a Synology device, you need to go to Control Panel > File Services> Advanced and then make sure to toggle on the “Enable Windows Network Discovery to Allow Access Via Web Browser” and “WS Discovery”.
Way 6. Use the Registry Editor
Using the Registry Editor can also help you fix the “mapped drive is disconnected after reboot” issue. Here’s how to do it:
Step 1. Open the Registry Editor window and navigate to this location: Computer\HKEY_LOCAL_MACHINE\SYSTEM\CurrentControlSet\Services\Dnscache. Then, change the Value of Start to 2 to enable DNS cache.
Step 2. Go to this location: Computer\HKEY_LOCAL_MACHINE\SYSTEM\CurrentControlSet\Services\LanmanServer\Parameters. Then, create a DWORD (32-bit) Value named Autodisconnect and set its Value to ffffffff to create autodisconnect.
Step 3. Navigate to “Computer\HKEY_LOCAL_MACHINE\SOFTWARE\Microsoft\Windows\CurrentVersion\Policies\System” and create a DWORD (32-bit) Value named EnabledLinkedConnections, set its value to 1 to add the EnableLinked Connections.
Step 4. Go to “Computer\HKEY_LOCAL_MACHINE\SYSTEM\CurrentControlSet\Services\LanmanServer\Parameters” to create a DWORD (32-bit) Value, named AllowInsecureGuestAuth, set its value to 1 to allow Insecure Login.
Step 5. Delete and recreate the mapped drive entry. Here’s the way:
- Navigate to “Computer\HKEY_CURRENT_USER\Network”.
- Then delete the folder with the name of your mapped drive (e.g., the drive letter X, Y, Z, etc.).
- Next, go to “Computer\HKEY_CURRENT_USER\SOFTWARE\Microsoft\Windows\CurrentVersion\Explorer\Map Network Drive MRU”.
- Delete the entry of an alphabet (like a, b, etc.).
- Then, restart your PC and map the network drive.
- After that, launch Registry Editor and go to “Computer\HKEY_CURRENT_USER\Network”.
- Open the folder with the mapped drive letter.
- Now, create a DWORD (32-bit) value, named as ProviderFlags, and then set its value to 1.
- Once done, check if the network drive disconnected again.
If the issue is still there, execute the following commands in the elevated Command Prompt window:
- net use Z /delete (where Z is your drive letter)
- net use /p:yes
- net use *: \\servernameorIP\sharename
In Conclusion
This post provides 6 effective ways to fix the “mapped drive is disconnected after reboot” issue. You can choose the way you like to fix the issue.

User Comments :