You’d better regularly back up your Windows by cloning the system disk via a piece of SSD cloning software like MiniTool Partition Wizard. Then you can directly run from the clone disk if something goes wrong on your computer. It is a good way to safeguard your Windows and important data.
MiniTool Partition Wizard DemoClick to Download100%Clean & Safe
Before you try the methods illustrated in the post, try the following methods to fix “keyboard or mouse works in BIOS but not in Windows” issue.
- Disconnect and then reconnect the keyboard or mouse
- Drain residual charge
- Test the mouse on another computer
- Replace the USB mouse with the PS/2 port mouse
Method 1: Turn on USB Legacy Support
The USB Legacy Support feature allows you to use USB mouse during the system startup. Hence, you can enable USB Legacy Support if keyboard or mouse works in BIOS but not in Windows. Here’s how to do that.
Step 1: Enter the BIOS setup screen of your computer. Since your mouse or keyboard can’t work in Windows, you need to know how to enter BIOS without keyboard and mouse. Here is one available method.
After turning off the computer, open its case and see if it has a Reset CMOS button which is usually an I/O black switch labeled as CLR, CLEAR, Clear CMOS near the battery. Depending on the design of the button, toggle the switch on or off, or press and hold it for a few seconds. Then turn on your computer to open the BIOS.
Step 2: Find a section called USB Configuration, Peripherals, Legacy USB, or something along the same lines.
Step 3: Enable the USB Legacy Support and hit F10 to confirm the operation.
Step 4: Press Esc or the Exit option to leave BIOS.
Method 2: Enable USB Options in the BIOS Menu
According to user reports, enabling USB options is one of the most effective ways to solve keyboard and mouse work in BIOS, not Windows. You can have a try too by following the steps below.
Step 1: Enter the BIOS without keyboard and mouse with the instructions above.
Step 2: Locate the USB options.
Step 3: Enable the USB keyboard and mouse simulator or any other options that sounds similar.
Step 4: Restart the computer and check if the mouse only works in BIOS but stops working on Windows 10 still.
Method 3: Disable the Intel Integrated Sensor Solution Driver
The Intel Integrated Sensor Solution driver manages the rotation control function of the Gyroscope, Accelerometer, and eCompass sensor in supported devices. However, it sometimes causes keyboard and mouse work in BIOS, not Windows. Then should disable the driver to get rid of the issue.
Step 1: Right-click on the Windows icon and then click Device Manager on the elevated menu.
Step 2: In the Device Manager window, find and expand the System Devices category.
Step 3: Find and right-click on the Intel Integrated Sensor Solutions driver, and then click Disable driver.
Step 4: Then restart your computer and check if keyboard/mouse only works in BIOS, not Windows.
Method 4: Roll Back or Reinstall the Keyboard or Mouse Driver
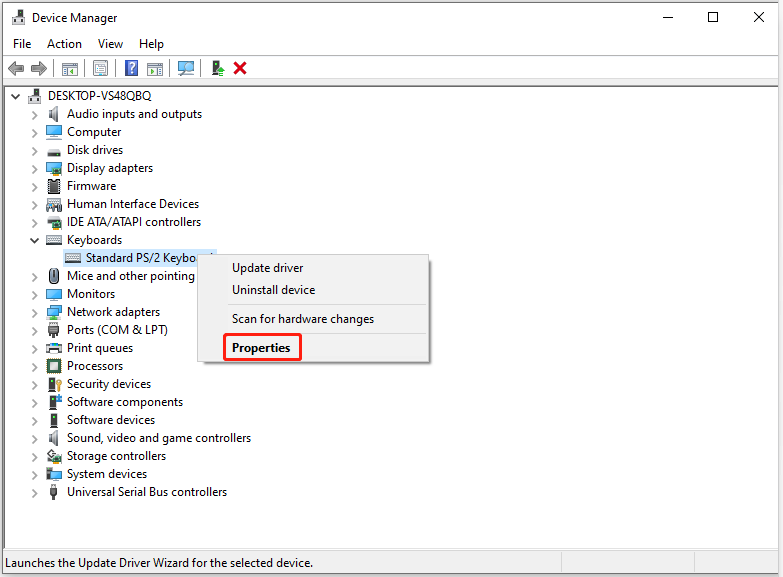
Step 1: Open the Device Manager.
Step 2: Expand the Keyboard or Mice and other pointing devices category.
Step 3: Right-click on your keyboard or mouse driver and click Properties.

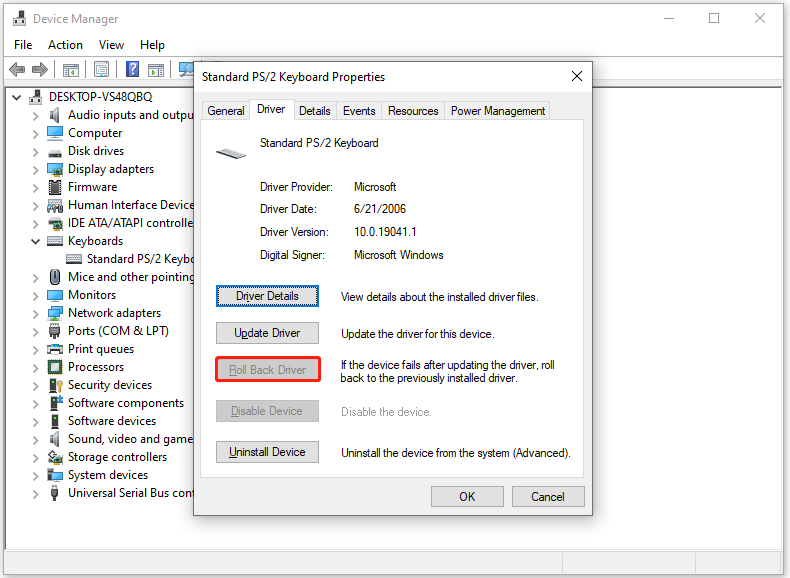
Step 4: In the next window, choose Roll Back Driver. Then follow the on-screen instructions to complete the operation.

Step 5: Check if the “keyboard or mouse works in BIOS but not in Windows” is solved.
Method 5: Perform Startup Repair
If the above methods don’t work, try performing a startup repair. It might fix the “keyboard/mouse only works in BIOS, not Windows” issue.
Step 1: Boot your computer into the Windows Recovery Environment.
Step 2: Tap Troubleshoot > Advanced Options.
Step 3: On the Advanced options menu, click Startup Repair.
Step 4: Follow the prompted instructions to finish the operation.


User Comments :