Microsoft has released Windows 11 update KB5035854 on March 12, 2024. However, during the update process, many users reported that they received a prompt that KB5035854 fails to install. Do you know how to solve this problem? This article from Partition Magic provides a full guide to help you fix this issue with ease.
Windows 11 KB5035854 Fails to Install
Windows 11 was updated with KB5035854 on March 12, 2024. This update is marked as OS Build 22000.2836, which solves security issues in the Windows operating system. After installing KB5035854, some problems can be solved:
- An issue that caused the troubleshooting process to fail was solved.
- An issue that affected Remote Desktop Web Authentication was solved.
These fixes and improvements are essential to maintaining the optimal functionality and security of Windows 11 systems.
However, some users were unable to install KB5035854 in Windows 11 during the installation process. How to solve this problem? Please continue reading below to get the answer.
Fix 1: Install KB5035854 Manually
If you are unable to install KB5035854 from Windows Settings, you can manually install the update from the Windows Update Catalog. Here are the steps.
Step 1: Go to the Microsoft Update Catalog website on your browser.
Step 2: In the search box, type in KB5035854 and press Search. Then, find the version that matches your system type and hit Download.

Step 3: Follow the on-screen guidelines to finish the installation process and restart your computer.
Fix 2: Run Windows Update Troubleshooter
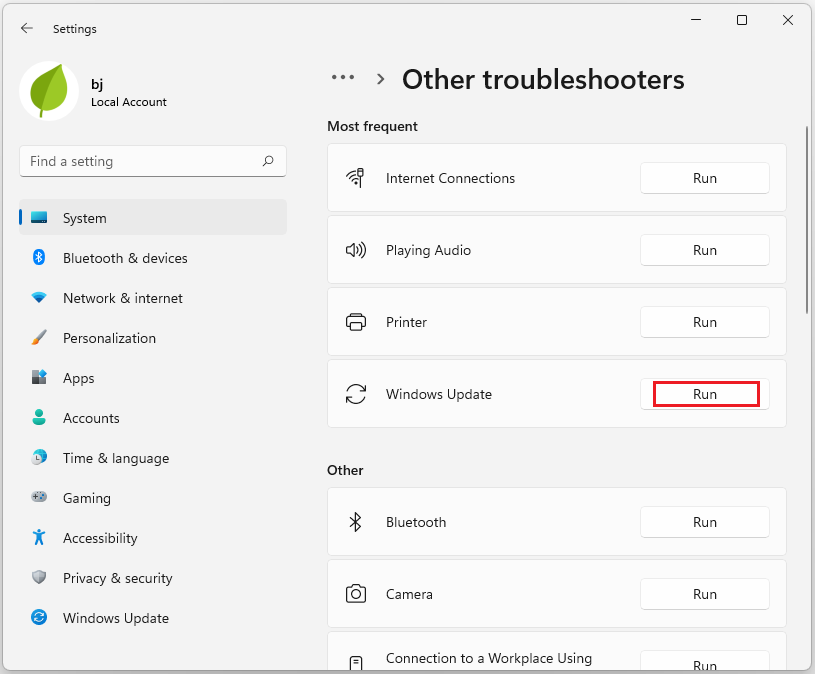
When you can’t install KB5035854 in Windows 11, you can run the Windows Update Troubleshooter, which is a built-in utility. This tool can fix issues related to updates. Please refer to the detailed steps below:
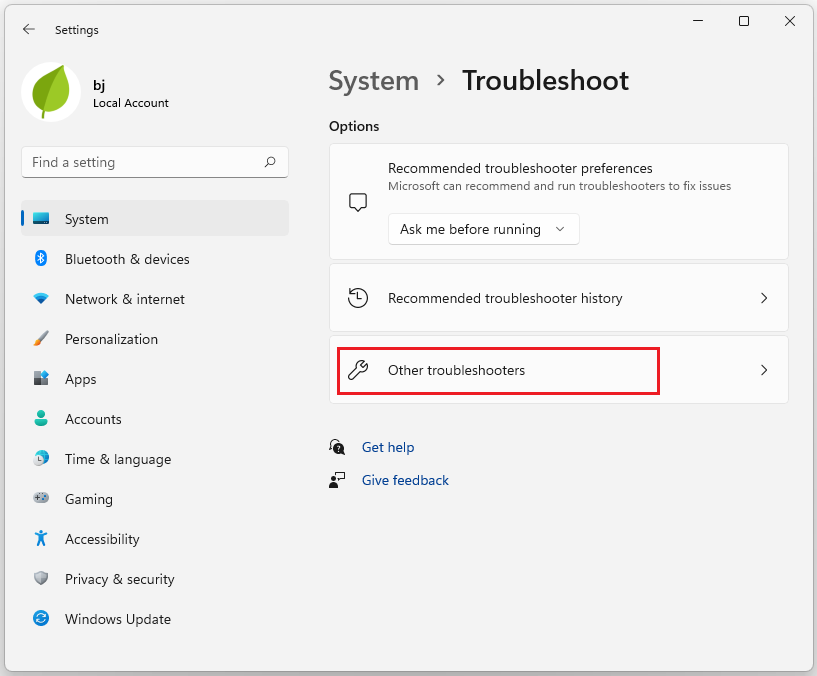
Step 1: Press the Windows logo key + S to open the Search window and type Troubleshoot settings to open.
Step 2: In the new pop-up window, click Other troubleshooters from the right side.

Step 3: Find Windows Update and click Run next to the section.

Step 4: Restart your computer when the update process finishes.
Fix 3: Reset Windows Update Components
Some people have reported that resetting Windows Update Components helped them successfully fix the “KB5035854 installation failed” issue. You can also try it to see if it can solve your problem. Here are the detailed steps:
Step 1: Input the Command Prompt in the Search box and run it as an administrator.
Step 2: In the pop-up window, run the following commands to restart all the services.
- net stop bits
- net stop wuauserv
- net stop appidsvc
- net stop cryptsvc
- Del “%ALLUSERSPROFILE%\Application Data\Microsoft\Network\Downloader\*.*”
- rmdir %systemroot%\SoftwareDistribution /S /Q
- rmdir %systemroot%\system32\catroot2 /S /Q
- regsvr32.exe /s atl.dll
- regsvr32.exe /s urlmon.dll
- regsvr32.exe /s mshtml.dll
- netsh winsock reset
- netsh winsock reset proxy
- net start bits
- net start wuauserv
- net start appidsvc
- net start cryptsvc
Once done, check if the Windows 11 Update KB5035854 stuck issue has been resolved.
Fix 4: Run Disk Cleanup
You can fix the “KB5035854 fails to install” issue by Disk Cleanup. Disk Cleanup can easily remove unnecessary files on your computer and make more free space.
Step 1: Type Disk Cleanup in the Windows search box and press Enter.
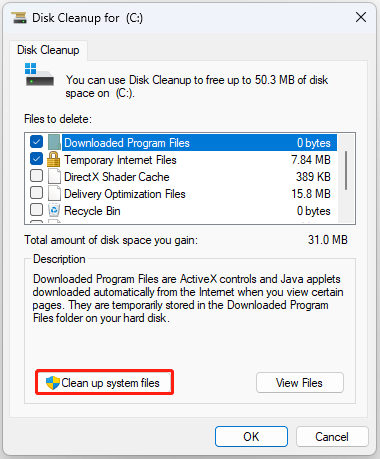
Step 2: Select the drive on which Windows has been installed and click OK to continue. If your Windows is installed on drive C, pick it from the list (it should be by default) and press OK.
Step 3: You can choose the largest portions of the data used. It usually included Temporary Internet Files, Temporary Files, Delivery Optimization Files, Recycle Bin, etc. Click the Clean up system files option and click OK to start cleaning.

Fix 5: Repair Corrupted System Files
Corrupted system files can cause many problems, such as the inability to install KB5035854 mentioned in this article. To get out of trouble, try running SFC and DISM to repair the corrupted system files.
Step 1: Enter CMD in the search box and click Run as administrator from the right side.
Step 2: In the command prompt window, enter sfc /scannow and press Enter.
Step 3: Run a DISM scan. Don’t forget to press Enter after each command.
- Dism /Online /Cleanup-Image /CheckHealth
- Dism /Online/Cleanup-Image /ScanHealth
- Dism /Online /Cleanup-Image /RestoreHealth
Wait patiently until the process ends. Restart your computer and then check if you can install KB5035854 successfully.
Bottom Line
When you encounter KB5035854 fails to install in Windows 11, try the above methods to fix it. I hope this article helps you.

![4 Ways to Fix KB5035845 Fails to Install [Full Guide]](https://images.minitool.com/partitionwizard.com/images/uploads/2024/08/kb5035845-fails-to-install-thumbnail.png)

User Comments :