About Windows 11 Update KB5034766
KB5034766, released on February 13, 2024, is a cumulative update for Windows 11 version 21H2. This update includes quality improvements and security patches. For instance, it solves memory leaks in ctfmon.exe and TextInputHost.exe, adds a renewed signing certificate to the Secure boot DB variable, and so on.
Installing KB5034766 is a great way to repair security issues for the Windows operating system. However, the update itself may randomly be troublesome. A few users have reported that KB5034766 fails to install due to different reasons.
To assist in solving the “KB5034766 not installing” issue, this post summarizes some possible fixes below. You can apply them if you are unable to install the specific update.
MiniTool Partition Wizard FreeClick to Download100%Clean & Safe
Fix 1: Run the Windows Update Troubleshooter
When facing the “KB5034766 not installing” issue, you can try to fix it by running the Windows Update troubleshooter. It’s a Windows-embedded utility that repairs lots of issues related to Windows updates.
Step 1: Press Windows + I to open Settings.
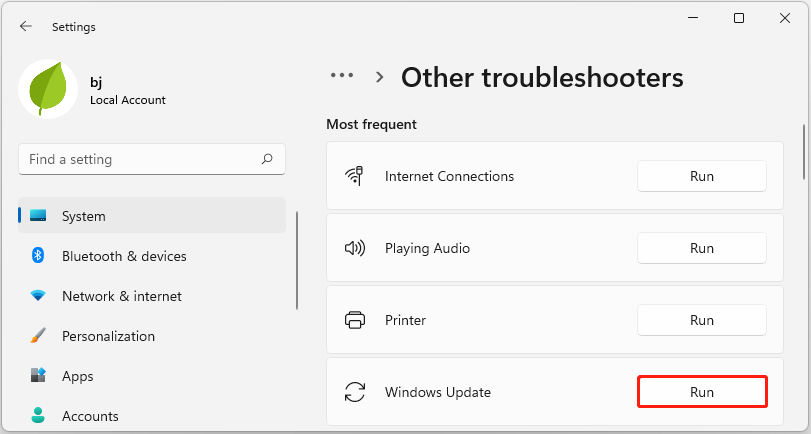
Step 2: In the System section, navigate to Troubleshoot > Other troubleshooters from the right side.
Step 3: In the next window, click Run after Windows Update. Then the troubleshooter will begin detecting and fixing any found problems that stop you from installing Windows updates.

Fix 2: Disable the Antivirus
The third-party antivirus software on your PC and Windows Defender Firewall may sometimes recognize the Windows update as a threat and interfere with the process. As a result, KB5034766 fails to install. To fix it, you’d better disable the antivirus programs temporarily.
Fix 3: Repair Corrupted System Files
Sometimes corrupted or missing system files may also lead to the frustrating issue that KB5034766 fails to install. In this case, it’s recommended that you use the System File Checker (SFC) to repair these problematic files. To do this, follow the steps below.
Step 1: Right-click the Start icon and select Run.
Step 2: Type cmd in the Run dialog box and press Ctrl + Shift + Enter.
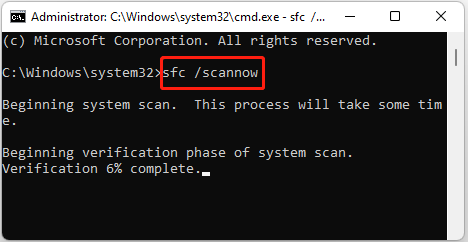
Step 3: After you open Command Prompt as an administrator, type sfc /scannow and press Enter.

Step 4: Wait patiently until the process ends. Then restart your computer to see if you can install KB5034766 smoothly.
Fix 4: Empty the SoftwareDistribution Folder
Empty the SoftwareDistribution folder may help with the issue that KB5034766 fails to install Windows 11 as well. You can do this with the given steps.
Step 1: Type services.msc in the Run dialog and press Enter.
Step 2: In the Services window, scroll down to find Windows Update. Then right-click this service and select Stop.
Step 3: Right-click the Background Intelligent Transfer Service (BITS) and select Stop.
Step 4: After that, press Windows + E to open File Explorer and then navigate to the path: C:\Windows\SoftwareDistribution.
Step 5: Press Ctrl + A to choose all folders and files in the SoftwareDistribution folder. Then press Delete to remove them.
Step 6: Go back to Services and restart the services you have stopped before.
Fix 5: Perform a Clean Boot
If KB5034766 fails to install because of software conflict, you can try performing a clean boot. By doing so, Windows will boot with a minimal set of drivers and startup programs, protecting the system from any software conflicts caused by third-party programs.
Fix 6: Install the KB Update Manually
It’s also possible for you to avoid the “KB5034766 not installing” issue by manually downloading and installing the failing Windows update. If you have no idea how to execute the operation, you can refer to this guide: How to Update Windows 11 Manually? [4 Simple Ways].
When KB5034766 fails to install, you can try to fix it with the above methods. If you have any other great solutions to the Windows update issue, please share them with us in our comment area below.

User Comments :