KB5034134 is a security update that was released for Windows 10 in January 2024. This security update includes quality improvements and addresses security issues for your system. If you want to make security improvements, you can try installing the specific update.
However, you are likely to encounter the issue that KB5034134 fails to install when you are attempting to install the update. Fortunately, this post summarizes certain possible methods for fixing the “KB5034134 not installing” issue. Simply keep reading and pick a suitable way to sort the issue out.
MiniTool Partition Wizard DemoClick to Download100%Clean & Safe
Method 1: Use the Windows Update Troubleshooter
After KB5034134 fails to install, you can try running the Windows Update troubleshooter first. It’s a Windows built-in utility that repairs plenty of issues related to Windows updates. To do this, follow the steps below.
Step 1: Press Windows + I to open Windows Settings. Then select Update & Security.
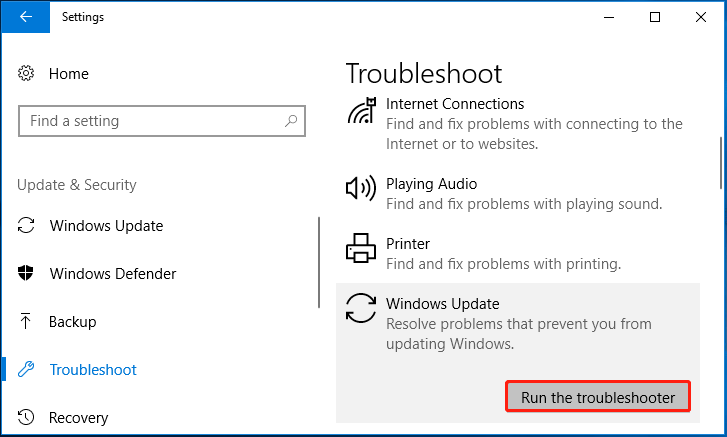
Step 2: Go to the Troubleshoot section and then click Windows Update on the right side.
Step 3: After that, click Run the troubleshooter under Windows Update. Then the troubleshooter will begin to detect and repair problems that prevent you from updating Windows.

Method 2: Run the SFC Scan
Running the SFC (System File Checker) scan may also help you solve the “KB5034134 not installing” issue. Here’s how to do this.
Step 1: Press Windows + R to open the Run dialog.
Step 2: Type cmd and press Ctrl + Shift + Enter to open Command Prompt as an administrator.
Step 3: In the elevated Command Prompt, type sfc /scannow and press Enter.
Step 4: Wait for the process to end. Then restart your computer to see if you can download and install KB5034134 smoothly.
Method 3: Clear the Windows Update Temporary Cache Folder
Another way you can try when KB5034134 fails to install is to clear the Windows update cache folder. You can execute the operation with the given steps.
Step 1: Run Command Prompt as an administrator.
Step 2: Input the following commands and press Enter after each.
- net stop wuauserv
- net stop bits
Step 3: Press Windows + E to open File Explorer and then navigate to the path: C:\WINDOWS\SoftwareDistribution.
Step 4: Delete all the folders and files in the SoftwareDistribution folder.
Step 5: Once done, go back to the administrative Command Prompt and run the following commands one after another.
- net start wuauserv
- net start bits
- exit
Step 6: Restart your PC and go to check if the update issue disappears.
Method 4: Modify Your Registry Keys
In some cases, KB5034134 fails to install because of the interference of the WUServer and WIStatusServer entries. As for this, you can try solving the issue by deleting the two entries in Registry Editor.
Step 1: Type regedit in the Run dialog and press Enter.
Step 2: In Registry Editor, go to the following path:
HKEY_LOCAL_MACHINE\SOFTWARE\Policies\Microsoft\Windows\WindowsUpdate
Step 3: Locate WUServer and WIStatusServer in the right panel. Then right-click them and select Delete to remove them.
Step 4: Once done, restart your computer and try to install the update again,
Method 5: Install the Windows Update Manually
If none of the above methods works, you can then try to download and install the problematic Windows update manually. You can refer to this post to complete the Windows update: [Tutorial] How to Download & Install Windows 10 Updates Manually.
When the KB5034134 fails to install on your PC, try to fix it with the methods listed in this post. If you have any other great solutions to the issue, please share them with us in the comment area below.

User Comments :