KB5029351 fails to install? Have you encountered this error on your PC? If so, you come to the right place. This post provides some feasible methods to fix the Windows 11 KB5029351 failed to install issue. Let’s explore it with MiniTool Partition Wizard.
About KB5029351
KB5029351 for Windows 11 22H2 is an update provided by Microsoft on 8/22/2023. It adds a new hover behavior to the search box gleam and fixes a number of other problems, including the search icon/TAB key/Narrator/search box size issue, etc.
However, some of the users failed to install KB5029351 on their computers with different error codes, like 0x800f0991, 0x0070002, 0x800f0922, etc.
After searching for this issue on the internet, we find that they encounter the issue for various reasons, such as program conflicts, compatibility issues, issues with the update files themselves, and so on.
Have you also encountered the “KB5029351 fails to install” issue? If so, you can continue reading this post. It provides some useful methods to fix this issue.
Fix 1. Run the Windows Update Troubleshooter
When you encounter update update-related issue on your computer, you can try running Windows update troubleshooter first. It is a professional built-in tool on Windows that can fix many update-related issues. Here’s the way:
- Press the Windows and I keys simultaneously to open the Settings window.
- Navigate to Update & Security > Troubleshoot.
- Click the Additional troubleshooters link.
- Choose Windows Update and then click Run the troubleshooter.
- Follow the on-screen instructions to complete the process.
- Once done, update again and check if the “KB5029351 failed to install” issue is fixed.
Fix 2. Turn off Third-Party Antivirus
Sometimes, the third-party antivirus may falsely identify the Windows 11 KB5029351 installation files as viruses or malware and then block them. So, before you try updating KB5029351 on your PC, you need to turn off all your third-party antivirus apps.
Fix 3. Use Google’s Alternate and Preferred DNS Server Addresses
Sometimes, the DNS server address provided by the ISP may prevent the Windows update installation and then cause an error message. So, you can try switching to domain name servers from providers like Google to fix the error. Here’s the guide:
- Press the Windows and R keys simultaneously to open the Run window.
- Type “ncpa.cpl” in the box and press Enter to open the Network Connections window.
- Right-click your adapter and select Properties.
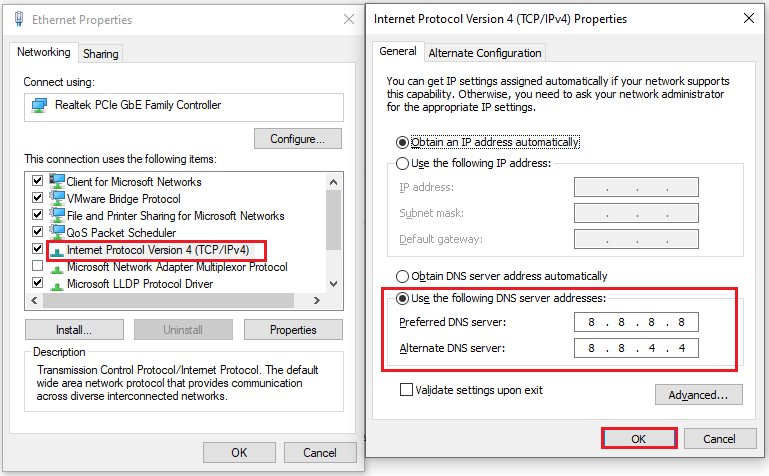
- Double-click “Internet Protocol version 4 (TCP/IPv4)”.
- Select “Use the following DNS server addresses”.
- Type “8.8.8.8” in the “Preferred DNS server” box.
- Then, type “8.8.4.4” in the “Alternate DNS server” box.
- After that, click OK to save the changes.
- Restart your PC and try installing the Windows 11 KB5029351.
Fix 4. Run SFC and DISM
Corrupted system files may also affect the Windows update. So, you can run SFC and DISM on your PC to fix these corrupted files. Here’s how to do it:
Step 1. Open the Search window, and then type “command prompt” in the search box.
Step 2. Click Run as administrator under the Command Prompt app.
Step 3. Type “sfc /scannow” and press the Enter key.
Step 4. Once done, restart your computer to check if the error is fixed. If not, proceed by initiating a DISM scan.
Step 5. Run the Command Prompt as administrator on your computer again. Run the following commands sequentially:
DISM.exe /Online /Cleanup-image /Scanhealth
DISM.exe /Online /Cleanup-image /Checkhealth
DISM.exe /Online /Cleanup-image /Restorehealth
Step 6. Once done, restart your computer to check if Windows 11 KB5029351 stuck shows again.
Fix 5. Restart the Windows Services
Windows update-related services play a crucial role in the Windows update installation. If there is anything improperly configured, it can cause errors easily, including the “KB5029351 fails to install” issue. So, you can try restarting them to fix the issue. To do that, you can do as follows:
- Open the Run window, type “services.msc”, and then press Enter.
- In the Services window, double-click Background Intelligent service from the list.
- From the Startup type field, select Automatic from its drop-down menu.
- Go to the “Service status” and click on Start.
- Then, click Apply and OK to save the changes.
- Next, do the same operations with Windows update and Cryptographic Services.
- Once done, restart your PC and check if you fixed the Windows 11 KB5029351 stuck issue successfully.
Fix 6. Use Microsoft Update Catalog
You can also try using the Microsoft Update Catalog website to update the KB5029351 on your computer. Here’s the tutorial:
- Navigate to the Microsoft Update Catalog website.
- Type “KB5029351” in the search box and press Enter.
- Then, find the one that matches your PC specs and Windows version.
- Click the Download button and proceed with the on-screen instructions.
- Once the installation is done, restart your computer.
Fix 7. Clear and Reset the Windows Update Cache
Some people report that clearing and resetting the Windows update cache helped them fix the “KB5029351 failed to install” issue successfully. So, you can also have a try. Here are the detailed steps:
Step 1. Run the Command Prompt as administrator.
Step 2. Type the following command lines, one at a time, and press the Enter:
- net stop wuauserv
- net stop cryptSvc
- net stop bits
- net stop msiserver
- net stop AppReadiness
Step 3. These commands can stop the Windows update associated services. Then, run the command “del %windir%\SoftwareDistribution” to rename the SoftDistribution folder.
Step 4. Use the command “bitsadmin /reset /allusers” to reset the Background Intelligent Transfer Service.
Step 5. After that, run the following commands to restart all the services.
- net start wuauserv
- net start cryptSvc
- net start bits
- net start msiserver
- net start AppReadiness
Step 6. Once done, check if the “Windows 11 KB5029351 failed to install” issue has been resolved.
Fix 8. Reset Windows Update Components
If there is anything wrong with the Windows Update Components, you may also encounter the “Windows 11 KB5029351 failed to install” issue. In this situation, you can try resetting it to fix the error. If you don’t know how to reset Windows Update Components, you can follow the guide in this post: How to Reset Windows Update Components in Windows 11/10?
Fix 9. Perform a Clean Boot
If you suspect the “Windows 11 KB5029351 fails to install” issue is caused by software or program conflicts, you can try perform a clean boot and then find out the culprit. Here’s the guide: How To Perform A Clean Boot On Your Windows 11 PC.
Fix 10. Try Advanced Ways
If none of the above solutions can help you fix the “KB5029351 failed to install” issue, you can try some advanced ways, such as using installation media to update Windows or performing an in-place upgrade to complete the installation of KB5029351.
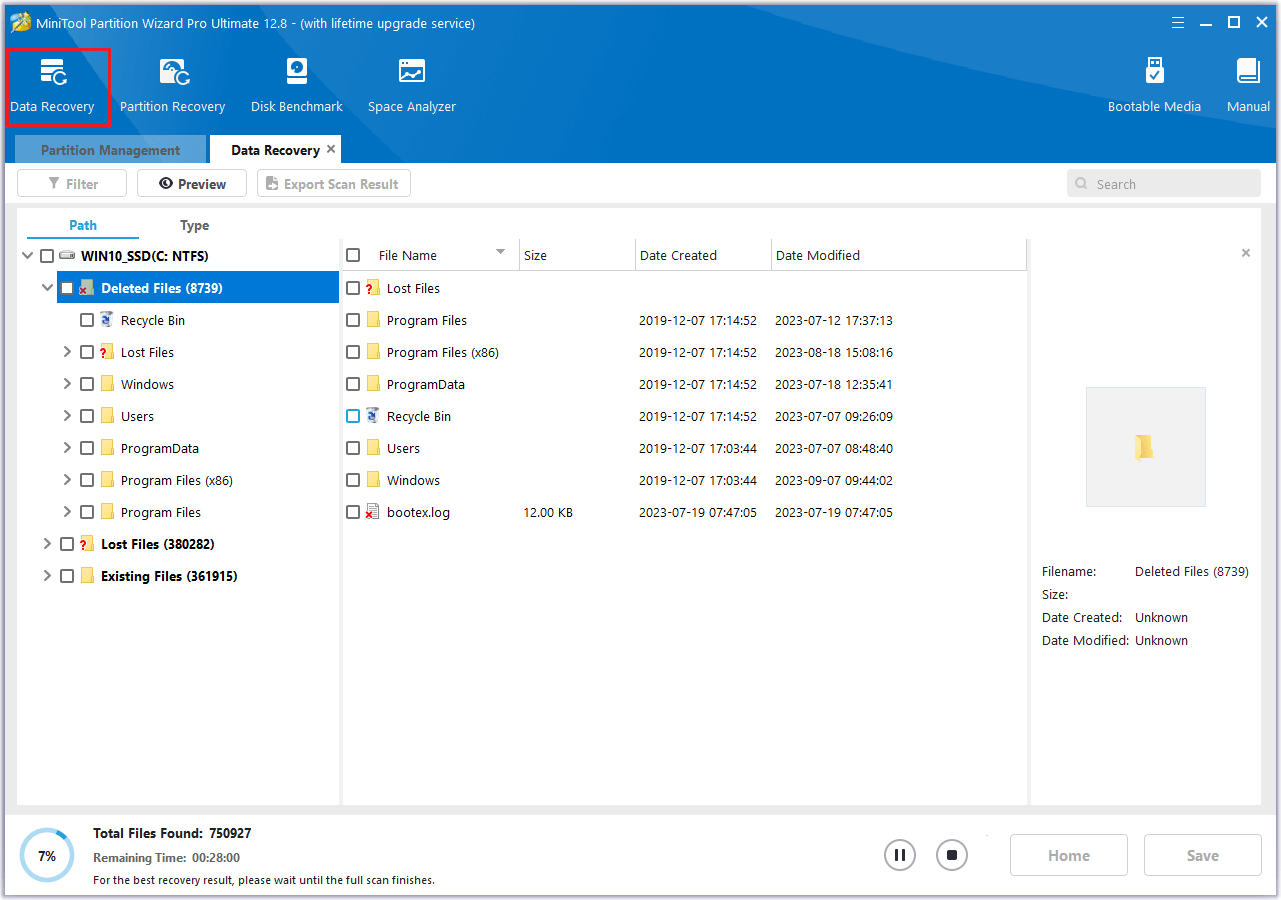
In addition, if you turn off your PC accidentally during the update process and lose some data, you can use MiniTool Partition Wizard’s Data Recovery feature to get your data back. It is a comprehensive and professional partition manager that can also help you create/delete/format partitions, clone disks, check disk errors, etc.
MiniTool Partition Wizard DemoClick to Download100%Clean & Safe
About The Author

Position: Columnist
Charlotte is a columnist who loves to help others solve errors in computer use. She is good at data recovery and disk & partition management, which includes copying partitions, formatting partitions, etc. Her articles are simple and easy to understand, so even people who know little about computers can understand. In her spare time, she likes reading books, listening to music, playing badminton, etc.
User Comments :