Have trouble with the Windows update KB5029244 installation? If the Windows update KB5029244 failed to install on your PC, you come to the right place. In this post, MiniTool Partition Wizard provides several feasible methods to fix the error.
Some people encounter the Windows update KB5029244 failed to install on their computer. This error bothers them a lot. After investigating extensive user reposts and posts, I summarized some effective methods to fix this error. You can try them one by one until you fix the error successfully.
Method 1. Try Some Basic Tricks
There are some basic tricks you can try to fix the Windows 10 22H2 Update KB5029244 can’t install issue.
- Check the Internet connection
- Disable security software
- Manual Windows Update installation
- Run Windows Update troubleshooter
Method 2. Change DNS Settings
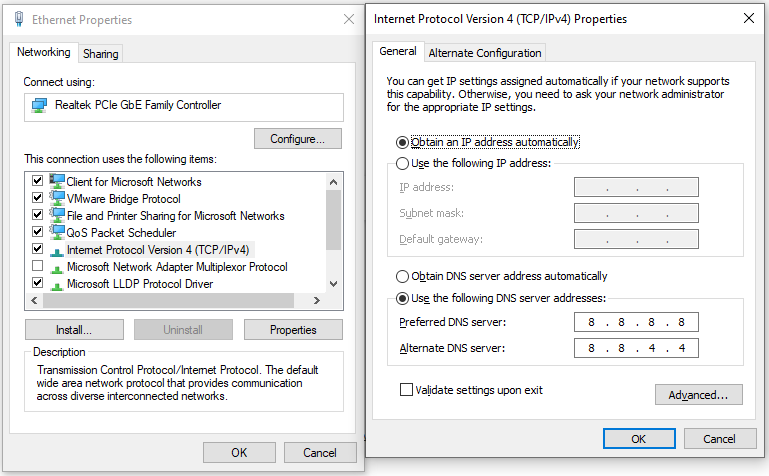
Some people report that changing DNS settings helps them fix the Windows 10 22H2 Update KB5029244 can’t install issue successfully. So, you can also try switching to domain name servers from providers like Google to fix the error. Here’s the guide:
- Press the Win + R keys to open the Run window.
- Type “ncpa.cpl” and press Enter to open the Network Connections window.
- Right-click your adapter and select Properties.
- Double-click “Internet Protocol version 4 (TCP/IPv4)”.
- Select “Use the following DNS server addresses”.
- Type “8.8.8.8” in the “Preferred DNS server” box.
- Then, type “8.8.4.4” in the “Alternate DNS server” box.
- After that, click OK to save the changes.
- Restart your PC and try installing the KB5029244 Windows 10.

Method 3. Restart and Enable Relevant Services
Before you try to install the Windows update KB5029244, you’d better check or restart the relevant services, as improper configurations may result in errors like the “KB5029244 fails to install” issue. Here’s the guide:
- Press Win + S to open the Quick Link menu, and then select Device Manager from the menu.
- In the pop-up window, double-click Background Intelligent Transfer service from the list.
- From the Startup type field, select Automatic from its drop-down menu.
- Go to the “Service status” and click on Start.
- Then, click Apply and OK to save the changes.
- Next, do the same operations with Windows update and Cryptographic Services.
- Once done, restart your PC and check if you fixed the “KB5029244 failed to install” issue successfully.
Method 4. Run SFC and DISM
Corrupted system files may also affect the Windows update. So, you can run SFC and DISM on your PC to fix these corrupted files. Here’s how to do it:
Step 1. Open the Search window, and then type “cmd” in the search box.
Step 2. Click Run as administrator under the Command Prompt app.
Step 3. Type “sfc /scannow” and press the Enter key.
Step 4. Once done, restart your computer to check if the error is fixed. If not, proceed by initiating a DISM scan.
Step 5. Run the Command Prompt as administrator on your computer again. Run the following commands sequentially:
DISM.exe /Online /Cleanup-image /Scanhealth
DISM.exe /Online /Cleanup-image /Checkhealth
DISM.exe /Online /Cleanup-image /Restorehealth
Step 6. Once done, restart your computer to check if KB5029244 Windows 10 stuck shows again.
If you still encounter the “Windows Update KB5029244 cannot be installed” issue, you can suspect there is something wrong with your disk. To check that, you can use MiniTool Partition Wizard’s Check File System and Surface Test.
It’s a professional and multifunctional disk manager that can help you partition hard drive, convert MBR to GPT, do data recovery, and so on. You can click the Download button to get its installation package and install it.
MiniTool Partition Wizard FreeClick to Download100%Clean & Safe
Method 5. Reset Windows Update Components
If there is anything wrong with the Windows Update Components, you may also encounter the “Windows Update KB5029244 cannot be installed” issue. In this situation, you can try resetting it to fix the error. If you don’t know how to reset Windows Update Components, you can follow the guide in this post: How to Reset Windows Update Components in Windows 11/10?
Method 6. Reset Windows Update Directory
Some people report that clearing and resetting the Windows update cache helped them fix the “Windows Update KB5029244 cannot be installed” issue successfully. So, you can also have a try. Here are the detailed steps:
Step 1. Open the Run window, type “services.msc” and press Enter.
Step 2. Right-click Windows update service and select Stop.
Step 3. Press Win + E to open the File Explorer window. Then, navigate to C:\Windows\SoftwareDistribution\Download.
Step 4. Press Ctrl +A to select all the content, and then press Delete to clear all of them.
Step 5. Back to the Services window, right-click Windows update, and select Start.
Step 6. Once done, check if the “KB5029244 fails to install” issue has been resolved.
Method 7. Try Clean Boot
If you suspect the “KB5029244 failed to install” issue is caused by software or program conflicts, you can try performing a clean boot and then find out the culprit. Here’s the guide: How to Clean Boot Windows 10 and Why You Need to Do So?
Wrapping Things up
This post provides 7 practical methods to fix the “KB5029244 failed to install” issue. You can try them to fix the error on your own.


User Comments :