Windows update KB4088776 is supposed to improve the security and performance of your system, but sometimes, KB4088776 won't install due to various issues, such as 0x80070002, 0x80070643, or 0x800f0922. Fortunately, this post of MiniTool Partition Wizard gives you some methods to fix this issue.
Solution 1. Run the Windows Update Troubleshooter
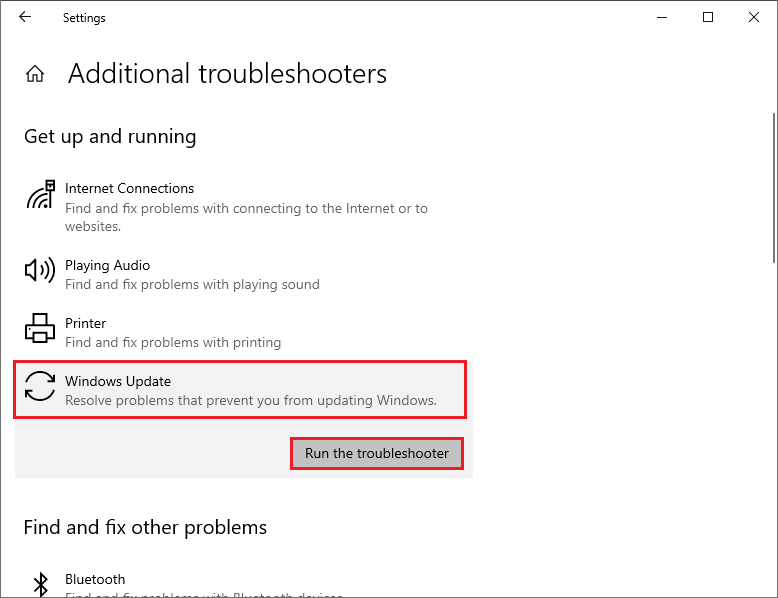
The first thing you can try is to run the built-in Windows Update troubleshooter, which can detect and fix common problems with Windows Update. To run this tool, follow these steps:
Step 1. Right-click the Windows icon and select Settings. Then click Update & Security > Troubleshoot > Additional troubleshooters.
Step 2. In the pop-up window, click Windows Update and select Run the troubleshooter.

Step 3. Then follow the on-screen instructions and let the troubleshooter scan and fix any issues.
Step 4. Once done, restart your computer and check if the issue is solved.
Solution 2. Uninstall the Previous Updates
Some users have reported that uninstalling the previous updates can help repair the “KB4088776 won’t install” issue. There may be some compatibility or corruption issues with these updates that prevent the new one from installing properly. To uninstall the previous updates, follow these steps:
Step 1. Navigate to Settings > Update & Security > Windows Update > View update history. Then click Uninstall updates.
Step 2. In the pop-up window, look for these updates: KB4056892, KB4073291, KB4058258, KB4077675, or KB4074588. Then select each update and click Uninstall.
Step 3. You may need to restart your PC after each uninstallation. After uninstalling all the previous updates, try to install Windows update KB4088776 again.
Solution 3. Reset Windows Update Components
To get rid of the “KB4088776 not installing” issue, you may need to reset the Windows Update components manually. This can help clear any corrupted or damaged files or settings that may cause Windows update KB4088776 issues. Here is how to do that:
Step 1. Press Win + R to open the Run command box. Then type cmd and press Ctrl + Shift + Enter to run Command Prompt as administrator.
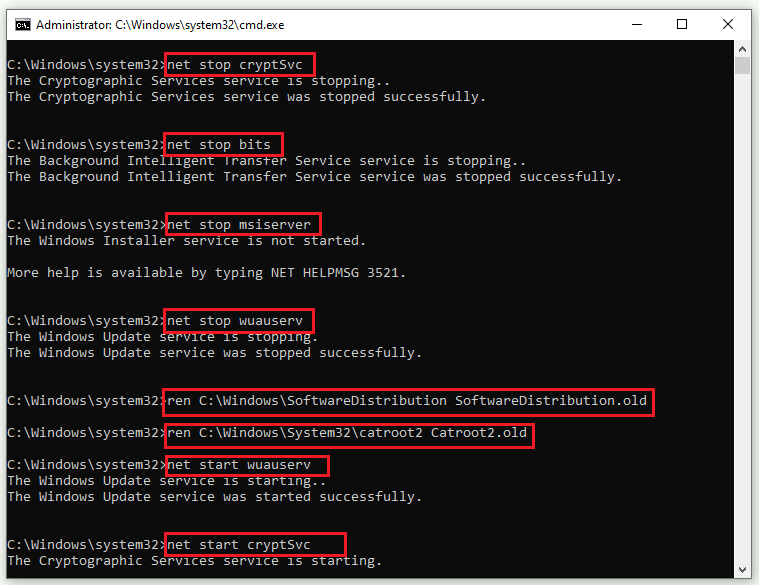
Step 2. In the Command Prompt window, type the following commands and press Enter after each one.
net stop cryptsvc
net stop bits
net stop msiserver
net stop wuauserv
ren C:WindowsSoftwareDistribution SoftwareDistribution.old
ren C:WindowsSystem32catroot2 Catroot2.old
net stop cryptsvc
net start bits
net stop msiserver
net start wuauserv

Step 3. Once done, restart your system and try to install Windows update KB4088776 again.
In addition, you can run SFC and DISM or use MiniTool Partition Wizard to check hard drive errors. Click the following button to download MiniTool Partition Wizard. Then install and launch it, right-click the partition to be checked, and select Check File System or Surface Test. You can refer to this post.
MiniTool Partition Wizard FreeClick to Download100%Clean & Safe
Solution 4. Disable Your Antivirus Software Temporarily
In addition to the above methods, you can try fixing the “KB4088776 not installing” issue by temporarily disabling your antivirus software before installing the update. Some antivirus programs may interfere with Windows Update and block or delete some files that are needed for the installation.
To temporarily disable your antivirus software, you can right-click your antivirus icon and select Disable or Turn off if it is available. Then try to install KB4088776 again. After installing the update, remember to enable your antivirus software again. You can also remove your third-party antivirus programs.
Conclusion
Is this post helpful to you? You can try the solutions one by one to solve the “KB4088776 won’t install” issue. Do you have other nice methods to fix KB4088776 not installing? You can feel free to share them with us in the following comment part.

![How to Fix Windows Update Error 0x800f0989 [Complete Guide]](https://images.minitool.com/partitionwizard.com/images/uploads/2023/04/0x800f0989-thumbnail.png)
User Comments :