If you close the lid of your laptop or you haven’t performed any operations for a long time, your PC will go to sleep to save power. In the Windows 11 sleep mode, your current work will be saved to RAM and all actions on the computer are stopped.
Sleep mode is useful if you want to stop working for a short period of time. However, if you download large files, update software, or perform a long task, you may want to disable the sleep mode so that you can take a break while the PC is running.
How to stop computer from sleeping Windows 11? You can try the following ways.
Way 1. Via Settings
How to turn off sleep mode Windows 11? The most convenient way is to use Settings. Here is the guide:
- Press the Windows logo key + I to open Settings.
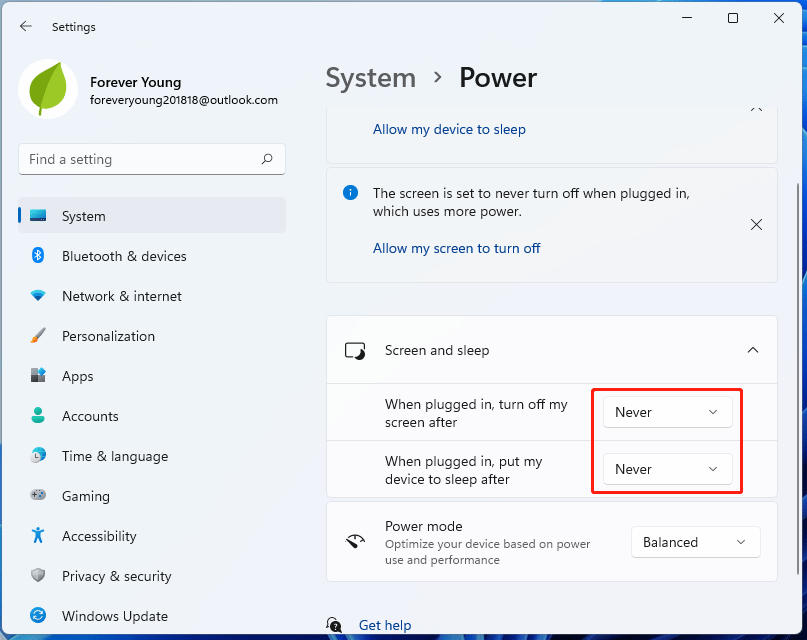
- Go to System > Power.
- Expand Screen and sleep.
- Set all the options to Never, especially the “When plugged in, put my device to sleep after” option and the “On battery power, put my device to sleep after” option.

Way 2. Via Control Panel
Windows 11 offers many ways to turn off the sleep mode. Control Panel can also do that. How to turn off sleep mode Windows 11 using Control Panel? Here is the guide:
- Open Control Panel.
- Choose System and Security.
- Choose Power Options.
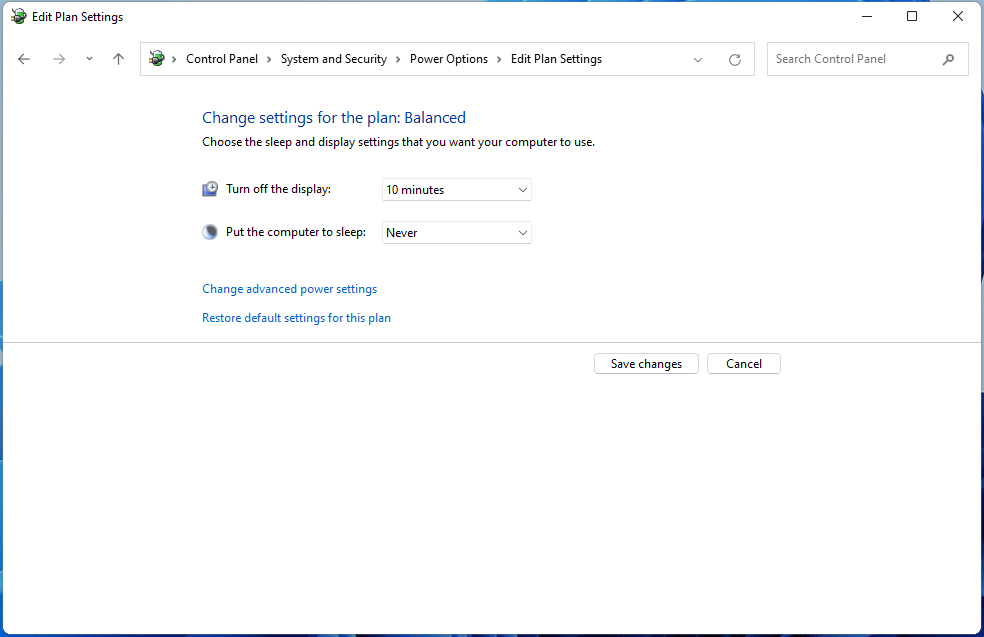
- Click Change plan settings behind the plan you select (Balanced in most cases).
- Set the “Put the computer to sleep” option to Never.
- Click Save changes.

Way 3. Via Local Group Policy Editor
Most Windows behaviors can be intervened by Local Group Policy Editor. Therefore, you can stop computer from sleeping using this tool. But note that Group Policy Editor is only available for Professional, Enterprise, and Education editions of Windows. If you’re using Windows Home, you can’t access the Local Group Policy Editor.
How to stop computer from sleeping Windows 11 using Local Group Policy Editor? Here is the guide:
- Press the Windows logo key + R to open the Run dialog.
- Type “gpedit.msc” and click OK to open Local Group Policy Editor.
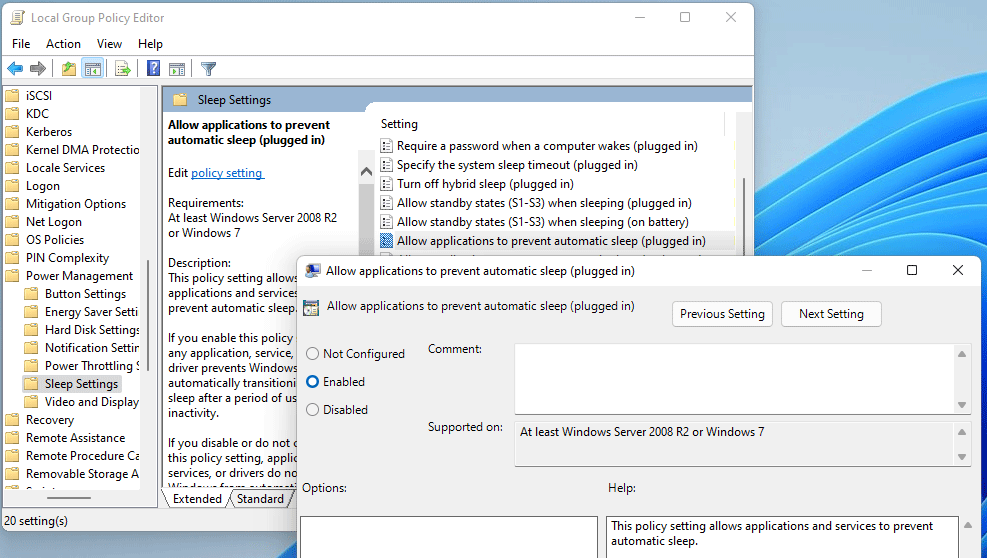
- Go to Computer Configuration > Administrative Templates > System > Power Management > Sleep Settings.
- Double-click the “Allow applications to prevent automatic sleep (plugged in)” policy.
- On the pop-up window, select Enabled and then click Apply and OK.
- If you are using a laptop, you should also enable the “Allow applications to prevent automatic sleep (on battery)” policy.
- Enable the “Turn on the ability for applications to prevent sleep transitions (on battery)” policy in the same way.
- Open the Run dialog, type “regedit”, and click OK to open Registry Editor.
- Go to HKEY_LOCAL_MACHINE\SYSTEM\CurrentControlSet\Control\Power.
- Double-click the HibernatedEnabled registry to change the value from 1 to 0 and click OK.
- Do the same for the HiberfileSizePercent registry as well. In this way, you can stop the computer from sleeping Windows 11 forever.

MiniTool Partition Wizard is a multifunctional program that can clone computer hard drives, recover data, etc. If you have these needs, you can have a try.
MiniTool Partition Wizard DemoClick to Download100%Clean & Safe


![How to Create Windows 10 Sleep Shortcut [Simplest Methods]](https://images.minitool.com/partitionwizard.com/images/uploads/2020/02/win10-sleep-shortcut-thumbnail.jpg)
User Comments :