Some users find the WebView2 Runtime is missing from Windows 11/10. Is there a way to install WebView2 Runtime manually? Of course, yes! This post from Partition Magic shows how to install WebView2 Runtime and fix the installation failure.
Microsoft Edge WebView2 Runtime is an underlying web platform and developer control for embedding web content. It enables you to embed web technologies like HTML, CSS, and JavaScript into native applications.
If WebView2 was deleted accidentally or corrupted, some programs like Microsoft Teams and New Outlook may not work. In this case, you need to install it manually. How to install Microsoft Edge WebView2 Runtime on Windows 11/10? Let’s find detailed steps in the following part.
Further reading: What to do if there is not enough disk space for WebView2 Runtime install? Don’t worry. MiniTool Partition Wizard can analyze your disk space and delete all unnecessary files permanently. Moreover, it can extend the C partition, change cluster size, convert MBR to GPT without data loss, clone hard drives, and more.
MiniTool Partition Wizard FreeClick to Download100%Clean & Safe
How to Install WebView2 Runtime on Windows 11/10
Microsoft Edge Developer offers separated WebView2 Runtime download packages based on system architecture (x64 or x86). Here’s how to get it and manually install it on Windows 11/10.
Step 1. Visit the official website of Microsoft Edge Developer.
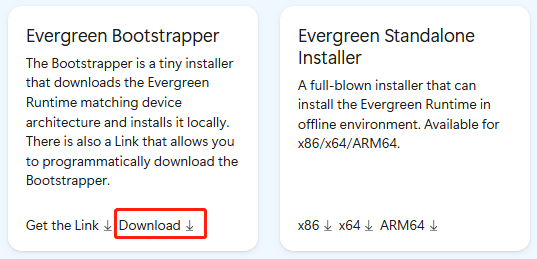
Step 2. Scroll down to the Evergreen Bootstrapper section and click Download. Of course, you can download a standalone WebView2 installer from the Evergreen Standalone Installer section.

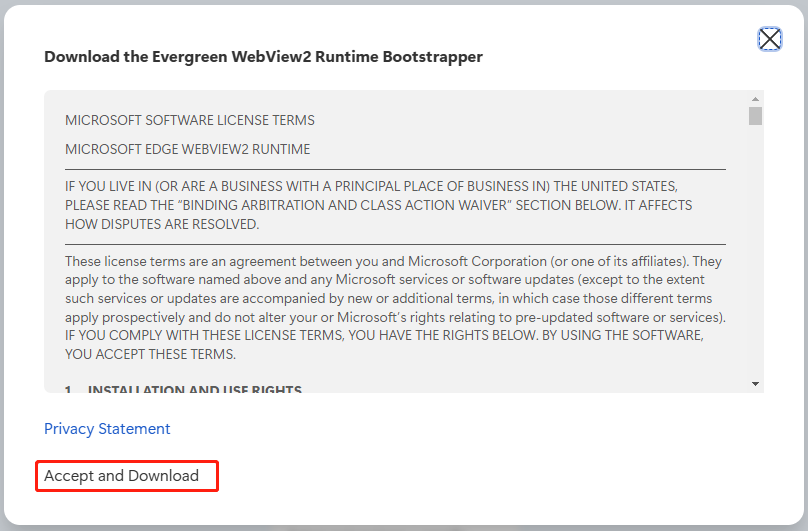
Step 3. In the pop-up window, click Accept and Download to start downloading.

Step 4. Once downloaded, find the executable file on your computer, right-click it, and select Run as administrator > Yes. Then you may need to enter your administrator credentials. Wait for the WebView2 installation to complete.
Now, you should know how to install Microsoft Edge WebView2 Runtime on Windows 10/11. However, sometimes the WebView2 Runtime not installing can occur. How to fix the problem? Let’s keep reading to learn more details.
What to Do to Fix WebView2 Runtime Not Installing
This post will focus on how to fix the WebView2 Runtime install failed on Windows 10/11. If you are struggling with the issue, pay attention to the following solutions.
Fix 1. Run into Safe Mode
The WebView2 Runtime not installing issue might be caused by incompatible or outdated device drivers. In this case, we recommend you boot the computer into Safe Mode. Some users report that they get the program installed smoothly in Safe Mode. Let’s try.
Step 1. Click the Start icon at the bottom left corner press the Power icon, and then click the Restart button with the Shift key pressed.
Step 2. Now, your computer will boot into the Windows Recovery Environment menu. Once here, click on Troubleshoot > Advanced options.
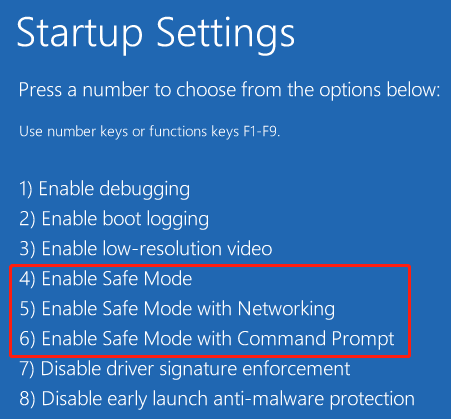
Step 3. In the Advanced options menu, select Startup Settings. Then press F4, F5, or F6 based on your needs to enter Safe Mode.

Fix 2. Run the WebView2 Runtime Installer as Admin
Some users from the Microsoft forum reported that the WebView2 Runtime install failed issue can be solved by running the install as admin. To do that, right-click the installer file and select Run as administrator.
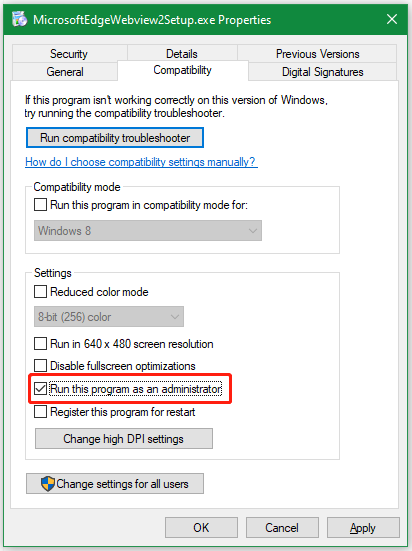
Alternatively, you can right-click the executable file, select Properties, go to the Compatibility tab, tick the checkbox next to Run this program as an administrator, and click on Apply > OK to save the change. Then run the installer to see if it works properly.

Fix 3. Uninstall the Previous Version of WebView2 Runtime
If you still experience the WebView2 Runtime install failed issue, you may try fully uninstalling any previous version of the program on the system. To do that, you can type Add or Remove Programs in the search box, select the best match, find the WebView2 Runtime in the list of installed programs, and select Uninstall.
Besides, you can open the Run dialog box, type temp in the box and press Enter, then delete all contents inside the Temp folder. Restart your computer and try installing WebView2 Runtime again.
Bottom Line
In a nutshell, this post mainly discussed how to get WebView2 Runtime downloaded and installed on Windows 10/11. It also provides corresponding fixes for the WebView2 Runtime not installing issue. If you enjoy this blog post, feel free to share it in your communities.

![How to Install Software Without Admin Rights? [3 Methods]](https://images.minitool.com/partitionwizard.com/images/uploads/2025/01/how-to-install-software-without-admin-rights-thumbnail.jpg)
User Comments :