Have you ever encountered the “GWXUS has stopped working” issue? If so, you don’t need to worry. Here, MiniTool Partition Wizard provides several solutions to fix the error with ease. You can try these methods to fix it on your PC.
GWXUX is a process responsible for downloading and installing updates for Windows 10. It is installed on a computer via Windows Updates. However, some people encounter the “GWXUX has stopped working” issue. Here’s a picture of the error.
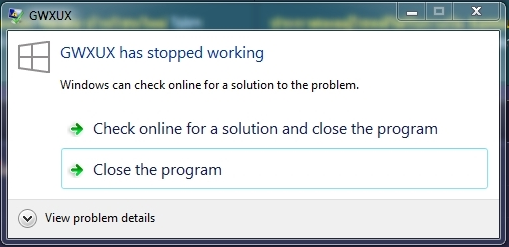
After investigating extensive user reports and posts, I find that the “GWXUX has stopped working” are mainly caused by these reasons:
- The installed update KB3035593.
- Corrupted system files.
- Temporary update issues.
- …
Solution 1. Run Windows Update Troubleshooter
As GWXUX.exe is related to the Windows update, you can run the Windows Update troubleshooter when you encounter the “GWXUX has stopped working” issue. Here’s how to run the Windows Update troubleshooter:
- Press the Win + S keys simultaneously to open the Search window, type “control panel” and select Control Panel under Best Match.
- In the Control Panel windows, type “troubleshooting” in the search box on the top right side, and then click Troubleshooting.
- Select View all in the left pane.
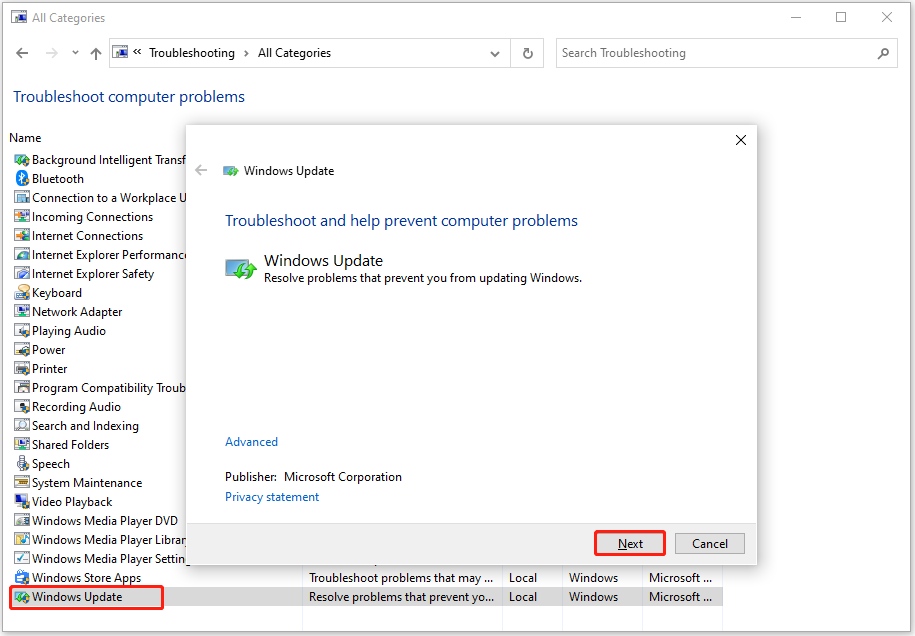
- Next, select Windows Update from the Troubleshoot computer problems list.
- Click Next in the pop-up window and wait for the process to complete.
Solution 2. Uninstall KB3035583
From the above reasons, you can know that the update KB3035593 is related to the “GWXUX has stopped working” issue. So, you can try uninstalling KB3035583 to fix the error. Here’s how to uninstall the updates:
Step 1. Open the Search window, type “control panel” and press Enter to open the Control Panel window.
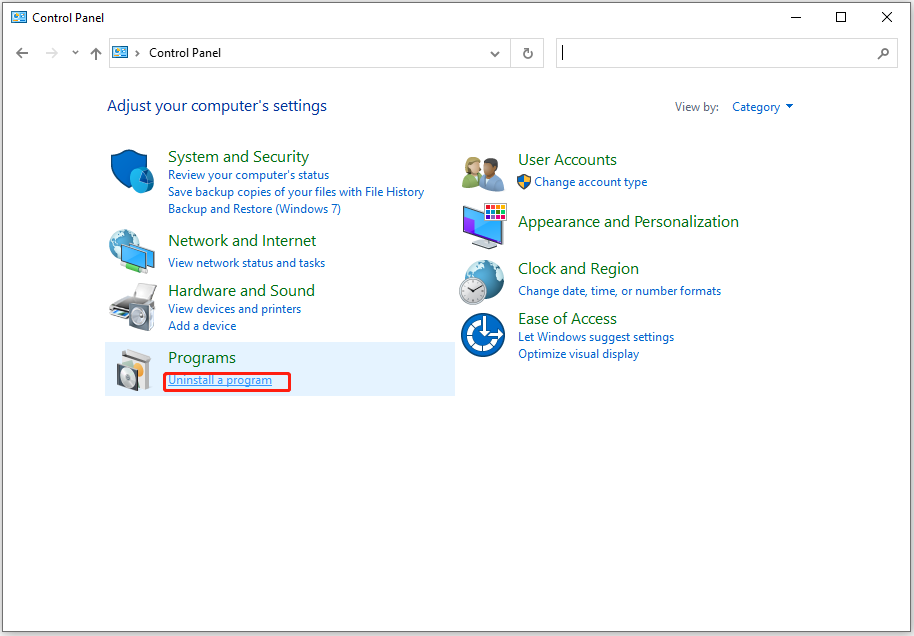
Step 2. Set View by as Categories, and then click Uninstall a program under Programs.
Step 3. Click View installed updates from the left pane.
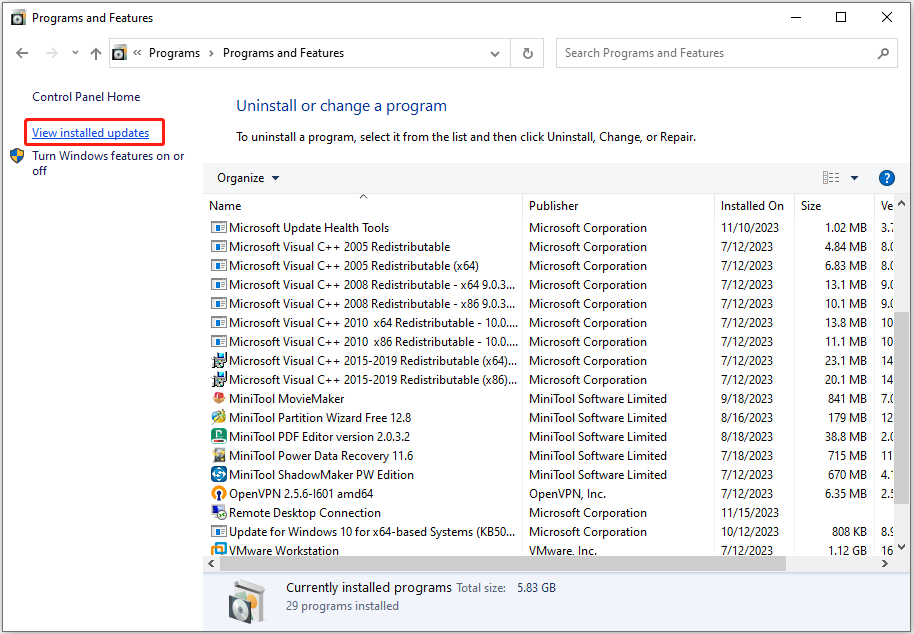
Step 4. Then, select KB3035583 from the list. Next, click Uninstall.

Step 5. Once done, restart your computer and then check if the error has been resolved.
Solution 3. Disable It Inside Task Scheduler
Some people report that disabling the GWXUX.exe inside Task Scheduler helps them fix the “GWXUX has stopped working” issue successfully. You can also have a try. Here’s how to do it:
Step 1. Open the Search window, type “task scheduler” in the search box, and then select Task Scheduler under Best Match.
Step 2. In the left pane of the pop-up window, navigate to Task Scheduler Library > Microsoft > Windows > Setup > GWX.
Step 3. Then, you will get two tasks listed under that GWX folder. Select the two tasks and then disable them permanently.
Step 4. Restart your computer and check if the error has been resolved.
Solution 4. Edit the Registry
You can also try to fix the “GWXUX has stopped working” issue by editing the Registry. Some people fix the issue successfully in this way. Here’s the guide:
Step 1. Press the Win + R keys to open the Run window, type “regedit.msc” and press Enter.
Step 2. In the Registry Editor window, navigate to “HKEY_LOCAL_MACHINE\SOFTWARE\Policies\Microsoft\Gwx”
Step 3. Right-click the blank area on the right pane, and select New > DWORD (32bit) Value.
Step 4. Then rename it as “DisableGwx”, and give it a value of 1 to enable it.
Step 5. Exit the Registry Editor window and restart your computer.
Once done, check if the error has been resolved. If not, you can back to Registry Editor to delete the newly created registry key or change its value to 0 to disable it.
Solution 5. Run System File Checker
Corrupted system files may also affect the GWXUS.exe and then result in the “GWXUX has stopped working” issue. In this case, you can try running SFC to fix this error. Here’s the way:
- Open the Run window, type “cmd”, and then press Ctrl + Shift + Enter simultaneously to run Command Prompt as administrator.
- Type “sfc /scannow” and press Enter.
- Once done, check if the “GWXUX has stopped working” issue has been resolved.
Solution 6. Perform System Restore
If none of the above solutions can help you fix the error, you can perform a system restore to fix the error. To do that, you can do as follows:
- Open the Search window.
- Type “system restore” in the search box, and then select Create a restore point under Best Match.
- In the System Properties window, click the System Restore button.
- Click Next and then you can see different restore points in the list.
- Select the restore point before the issue occurs time and then click Next.
- Confirm your restore point and click Finish.
Further Reading:
MiniTool Partition Wizard is a professional and multifunctional partition manager. It can help you check for disk errors, partition hard drive, convert MBR to GPT, do data recovery, migrate OS to SSD without reinstalling OS, format USB to FAT32, change cluster size, rebuild MBR, and more.
If you have any need above, you can download it to your computer.
MiniTool Partition Wizard FreeClick to Download100%Clean & Safe
In Conclusion
How to fix the “GWXUX has stopped working” issue? This post provides 6 useful to help you to get rid of the issue. You can try them one by one until the issue gets fixed.

![[Solved] How to Fix Computer Crashing When Watching Videos?](https://images.minitool.com/partitionwizard.com/images/uploads/2023/11/computer-crashes-when-watching-videos-thumbnail.png)
![[Solved] How to Fix BitLocker Drive Encryption Error 65000?](https://images.minitool.com/partitionwizard.com/images/uploads/2023/11/bitlocker-error-65000-thumbnail.png)
User Comments :