How to fix the GeForce Now error 0xC192000C? If you are searching for a solution to this error, you have come to the right place. Here, Partition Magic provides several effective methods to solve the error.
Some users report encountering the GeForce Now error 0xC192000C when launching a game on the service. This error is quite frustrating as it prevents them from playing any games. After investigating extensive user reports and posts, I find that the error can mainly be caused by these reasons:
- Server-side interruptions
- Connection problems
- Account authentication problems
- Corrupted cache files
- Network connectivity conflicts
- Unstable Internet Connections
- Outdated GeForce Now Client
Have you also run into the same error? If so, continue reading to get some useful solutions.
MiniTool Partition Wizard FreeClick to Download100%Clean & Safe
Method 1. Try Some Basic Tricks
If you encounter the GeForce Now error 0xC192000C on your computer, you can try the following ways to fix the error first.
- Check GeForce Now Server Status
- Check Internet connection
- Disconnect from VPN and Proxy
- Restart GeForce Now and your computer
- Temporarily disable antivirus and firewall
If all the above basic tricks can’t help you fix the error, you can continue and try other methods.

Method 2. Run the Network Troubleshooter
The GeForce Now error 0xC192000C can also be triggered by a network issue. So, you can try running the built-in Windows network troubleshooter to help you identify and solve the error. Here’s how to do that:
Step 1. Press the Win + S keys simultaneously to open the Search window, type “troubleshoot” in the search box, and press Enter.
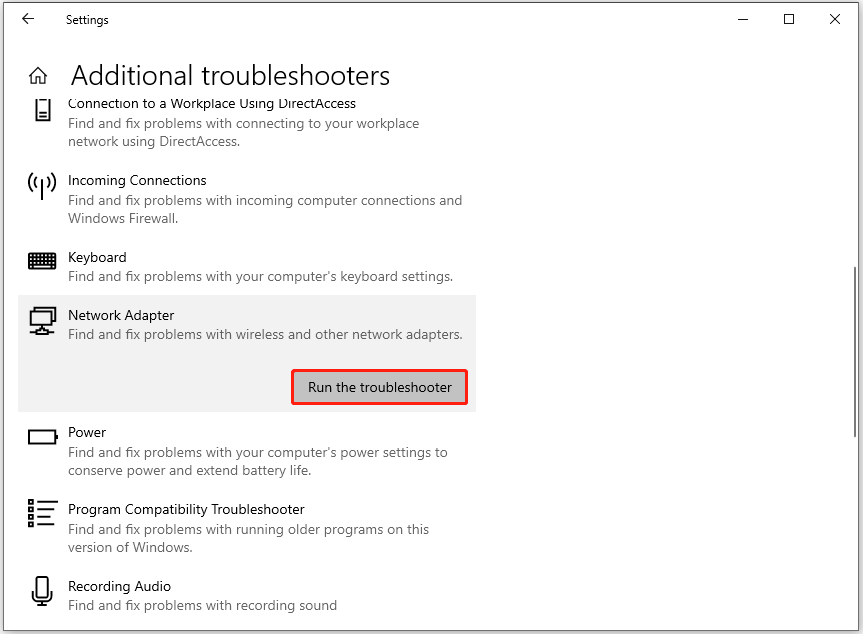
Step 2. In the pop-up window, click Additional troubleshooters.
Step 3. Scroll down to find and choose Network Adapter, and click Run the troubleshooter.
Step 4. Wait for the scanning process to complete.
Step 5. Once done, if there are any issues found, follow the on-screen guide to fix them.
If the Network Adapter troubleshooter is unable to help you fix the error, you can try entering the Additional troubleshooters window again, choose Internet Connections troubleshooter, and click Run the troubleshooter. Once finishes, follow the on-screen guide to fix the found issues.
Method 3. Clear GeForce Now Cache Files
Corrupted or outdated cache data may cause the GeForce Now error 0xC192000C as well. In this case, you can try clearing the GeForce Now cache files to resolve the error. Here are the detailed steps:
Step 1. Press the Win + E keys simultaneously to open the File Explorer window.
Step 2. Type “%localappdata%” in the Quick access box and press Enter.
Step 3. Then, go to NVIDIA Corporation > GeForceNOW, and delete the Cache and Logs folder.
Step 4. After that, restart GeForce Now and check if the error has been resolved.
Method 4. Update GeForce Now
An outdated GeForce Now version may also result in the GeForce Now error 0xC192000C. In this situation, you can try updating GeForce Now and its drivers to fix the error. Here are the detailed steps:
Update GeForce Now:
- Launch GeForce Now on your computer.
- Navigate to Settings and check for updates.
- If there are available updates, install them.
- Once done, restart the app.
Update the Driver:
- Launch GeForce Experience on your PC.
- Go to the Drivers tab.
- Click the Check for Update option.
- If there are available updates, install them and restart your PC.
Method 5. Flush DNS and Reset Network Settings
Some people report that they fixed the GeForce Now error 0xC192000C successfully by flushing DNS and resetting Network settings. You can also have a try. Here’s the way:
Step 1. Press the Win + X keys simultaneously to open the Quick Link menu. Then, select Windows PowerShell (Admin) from the menu.
Step 2. In the pop-up window, run the following commands one by one:
- ipconfig /flushdns
- ipconfig /registerdns
- ipconfig /release
- ipconfig /renew
- netsh winsock reset
Step 3. Once done, restart your PC and check if the error is fixed.
Method 6. Reinstall GeForce Now
If the GeForce Now error 0xC192000C persists, you can try reinstalling the GeForce Now app to fix the error. Here’s the tutorial:
Step 1. Press the Win + R keys simultaneously to open the Run dialog, type “appwiz.cpl” and press Enter.
Step 2. In the Feature and Program window, right-click GeForce Now and select the Uninstall button.
Step 3. Next, navigate to the following locations to delete the remaining GeForce Now Folders:
- C:\Program Files\NVIDIA Corporation
- C:\Users\YourUser\AppData\Local\NVIDIA Corporation
Step 4. Once done, open your browser and go to NVIDIA ‘s official site to download the latest version of the app.
Method 7. Contact NVIDIA Support
If none of the above can help you fix the GeForce Now error 0xC192000C, the only thing you can do is contact NVIDIA Support for help. To do that, you just need to go to the NVIDIA Support website, submit a ticket, and wait for a response from the official.
To Sum Up
How to fix the GeForce Now error 0xC192000C? In this post, you can get several effective methods to solve the error. If you encounter the same error on your PC, you can try these methods one by one until you fix the error successfully.
About The Author

Position: Columnist
Charlotte is a columnist who loves to help others solve errors in computer use. She is good at data recovery and disk & partition management, which includes copying partitions, formatting partitions, etc. Her articles are simple and easy to understand, so even people who know little about computers can understand. In her spare time, she likes reading books, listening to music, playing badminton, etc.
User Comments :