If you don’t know how to find file path of mounted ISO in Windows 11, this post is worth reading. It provides a full guide to find file path of mounted ISO in Windows 11. Now, explore the content with Partition Magic.
When you don’t remember the actual location of the mounted ISO image file stored on your PC, we have covered some easy ways to find file path of mounted ISO file. All installed ISO image files are located under the “This PC” section of File Explorer.
In addition to ISO files, you can also use these options to find the file path of an installed IMG file.
MiniTool Partition Wizard DemoClick to Download100%Clean & Safe
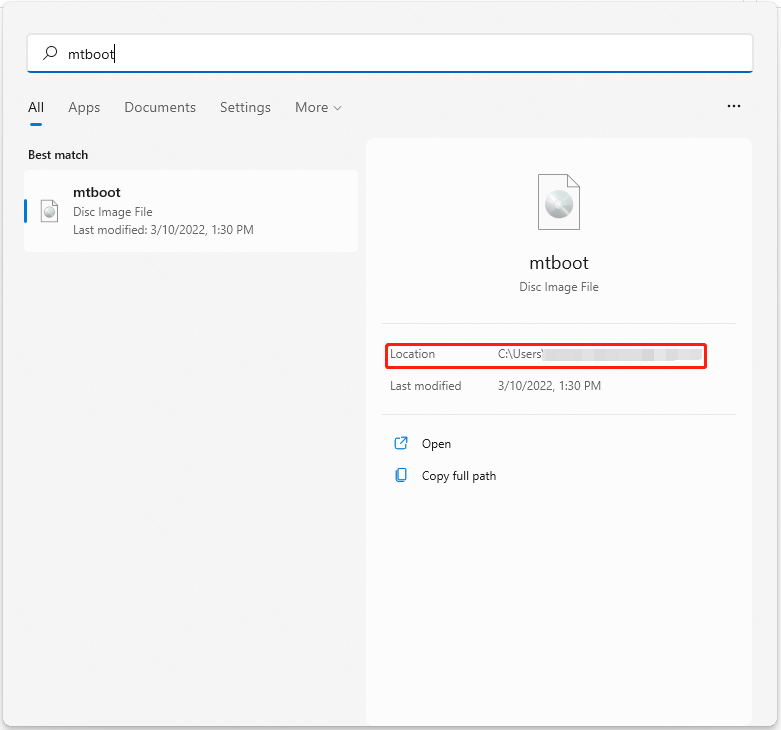
Way 1. Use the Search Box
This method is useful if you know the file name of the mounted ISO image. Type the name of the ISO file that is installed on your Windows 11 PC in the Search box. Once the search results appear, file location is displayed in the right section of Windows Search, as shown in the image above.

Alternatively, you can place your mouse cursor over the file name in the search results and you will see the file path to the ISO image in the description that pops up.
Way 2. Use the DiskPart Command
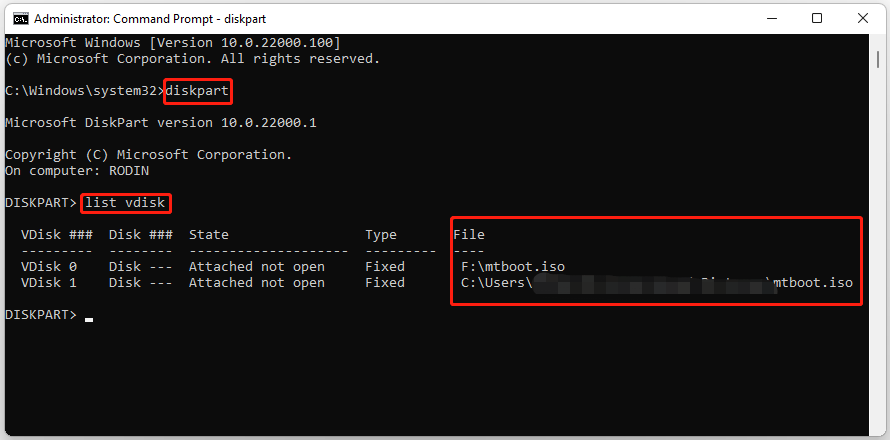
DiskPart is a disk partitioning utility which uses command lines to perform operations. You can also use it to check file path of mounted ISO in Windows 11.
Step 1: Press Win + R, type cmd in the Run box, and press Ctrl + Shift + Enter. Click Yes in the pop-up window to run Command Prompt as administrator.
Step 2: In the Command Prompt window, type diskpart and press Enter. Then type list vdisk and press Enter.
Step 3: Then this will display a list of all virtual drives’ disk number, state, type, and file formation. In the File section, it shows the file path of ISO files.

Way 3. Use the Get-Volume Command
You can use Windows Terminal with the Get-Volume command via Command Prompt to find file path of mounted ISO in Windows 11.
Step 1: Open Windows Terminal with Command Prompt. Execute the following command to check the file path of the mounted ISO. Replace C with the actual volume name of the mounting ISO file.
PowerShell “Get-Volume C | Get-DiskImage | Select-Object ImagePath”
Step 2: Wait a few seconds and the image path under ImagePath will appear along with the ISO file name.
If you have mounted more than one ISO image on your Windows 11 system, then the Get-Volume command can also be used to view the file path of all those ISO images at once. You can run the following command in the Command Prompt window.
PowerShell “Get-Volume |%{$d=$_.DriveLetter;$_ |Get-DiskImage |select @{Name=’DriveLetter’;Expression={$d}},ImagePath}”
Now, you will see the ImagePath output as the full file path location of the mounted ISO for this drive.
Way 4. Use the Get-DiskImage Command
The Get-DiskImage command is used to obtain one or more disk image objects (ISO images or virtual hard disks). It also helps to find file path of mounted ISO.
Step 1: Open Windows Terminal with Command Prompt.
Step 2: Type the following command. Replace C with the drive letter where your ISO file is mounted.
PowerShell “Get-DiskImage -DevicePath \\.\C: | Select-Object ImagePath”
Step 3: Then under ImagePath, check file path of mounted ISO in Windows 11.
Bottom Line
How to find file path of mounted ISO in Windows 11. This post provides 4 ways to help you do that.
Besides, if you are looking for a professional partition manager, MiniTool Partition Wizard is a great choice. It can migrate OS, clone a hard drive, convert MBR to GPT, etc.
MiniTool Partition Wizard DemoClick to Download100%Clean & Safe


User Comments :