Some users report that their external webcam is not detected in their Windows 11/10 computers. This issue can have a variety of causes, such as antivirus software conflicts, corrupted drivers, and more.
What if you are also facing this problem? Continue reading this article to learn how to fix it. Before you proceed with these troubleshooting steps, try the following:
- Restart your computer.
- Plug your webcam into another available USB port.
- Check if your webcam cable is damaged.
- Try your webcam on another working computer.
![[5 Fixes] Search Bar Not Working After Windows 11 24H2 Update](https://images.minitool.com/partitionwizard.com/images/uploads/2025/04/search-bar-not-working-after-win11-24h2-update-thumbnail.png)
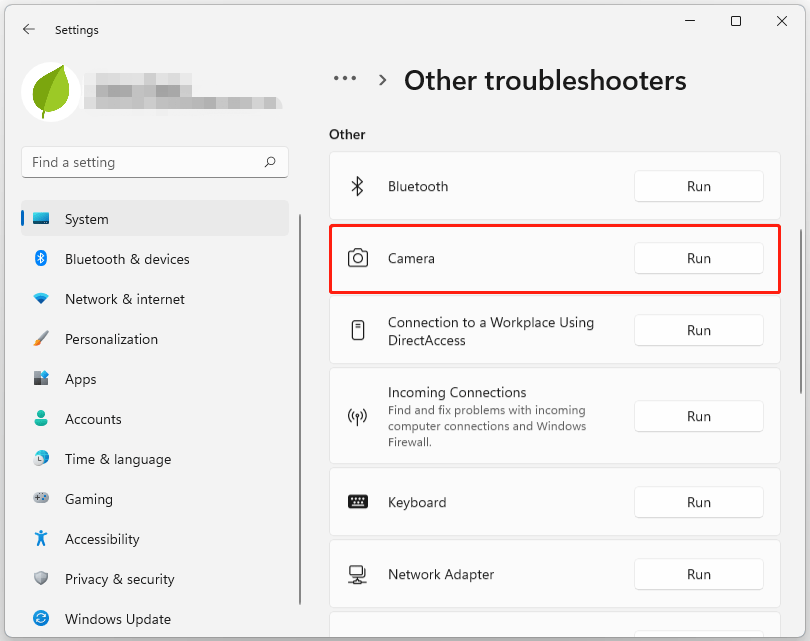
Fix 1. Run the Camera Troubleshooter
The Camera troubleshooter is an automated troubleshooter that can help fix camera problems on your Windows PC. To run the camera troubleshooter, here are the steps on Windows 11:
- Go to Settings > System > Troubleshoot > Other troubleshooters.
- Locate the Camera and click the Run button.
Fix 2. Check the Camera Settings
The next step is to check your privacy settings. Your webcam may be blocked. Follow the instructions below:
- Go to Settings > Privacy and Security > Camera.
- Toggle on the switches for both Camera access and Let apps access your camera.
- Scroll down a bit further to check if the switch for the app you are using the webcam with is turned on.

Fix 3. Temporarily Disable Antivirus Software
Your antivirus software may be blocking your webcam. To check this, disable your antivirus software and check if the problem persists. After the issue of the USB webcam not detected is solved, you can re-enable the antivirus software.
Fix 4. Reinstall the Webcam Driver
A corrupted driver can also cause problems with the corresponding hardware device. In this case, reinstalling the driver can help. Follow these steps to uninstall and reinstall the webcam driver:
- Right-click on the Windows icon and select Device Manager to open Device Manager.
- In the Device Manager window, expand the Cameras category.
- Right-click the webcam driver and select Uninstall device. Also, check for hidden devices. Go to View > Show hidden devices. Uninstall the camera driver that appears after enabling hidden devices.
- Close Device Manager and restart your computer. Windows will automatically reinstall the missing driver on restart.
Once done, check if the problem is resolved.
Fix 5. Reinstall the USB Serial Bus Controller
If the problem persists, uninstall and reinstall the USB controller. Before you proceed, we recommend that you create a system restore point so that if anything goes wrong, you can restore your system to a previous working state.
Follow these steps:
- Open Device Manager.
- Expand the Universal Serial Bus controllers branch.
- Right-click the USB host controller drivers one by one and select Uninstall device.
- Close Device Manager and restart your computer. Windows 11 will automatically reinstall the missing drivers.
Fix 6. Switch External USB Camera to Use UVC Driver
Most available USB webcams are UVC (Standard USB Video Class) compatible cameras. They will work with the UVC driver included with Windows (built-in UVC driver).
If your webcam is not working properly, switching to the built-in UVC driver may solve the problem. Follow the steps below to change the driver (administrator privileges are required).
- Open Device Manager. Then find the problematic webcam in the list of devices displayed in Device Manager. It should appear under Cameras or Imaging devices.
- Right-click the webcam device and select Update driver.
- Select Browse my computer for drivers > Let me pick from a list of available drivers on my computer.
- Select USB Video Device and select Next to complete the driver update.
- Select Close to confirm the setup options and return to Device Manager. The webcam will now appear under the Cameras category in the Device Manager list.
Bottom Line
That’s all about how to fix an external webcam not detected. If you are troubled by this issue, try these solutions.
By the way, if you are looking for a professional partition/disk manager, MiniTool Partition Wizard is a great choice. It can help you create/format/resize/extend/wipe partitions, clone a hard drive, partition a hard drive, convert MBR to GPT, recover data from hard drives, and so on. You can have a try if you have this need.
MiniTool Partition Wizard FreeClick to Download100%Clean & Safe
About The Author

Position: Columnist
Vega joined MiniTool as an editor after graduation. She enjoys helping people with computer problems, including disk management, data recovery, and more. She is constantly expanding her knowledge in related fields. And she will continue to bring more easy-to-understand professional articles to help people solve various problems on the PC. In her daily life, Vega enjoys hanging out with friends, shopping online and listening to music. She is someone who knows how to enjoy life.
User Comments :