For different cases, you need to enable or disable secure boot for a virtual machine. For instance, you need to enable secure boot for a virtual machine to install Windows 11 on the VM. How to activate or deactivate UEFI secure boot for a virtual machine? Partition Magic offers you the steps in 2 cases.
Installing Windows 11 on a VM involves two things: encrypting the VM and enabling the TPM & securing the VM by enabling the UEFI secure boot.
Windows 11 needs both a TPM chip and secure boot to offer solid protection against threats and stop any malware from running when the system loads up. Though Windows 11 can work without Secure Boot and a TPM 2.0 chip, it won’t offer an extra layer of system protection. It means many features like Core-isolation and Data Encryption won’t work.
Therefore, you need to enable secure boot and TPM for a VM if you want to install Windows 11 on it with robust security protection. The steps to enable or disable UEFI secure boot for virtual machines in 2 cases have been offered to you. Simply follow them one by one.
Before starting the process, you should learn the prerequisites to enable or disable secure boot for virtual machines.
Prerequisites to Enable or Disable Secure Boot
Before you enable secure boot for a virtual machine, ensure that the operating system and firmware of the VM support UEFI boot. In addition to that, there are some other prerequisites you should know before starting the operation.
MiniTool Partition Wizard DemoClick to Download100%Clean & Safe
- EFI firmware
- Virtual hardware version 13 or later
- An operating system that supports UEFI secure boot
- Add a Trusted Platform Module (TPM) to an encrypted virtual machine with a minimum hardware version of 14 that uses the UEFI firmware type.
- VMware Tools version 10.1 or later is required for virtual machines. You can upgrade virtual machines to the required VMware Tools version once it becomes available.
However, you can enable secure boot just as you can for a physical machine for certain virtual machine hardware versions and operating systems. On physical machines, you can follow these Steps to Activate TPM 2.0 and Secure Boot to Install Windows 11.
Case 1: Enable or Disable Secure Boot on an Existing VM
It is very easy to enable or disable UEFI secure boot for virtual machines that exist on the PC. Here’s the tutorial for you.
Step 1: Power off the VM, click the VM tab, and choose the Settings option from the drop-down menu.
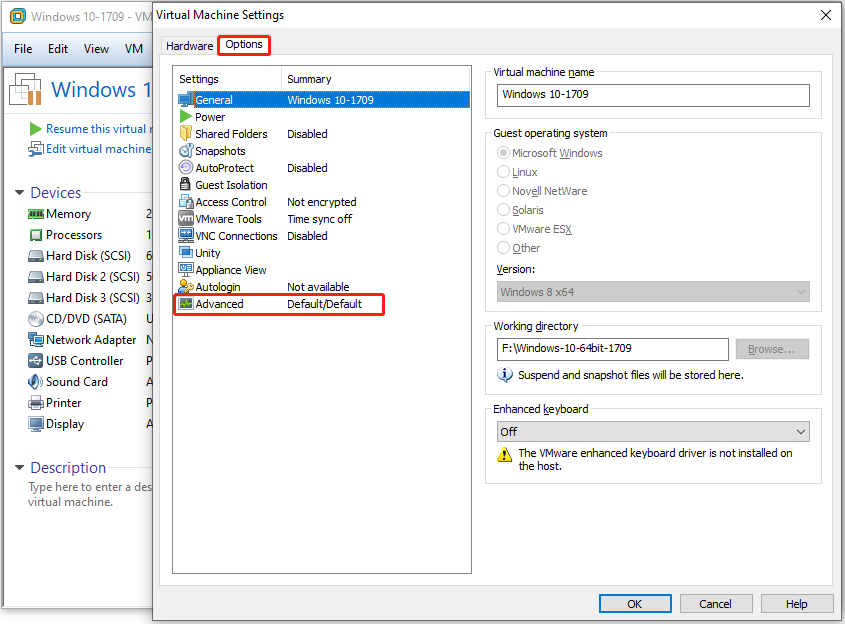
Step 2: In the Virtual Machine Settings window, navigate to the Options tab and click Advanced under the Settings section.

Step 3: Under the Firmware type section, pick UEFI and tick the “Enable secure boot” option. If you want to disable secure boot for VM server, uncheck the “Enable secure boot” option instead.
Step 4: Click on Apply > OK to carry out the changes. The steps to enable or disable secure boot for a virtual machine (already exists) have been shown to you.
If you want to enable or disable TPM 2.0 in VirtualBox, please refer to these steps.
- Search VirtualBox in the search box and click on the best-matching result to open the app.
- Tap on a Windows virtual machine and click the Settings icon.
- Locate the System settings option and find the TPM option.
- Click the arrow icon to open the drop-down menu and pick the v2.0 option.
- Scroll down and locate the Extended Features section.
- Tick the Enable EFI (special OSes only) check box.
- Click OK to save changes.
To disable TPM, set the TPM version to None and uncheck the Enable EFI (special OSes only) option.
Case 2: Enable or Disable Secure Boot for a New VM
How to activate or deactivate UEFI secure boot for a virtual machine to create? In other words, how to enable or disable secure boot for a new virtual machine. In this section, we will illustrate the steps to enable secure boot for a new virtual machine.
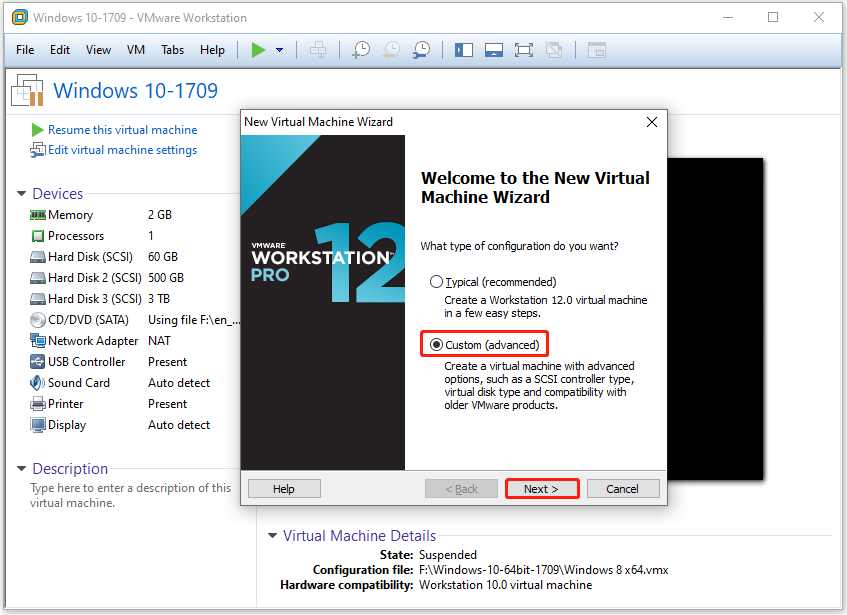
Step 1: Launch the VMware workstation on your PC and create a new virtual machine by selecting Custom (Advanced) configuration.
- Click the File tab after you launch the VMware workstation.
- Choose New Virtual Machine in the drop-down menu.
- In the New Virtual Machine Wizard window, choose Custom (Advanced) and click Next.

Step 2: Confirm hardware compatibility in the pop-up window and click Next to continue.
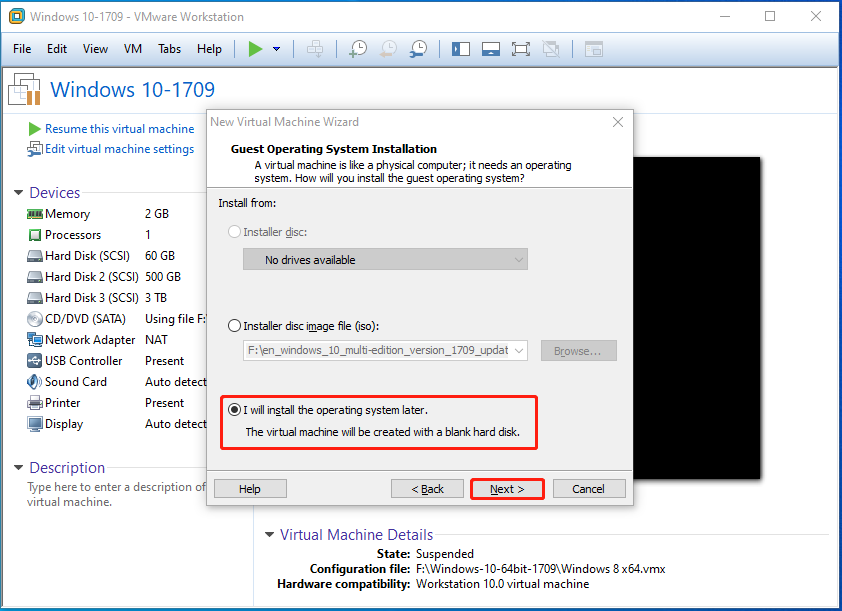
Step 3: Tick the option “I will install the operating system later” and hit the Next button.

Step 4: In the next window, choose a guest operating system from the given options and pick the specific version. In this scenario, we select Microsoft Windows and the Windows 11 x64 version. Then click Next to move on.
Step 5: Based on your needs, specify the virtual machine name and click Browse to specify the location for the VM. After that, click Next.
Step 6: In the firmware type selection window, choose UEFI and tick the Secure Boot option. Then hit Next.
Step 7: Finally, click the Finish button to complete the operation.
Conclusion
This post shows you the steps to enable or disable secure boot for a virtual machine in 2 cases. Based on your situation, follow the corresponding steps in the post.


User Comments :