About NTFS File Compression
NTFS file compression is a feature that comes with Windows PCs, which compresses files and folders by removing reductant data from them. The good news is that it performs this job without damaging the file and losing the data.
You can enable NTFS file compression to save disk space. However, you should also know that compressing data adversely affects performance. Here are some performance characteristics of NTFS compression.
- Files or folders saved into an existing compressed folder will automatically be compressed.
- Compressed files are also expanded before copying over the network, so NTFS compression doesn’t save network bandwidth.
- When you copy or move a compressed NTFS file to a different folder, NTFS decompresses the file, copies, or moves the file to the new location, and then recompresses the file.
- After you disable NTFS file compression, any currently compressed files will remain compressed. You can uncompress any currently compressed files, but you can’t compress them again when you enable NTFS file compression.
Further reading:
To increase disk space without affecting performance, you can free up disk space or extend the partition by using MiniTool Partition Wizard.
This space analyzer helps you find what’s taking up your hard drive space and delete useless files to release disk space. It also allows you to take unallocated space or free space from other partitions on the same disk to enlarge the partition.
MiniTool Partition Wizard FreeClick to Download100%Clean & Safe
#1: Enable or Disable NTFS File Compression via Local Group Policy Editor
Here are the steps to enable NTFS file compression via Local Group Policy Editor.
Step 1: Open the Run dialog window by holding the Windows and R keys.
Step 2: In the Run window, type gpedit.msc and click OK.

Step 3: In the left panel of the window, navigate to the destination by following the path below.
Computer Configuration\Administrative Templates\System\Filesystem\NTFS
Step 4: Double-click Do not allow compression on all NTFS volumes on the right pane to edit its properties.
Step 5: In the prompted window, set the radio button to Not Configured or Disabled to enable NTFS file compression. Then click Apply > OK to save changes.
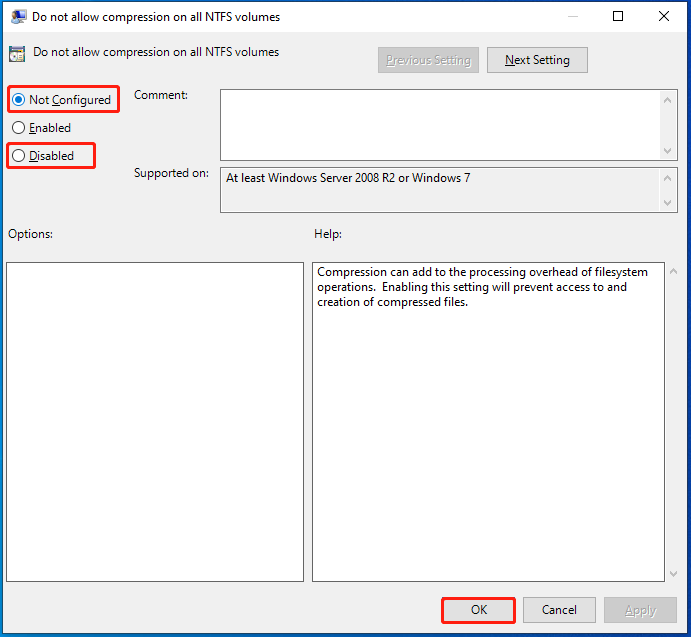
Step 6: Exit Local Group Policy Editor and restart the computer.
#2: Enable or Disable NTFS File Compression via Command Prompt
Command Prompt also allows you to enable or disable NTFS file compression. Here are the instructions for you.
Step 1: Type cmd in the search box and click Run as administrator under the displayed Command Prompt program. Alternatively, right-click Command Prompt under Best match after you type cmd and then click the Run as administrator option.
Step 2: In the Command Prompt window, type “fsutil behavior set disablecompression 0” and hit Enter to enable NTFS file compression.
Step 3: To disable NTFS file compression, execute the command: fsutil behavior set disablecompression 1
Step 4: Exit Command Prompt and restart the PC.
#3: Enable or Disable NTFS File Compression via Registry Editor
Registry Editor allows you to perform various tasks by editing the Registry value. You are also allowed to enable or disable NTFS file compression via Registry Editor. Improper operations can make the system unstable.
Therefore, it’s recommended to back up the Registry before you start editing it. To do that, open Registry, right-click Computer, click Export, and then configure the location & file name and save it. Alternatively, you can also create a system restore point or make a Windows backup by using MiniTool Partition Wizard to safeguard your PC.
MiniTool Partition Wizard DemoClick to Download100%Clean & Safe
Now, follow these steps to enable or disable NTFS file compression via Registry Editor.
Step 1: Open the Run window, type regedit.exe, and click OK. By doing so, you will open Registry Editor.
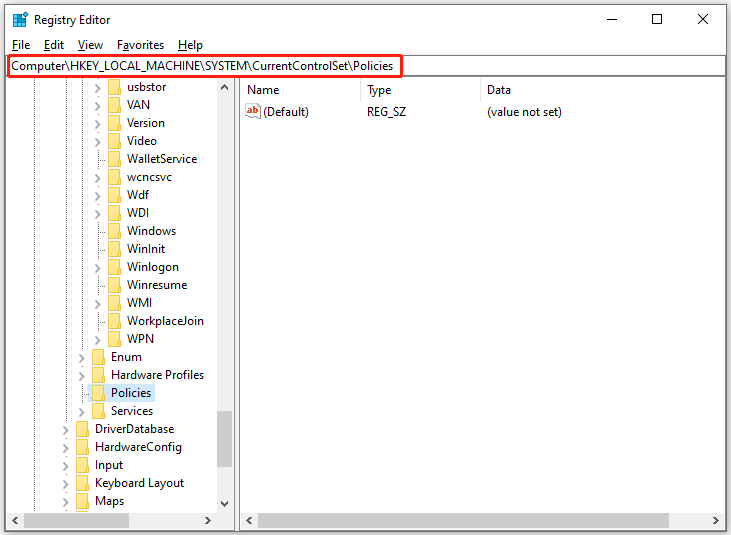
Step 2: Copy the path below and paste it into the address bar of Registry Editor, and then hit Enter.
Computer\HKEY_LOCAL_MACHINE\SYSTEM\CurrentControlSet\Policies
Step 3: On the right side of the window, right-click the blank space and choose New > DWORD (32-bit) Value.
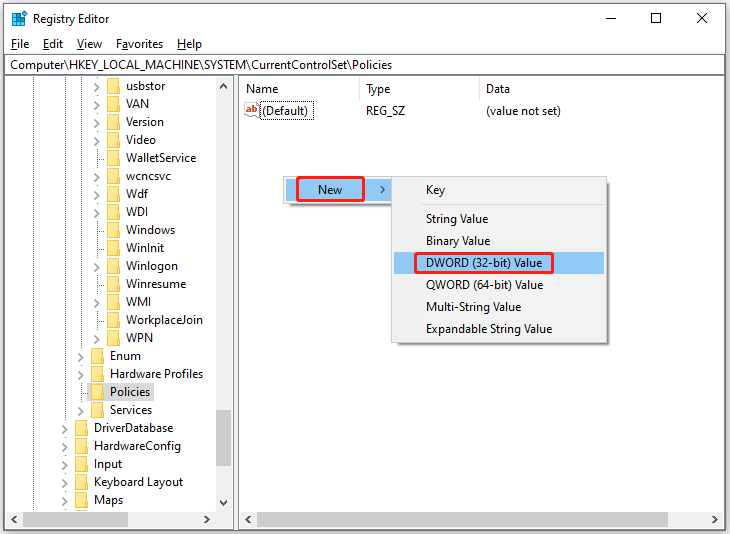
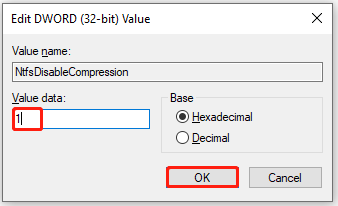
Step 4: Rename the value name as NtfsDisableCompression and double-click on it to edit its properties.
Step 5: Input 1 in the value data field and click OK to disable NTFS file compression. To enable NTFS file compression, input 0 and click OK.
Step 6: Exit Registry Editor and restart the PC.
Conclusion
This post has shown you 3 methods to enable or disable NTFS file compression on Windows 11/10 computers. You can follow the given instructions to complete the operation.
User Comments :