For some reason, you need to enable or disable Dev Drive Protection. Here comes the question: how to enable or disable Dev Drive protection on Windows 11. If you are unclear about it, refer to the methods offered by MiniTool Partition Wizard in this post.
As its name suggests, Dev Drive protection is created to protect the Dev Drive. It means that the Dev Drive will have antivirus support. This feature is available in Windows 11 Build 25931 and will be rolled out to the stable version soon. If you run this version of Windows 11, you can enable or disable Dev Drive protection.
In this post, you can learn two ways to enable or disable Dev Drive protection. And each of them has detailed steps.
#1: Enable or Disable Dev Protection via Windows Security
The following steps show you how to enable/disable Dev Drive protection via Windows Security.
Step 1: Open the Settings app by holding the Windows and I keys.
Step 2: Click Privacy & Security > Windows Security > Open Windows Security.
Step 3: Then click the Windows Security option.
Step 4: Find and enable Dev Drive protection.
Step 4: Eventually, click on the Exit button.
![How to Enable or Disable Resilient File System? [Full Guide]](https://images.minitool.com/partitionwizard.com/images/uploads/2023/09/enable-or-disable-resilient-file-system-thumbnail.jpg)
#2: Enable or Disable Dev Protection via Registry Editor
In addition to Windows Security, Registry Editor also allows you to enable or disable Dev Drive Protection. You’d better make a backup for your Registry. In case something goes wrong, you can restore it to make it work properly again. After that, follow these steps to disable or enable Dev Drive protection.
MiniTool Partition Wizard DemoClick to Download100%Clean & Safe
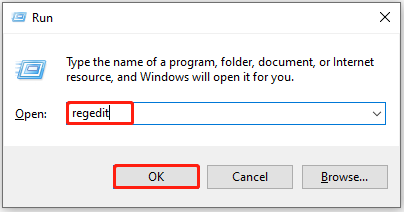
Step 1: Press the Windows and R keys to open the Run dialog window.
Step 2: Type regedit in the Run window and click OK.
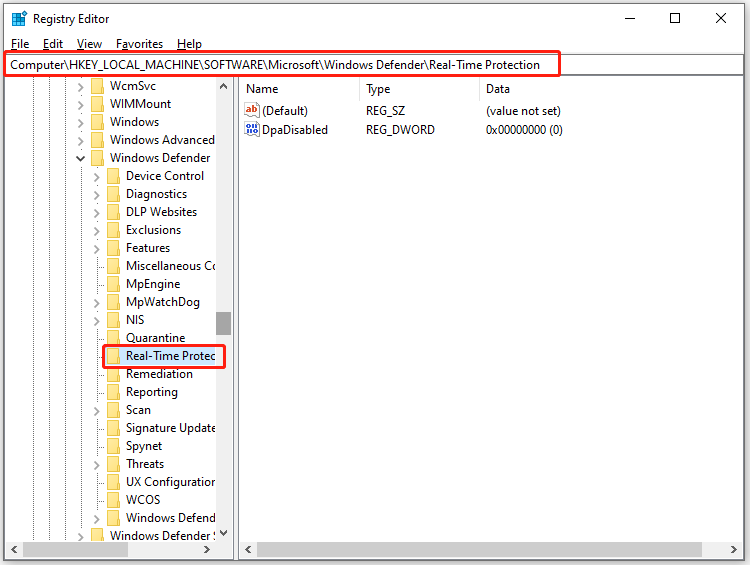
Step 3: Follow the path below to navigate to the destination.
Computer\HKEY_LOCAL_MACHINE\SOFTWARE\Microsoft\Windows Defender\Real-Time Protection
Step 4: Move to the right side of the window, right-click on the empty space, and then click New > DWORD (32-bit) Value.
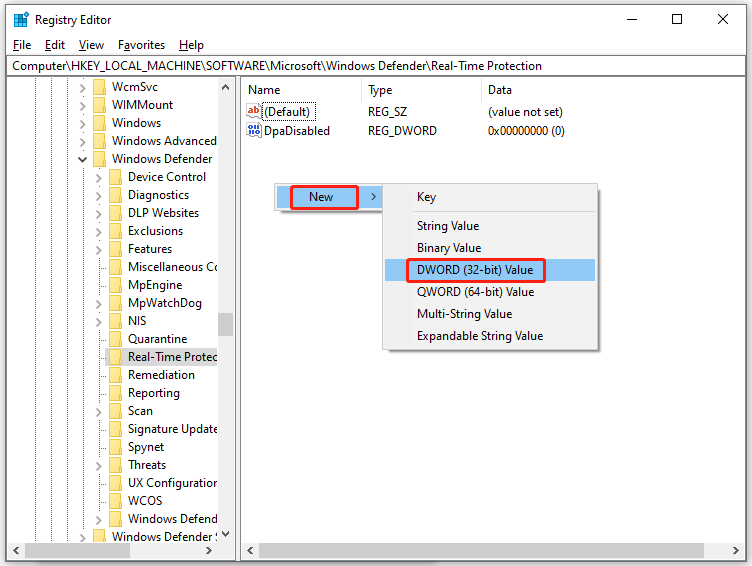
Step 5: Name the newly create DWORD value entry as DisableAsyncScanOnOpen. Then double-click on it and set the value data to 0 to enable Dev Drive protection. If you want to disable Dev Drive protection, set the value data to 1.
Step 6: Close Registry Editor and then restart your computer.
How to enable or disable Dev Drive protection? Well, this post provides you with 2 methods. Pick either one of them to enable or disable Dev Drive protection.
User Comments :