Have you heard of Dell Data Wipe? How to enable Dell Data Wipe SSD? In this article, Partition Magic will introduce a step-by-step guide to enable Dell Data Wipe SSD and an alternative to Dell Data Wipe.
About Dell Data Wipe
Dell Data Wipe is a feature in the Dell Enterprise Client BIOS that enables our customers to invoke data wipe of the internal storage devices in their systems. This enables efficient erasure for repurposing or redeployment using industry-standard data erasure capabilities already supported by Dell storage devices.
The Data Wipe feature in Dell BIOS is available on select Dell computer models such as Latitude, OptiPlex, Precision, XPS, Vostro, and Inspiron series. It allows users to securely wipe data by accessing the hard drive or SSD from the computer’s BIOS settings.
Erased SSD data cannot be recovered, so this is a useful feature for users who want to protect sensitive data or reconfigure their SSD.
- Only internal storage devices are supported: SATA hard drives, SSDs, and eMMC, depending on the device type supported by the system.
- Use industry standard approved data erasure methods such as Secure Erase for SATA and Sanitize for eMMC.
- Accessible only by physically existing users. The user must be physically present before drive erasure can begin.
How to Enable Dell Data Wipe SSD
In this part, I will explain the detailed steps on how to securely erase SSD data using Dell Data Wipe in BIOS.
Step 1: During system startup, press F2 at the Dell startup screen to boot into the system BIOS. Once in the BIOS, select the Maintenance option and then select the Data Wipe option in the left pane of the BIOS.
Step 2: Check the Wipe on next boot box in the right pane. Then it will generate a warning popup explaining what will happen and confirming that you want to proceed with the wipe operation.
Step 3: A new pop-up window will appear to finalize the data erasure operation. The default response to this popup is to cancel the process, click No if you want to proceed with the data erasure operation, and then click Exit to leave BIOS Setup.
Step 4: The system will now reboot and you will see the Dell Security Manager screen to finalize the data wipe operation. Select Continue > ERASE to continue the data erasure process.
Step 5: This process may take several hours depending on the number and size of SerialATA storage devices connected.
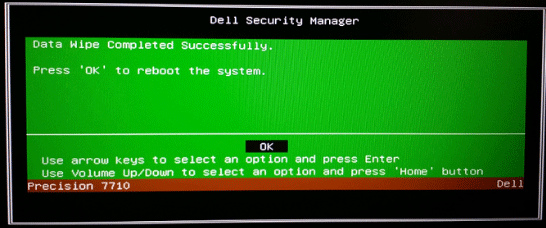
Step 6: The successful erasure process is reported with a green dialog box and a “Data erasure completed successfully” message. After restarting the system, the operating system will not be found and you will need to reinstall the operating system and all drivers and applications.

Recommendation: An Alternative to Dell Data Wipe
Apart from erasing all data on SSD using Dell Data Wipe utility, you can also try the best SSD erasure tool – MiniTool Partition Wizard to completely delete data on SSD and make them unrecoverable.
It is an all-in-one partition manager that boasts many powerful features such as resize partition, align partition, convert MBR to GPT, convert NTFS to FAT32 without data loss, migrate OS to SSD, etc.
With this powerful tool, you can wipe all the data on your hard drive permanently. It is very easy to operate just with a few clicks. Click on the following buttons to download this tool and install it on your computer.
MiniTool Partition Wizard FreeClick to Download100%Clean & Safe
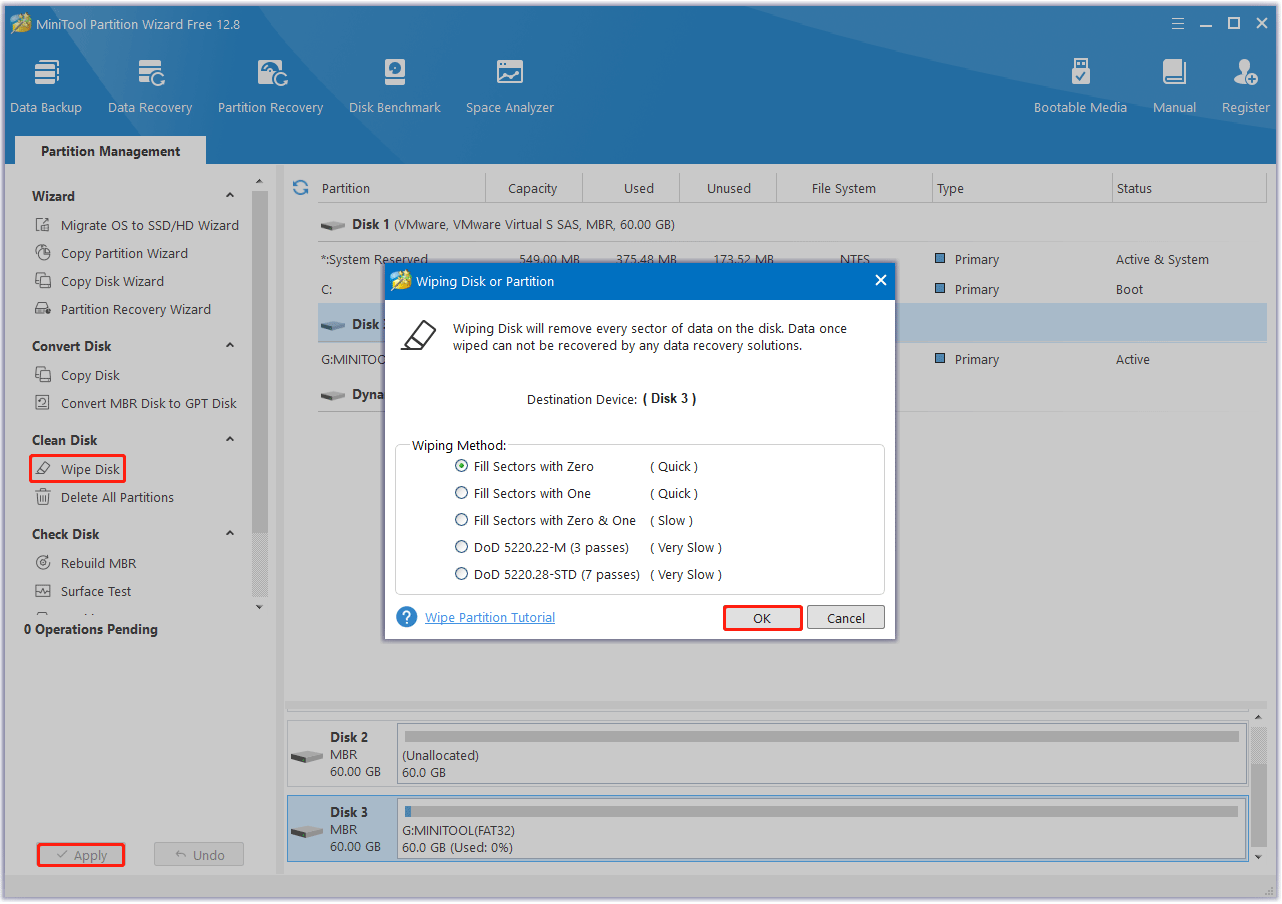
Step 1: Launch MiniTool Partition Wizard to get the main interface. Then select the disk that you want to wipe and choose Wipe Disk from the left action panel or from the right-click menu.
Step 2: Choose one of five wiping methods listed on the pop-up window and click OK. Different wiping methods cost different times and bring different security. To be specific, the more time it costs, the higher security you will.
Step 3: Click Apply to carry out the operation. Then the wiping process starts automatically and you just need to wait patiently until the process ends.

Bottom Line
Do you know how to enable Dell Data Wipe SSD? Now, I believe you have known how to do that. You can try the alternative if you think its steps complicated.


User Comments :