What Is the EA3 Audio Format?
EAC3, or Enhanced AC3, is a digital audio compression format created by Dolby Labs for storing and transmitting multi-channel audio. It serves as an upgraded version of Dolby Digital (AC-3), thus offering superior performance compared to the AC3 format in several areas.
However, some of the MX Player users report that they encounter the “EAC3 audio format not supported” error on their devices. If you are one of them, no worries. Continue reading, you can get a full guide about that.
What Causes EAC3 Audio Format Not Supported
What causes EAC3 audio format not supported in MX Player? After searching for the error on the Internet, I found that it is because MX player no longer supports DTS and Dolby audio codecs.
How to Fix EAC3 Audio Format Not Supported
How to fix EAC3 audio format not supported? In this section, I outline some useful ways to troubleshoot it. You can try the following methods one by one until you fix the error successfully.
Method 1. Add the Custom Codecs
If you encounter the EAC3 audio not supported error on your device, the first way you do is add the custom codecs to your MX Player or other players to fix the error. Here, I will show how to add the custom codecs to MX Player:
- Open your MX Player.
- Click the Settings on the main menu.
- Select Decoder, and scroll down to find the Custom Codec.
- Visit the MX Player website to download the EAC3 codec.
- Once downloaded, open MX Player again.
- Then, it will automatically detect the codec. If it’s compatible, click OK to complete the installation.
If MX Player is unable to detect the codec automatically, you can do as follows to add the custom codecs:
- Open MX Player, go to main menu > Settings.
- Select Custom Codec under the General section.
- Select the path where you downloaded the codec.
- Restart MX Player and then the codec may be detected successfully.
Method 2. Use VLC Media Player
VLC media player is a powerful player that can help you do conversion between different audio formats. So, you can try using it to convert EAC3 to other compatible audio format (like MP3, MP4) to fix the audio format EAC3 is not supported error. Here’s how to do that:
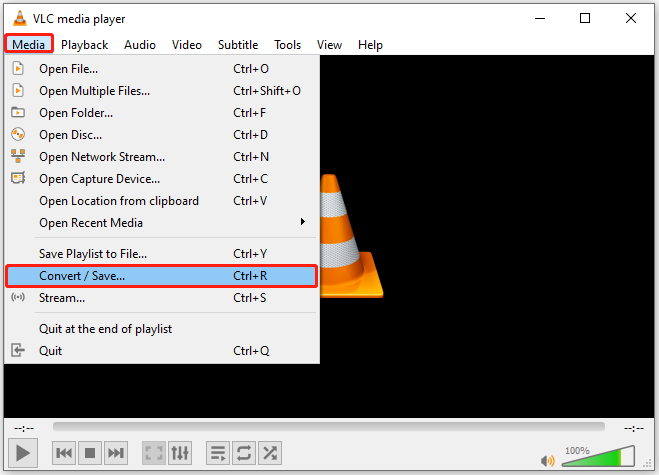
Step 1. Launch VLC media player on your computer.
Step 2. Click Media from the top toolbar, select Convert/Save from the drop-down menu.
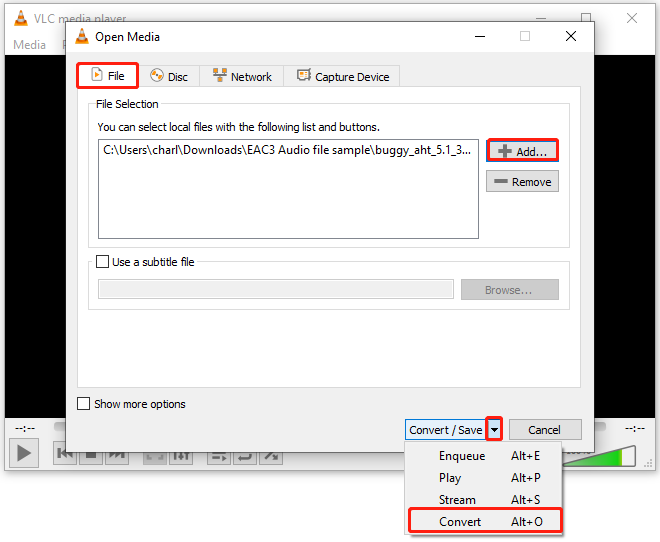
Step 3. In the pop-up window, click Add to select the EAC3 audio file that you want to convert. If you don’t see the EAC3 file in the pop-up window, you can click Media Files > All Files (*).
Step 4. Then, click the down arrow to open the drop-down menu, and then select Convert.
Step 5. Next, choose Video -H.264 + MP3 (MP4) from the drop-down menu, and click Browse to set the Destination file. Then, click Start to continue.
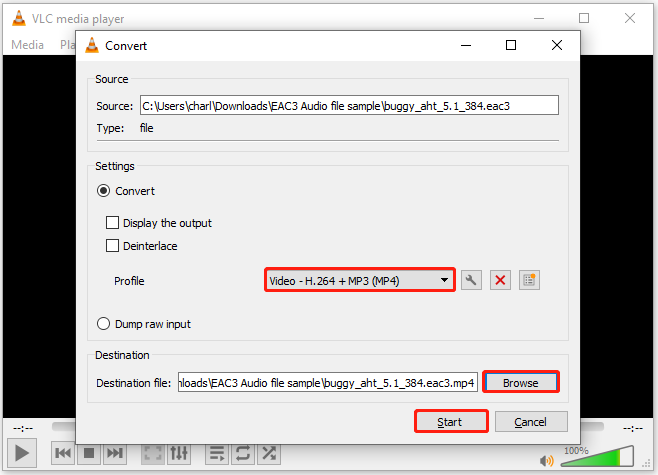
Step 6. Once done, the converted audio file will be saved. Then, you can play the converted audio file on MX Player or other players without the audio format EAC3 is not supported error.
Method 3. Convert EAC3 to MP3 or MP4 Format Online
There are various online EAC3 converters on the Internet, such as ezyZip, Convertall, etc. You can choose one that you are reliable to do the EAC3 to MP3/MP4 conversion. After using a reliable online EAC3 converter to do the conversion, you can play the converted audio files on MX Player or other players without encountering the EAC3 audio not supported error.
Method 4. Use an EAC3 Audio Format Supported Player
If you don’t like to use the above methods, you can also choose to uninstall the MX Player. Then, download and install an EAC3 format supported player.
Bonus Tip: How to Recover Lost or Deleted EAC3 Audio Files?
How to recover lost or deleted EAC3 audio files? If you accidentally delete the EAC3 audio files or lose some of the EAC3 audio files, you don’t need to worry. MiniTool Partition Wizard is a professional data recovery tool that offers the Data Recovery feature to help you recover your deleted or lost EAC3 audio files with ease. Here’s the guide:
MiniTool Partition Wizard DemoClick to Download100%Clean & Safe
- Download and install MiniTool Partition Wizard on your computer.
- Launch this app to enter the main interface.
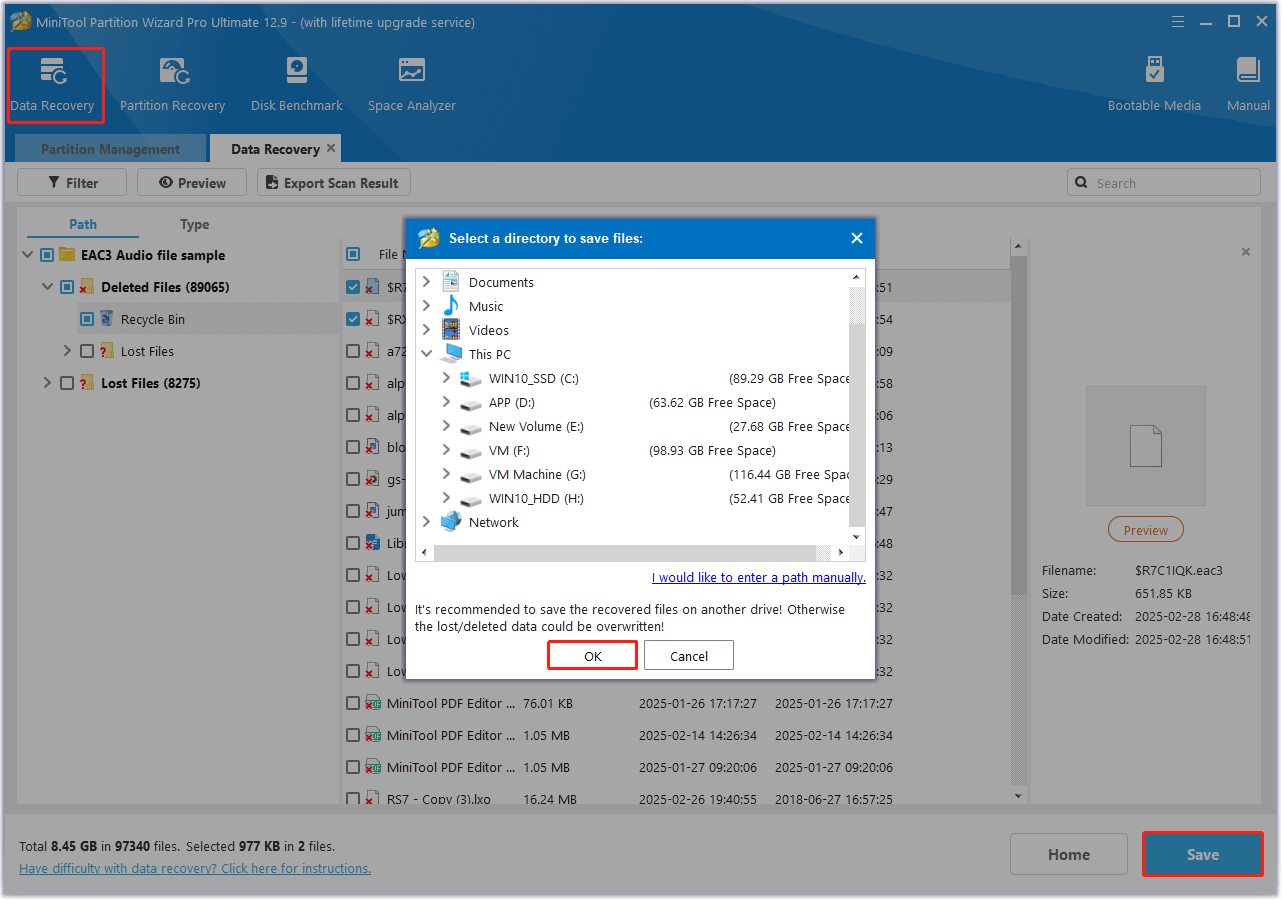
- Click the Data Recovery feature from the top toolbar.
- Move your cursor to Select Folder and click Browse.
- Choose the EAC3 audio file folder and click Select Folder.
- Wait for the scanning process to complete.
- Check all the files that you want to recover and click Save.
- Choose a safe location and click OK.
Wrapping Things Up
This is the end of the post. This post shows why the “EAC3 audio format not supported” error occurs and provides some useful ways to fix the error.
About The Author

Position: Columnist
Charlotte is a columnist who loves to help others solve errors in computer use. She is good at data recovery and disk & partition management, which includes copying partitions, formatting partitions, etc. Her articles are simple and easy to understand, so even people who know little about computers can understand. In her spare time, she likes reading books, listening to music, playing badminton, etc.
User Comments :