About Dual Boot on Raspberry Pi
Let’s first quickly review dual boot and why you need to dual boot your Raspberry Pi.
1. What is dual boot?
Dual boot means that you can use two different operating systems on the same computer.
On a computer, you can install Windows and Linux and choose which operating system to use when you boot your computer.
On a Raspberry Pi, you can use multi-boot because you can install many distributions on the Raspberry Pi (there are currently 3 or 4 Raspberry Pi OS versions). You can install multiple systems on the SD card and then choose which system to boot each time.
2. Why do you need to multi boot Raspberry Pi?
If you use your Raspberry Pi for different purposes, you may need to multi boot Raspberry Pi. You can install different systems on the SD card according to your needs.
3. What do you need to prepare to dual boot your Raspberry Pi?
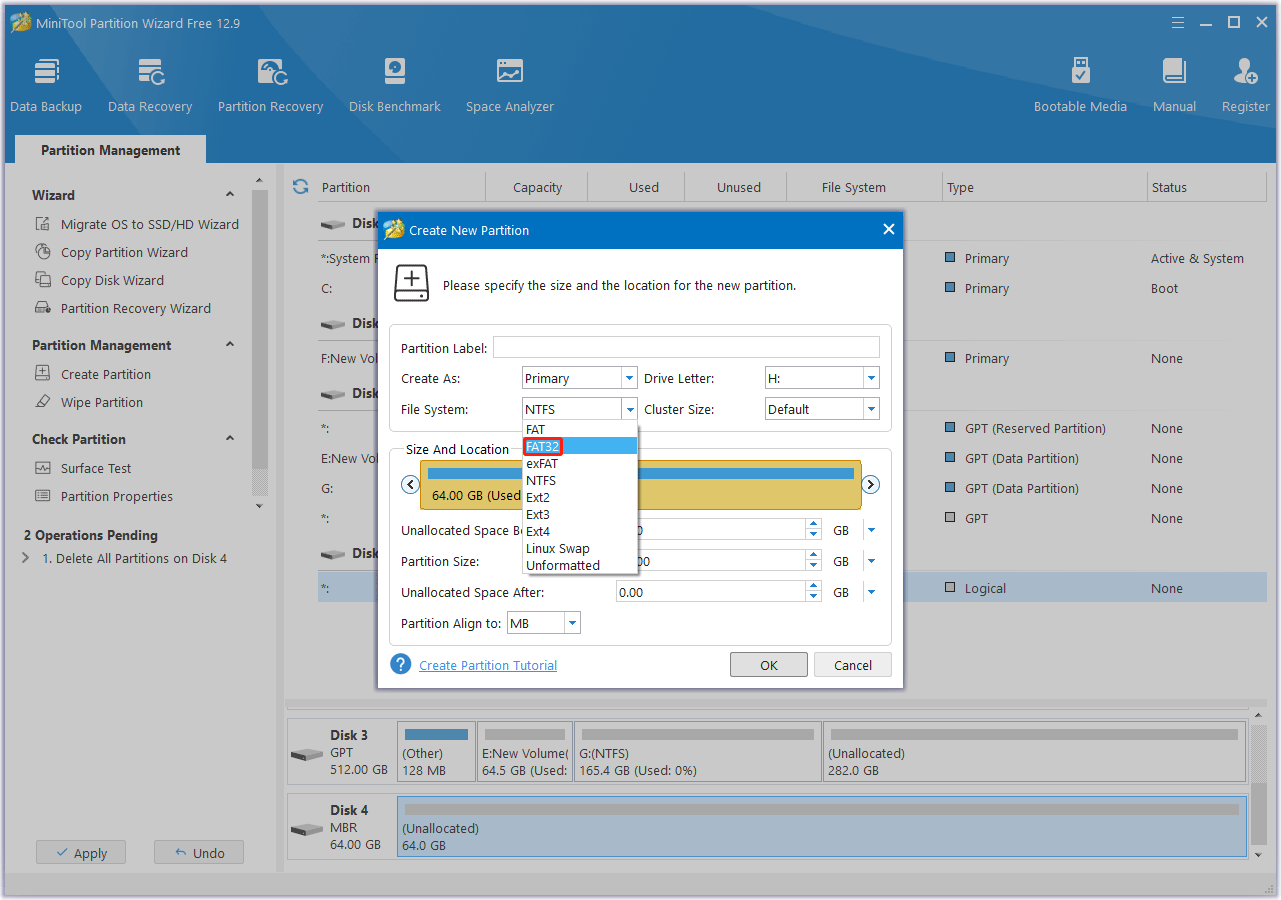
Before dual-booting your Raspberry Pi, prepare an empty 64G or larger FAT32 formatted SD card. If you’re already using it, especially if you’ve used PINN or another tool for multiboot, I recommend resetting your SD card. In this step, we’ll delete all partitions on the SD card and create a new partition using all the space.
In Windows, you can’t create or format partitions larger than 32GB to FAT32. For this, you can use the MiniTool Partition Wizard to break through the limitations, which allows you to create FAT32 partitions up to 2TB on Windows.
MiniTool Partition Wizard FreeClick to Download100%Clean & Safe
To reset your SD card using MiniTool Partition Wizard, you can follow the steps below.
- Launch MiniTool Partition Wizard to enter its main interface.
- Right-click the target SD card and select Delete All Partitions from the context menu. When a warning box appears, click Yes to continue.
- Now, you can preview that your SD card has one unallocated space. Right-click it and select Format.
- In the Format Partition window, set the File System to FAT32, and then click OK.
- Finally, click Apply in the bottom-left corner to execute the pending operation.
![How to Increase Raspberry Pi Storage [4 Ways]](https://images.minitool.com/partitionwizard.com/images/uploads/2023/01/raspberry-pi-storage-thumbnail.png)
How to Dual Boot Raspberry Pi?
PINN is currently the best choice for creating a Raspberry Pi dual boot. After copying the PINN files to the SD card, PINN will launch a wizard to let you choose the operating system you want to install on the same device. Once completed, you will get a boot menu to choose the system to boot after each reboot.
Here are the steps:
Step 1. Get PINN.
Get PINN Lite from https://sourceforge.net/projects/pinn/. If you choose offline mode, you need to increase the partition size of PINN to at least 3 GB.
Step 2. Put the PINN file on the SD card.
- Extract the archive to a new folder.
- Copy all the files in this folder to the SD card.
- Eject the SD card from your computer.
- Insert the SD card into your Raspberry Pi and start it.
Step 3. Configure WiFi connection.
On the first boot, PINN will ask you to configure the wireless connection:
- Click Close to close the error message.
- The WiFi network selection opens.
- Select your WiFi network in the list.
- Then enter your password.
- After a few seconds, you are connected.
Step 4. Install the system.
Now, to create a dual boot (or multi boot) on the SD card, check the box for each system you want to use.
- Raspberry Pi OS (Full, Lite, Standard)
- Twister OS
- Ubuntu or Ubuntu Mate
- Android (lineage)
- LibreElec
- Lakka
- Data Partition
- OSMC
- RISC OS
After selecting the system, click on the Install button in the top menu. The installation process begins. Wait for a few minutes/hours depending on your internet connection.
Step 5. Dual boot Raspberry Pi.
After the installation is complete, restart the Raspberry Pi. At first, you will see a menu asking you to select the operating system to boot.

Select the operating system in the list and confirm. This menu stays for 10 seconds and then boots the previously selected operating system. So, if you often use the same operating system, you don’t have to choose it every time you boot.
Bottom Line
How to dual boot Raspberry Pi? This post offers a step-by-step guide for you. You can have a try.
About The Author

Position: Columnist
Vega joined MiniTool as an editor after graduation. She enjoys helping people with computer problems, including disk management, data recovery, and more. She is constantly expanding her knowledge in related fields. And she will continue to bring more easy-to-understand professional articles to help people solve various problems on the PC. In her daily life, Vega enjoys hanging out with friends, shopping online and listening to music. She is someone who knows how to enjoy life.
User Comments :