If you want to do Dish Hopper external hard drive format, you come to the right place. In this article, MiniTool Partition Wizard not only tells you which format is suitable for Dish Hopper external hard drive but also introduces how to format Dish Hopper external hard drive.
Dish Hopper is the best whole-home DVR and cable/satellite receiver experience anyone has ever experienced. You can use a DVR external hard drive with Dish Hopper to share or store your recordings.
However, there are situations where you may wish to format your Dish Hopper hard drive. This includes when trying to improve security, change drive functionality, or install new file formats.
So, which format is the best external hard drive for Hopper? How to format it? Please keep reading.
Which Is Suitable for Dish Hopper External Hard Drive Format
Looking for the best file system format for your Dish Hopper external hard drive? The Dish Hopper can be formatted as FAT32, exFAT, NTFS, Ext2/3/4.
While ext3 is as good as NTFS at supporting large files and has better hard drive speeds, it is better suited to Linux. If it’s a Windows-based storage device, NTFS is your best choice.
exFAT is superior for portable storage devices because of its increased efficiency in managing power and memory. You can also use the same storage device on Windows and macOS. Additionally, the reason for using the FAT32 format is to access files in older operating systems.
Ultimately, it depends on your preference for the file system you want to format your Dish Hopper external hard drive with.
How to Format Dish Hopper External Hard Drive
MiniTool Partition Wizard is professional free disk partition software that offers a wide range of features related to disk/partition management. It breaks the limitation of Windows built-in tools and allows users to easily format the external hard drive into NTFS, FAT32, exFAT, and other formats.
Besides, this partition software can help you upgrade to a larger hard drive without reinstalling the OS, back up data to keep your data safe, check disk health, and more.
Here are the steps to format the external drive with MiniTool Partition Wizard. First of all, you need to download and install it on your PC
MiniTool Partition Wizard FreeClick to Download100%Clean & Safe
Step 1: Connect the external hard drive to the Windows PC. Then launch it to get its main interface.
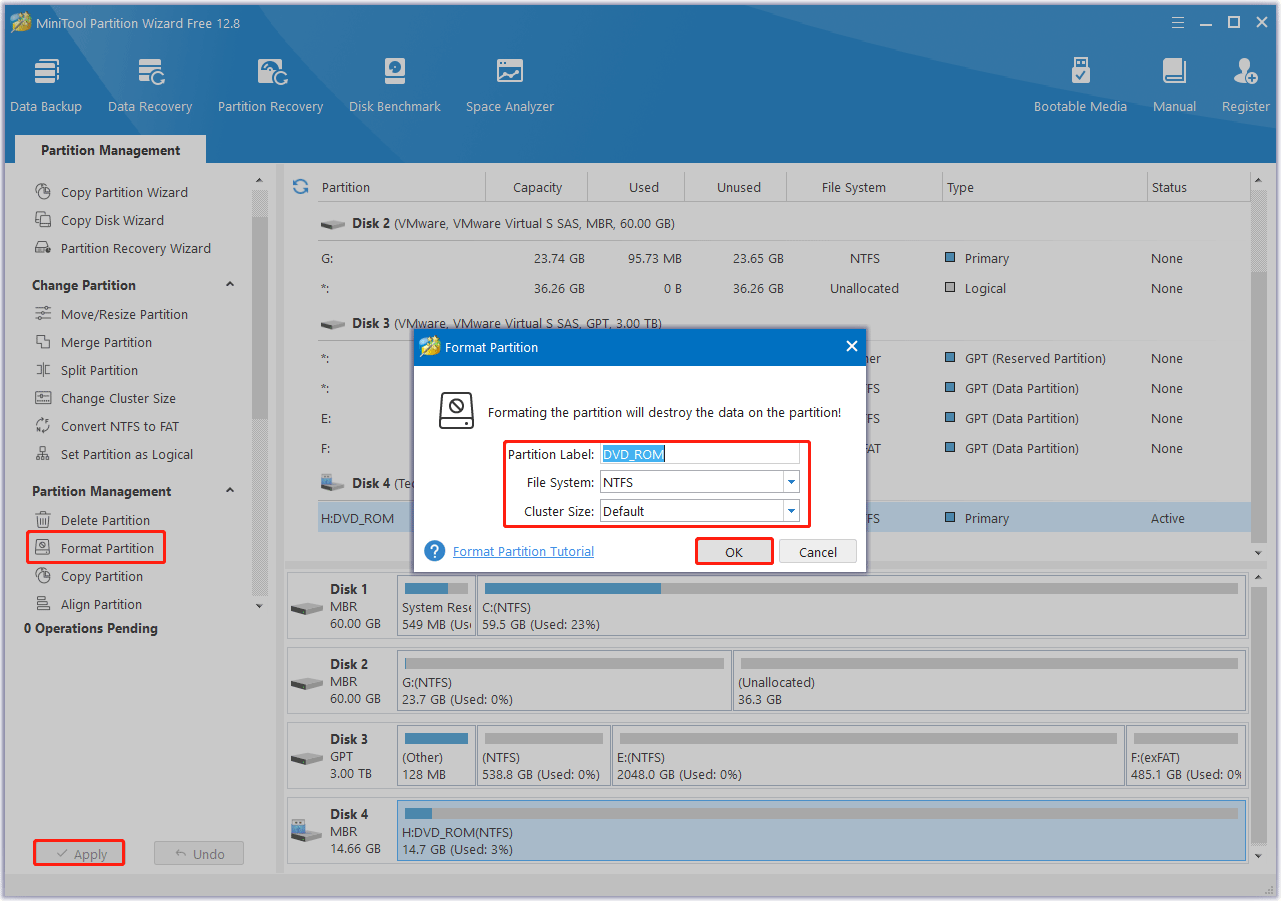
Step 2: Select the partition you want to format and choose Format Partition from the left action panel.
Step 3: Then set the Partition Label, File System, and Cluster Size. Then click on OK to continue.
Step 4: Click on Apply to confirm the changes.

Ways to Dish Hopper Not Recognizing External Hard Drive
Although Dish Hopper works perfectly, sometimes you may encounter the Dish Hopper not recognizing external hard drive problem. Here is how to solve the problem.
#1. Check compatibility
First, you need to check its external hard drive compatibility requirements. The best way to resolve this issue is to visit the Dish website.
#2. Restart the hard disk video recorder
If you’ve used this drive on your DVR before and for some reason can’t get it to work, there’s no need to worry as this can be fixed easily. All you need to do is restart the DVR using the remote control or the power button, which will help you resolve the issue in no time.
After restarting the DVR, you can try to access the external hard drive that encountered the error again and it will work normally.
#3. Check cables and hard drive
Now, the hard drive might be corrupted or there might be some problem with the connecting cable that connects the external hard drive to the DVR box. To fix this issue, you need to check if they are all working properly.
Bottom Line
That’s all about the Dish Hopper external hard drive format guide. This post also provides several ways to fix the Dish Hopper not recognizing external hard drive problem.

![Why Is Toshiba SSD Slow Write Speed & How to Fix It? [Full Guide]](https://images.minitool.com/partitionwizard.com/images/uploads/2023/09/toshiba-ssd-slow-write-speed-thumbnail.png)


User Comments :