Dell XPS 8930 SSD Upgrade
The Dell XPS 8930 desktop is one of the top mid-range general-purpose desktop computers preferred by users. It has a compact form factor and decent gaming performance. The Dell XPS 8930 desktop features an Intel I7 quad-core processor and high-performance graphics to power you through everything from photo/video editing to gaming.
After using your Dell XPS 8930 computer for a period of time, you may find that the internal SSD is filled with files and folders, causing poor computer performance. Sometimes, hard drives can get corrupted, which can put data at risk.
For faster speeds, more storage, and data security, you can choose to replace your Dell XPS 8930’s original hard drive with a new SSD. So, how to perform the Dell XPS 8930 SSD upgrade? The following guide may be helpful to you.
How to Run Dell XPS 8930 SSD Upgrade
Before You Do
- Choose an SSD compatible with the Dell XPS 8930. Supports M.2 NVMe SSD and 2.5-inch SATA SSD.
- If your laptop only has one drive bay, prepare a SATA to USB cable to connect the SSD to your PC.
- Prepare a suitable screwdriver, open the computer case, take out the original hard drive, and replace it.
After making these preparations, start the Dell XPS desktop SSD upgrade. Just find the details in the sections below.
How to Upgrade Dell XPS 8930 SSD
Before you replace your PC’s original disk with an SSD, you need to transfer everything from the old disk to the new SSD. For this, you can use MiniTool Partition Wizard, a powerful and reliable hard drive cloning software and partition manager. By the way, you can also use this tool to get storage analysis.
MiniTool Partition Wizard DemoClick to Download100%Clean & Safe
Step 1: Download and install MiniTool Partition Wizard on your PC. Then launch it to its main interface.
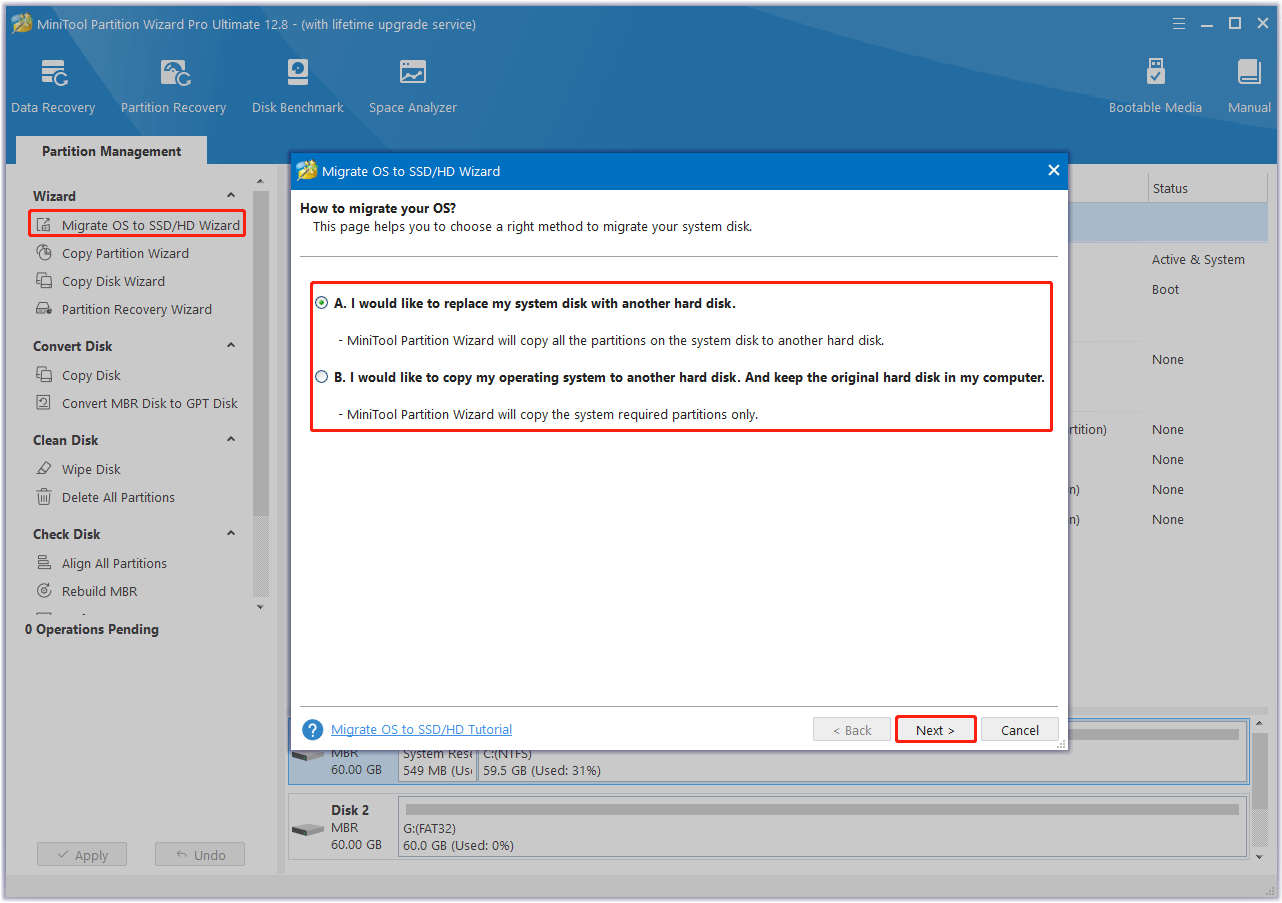
Step 2: Choose Migrate OS to SSD/HD Wizard from the left action panel.
Step 3: Choose a method to migrate the disk. To clone the whole system disk to the new SSD, choose option A; to migrate the system required partitions only, choose option B.

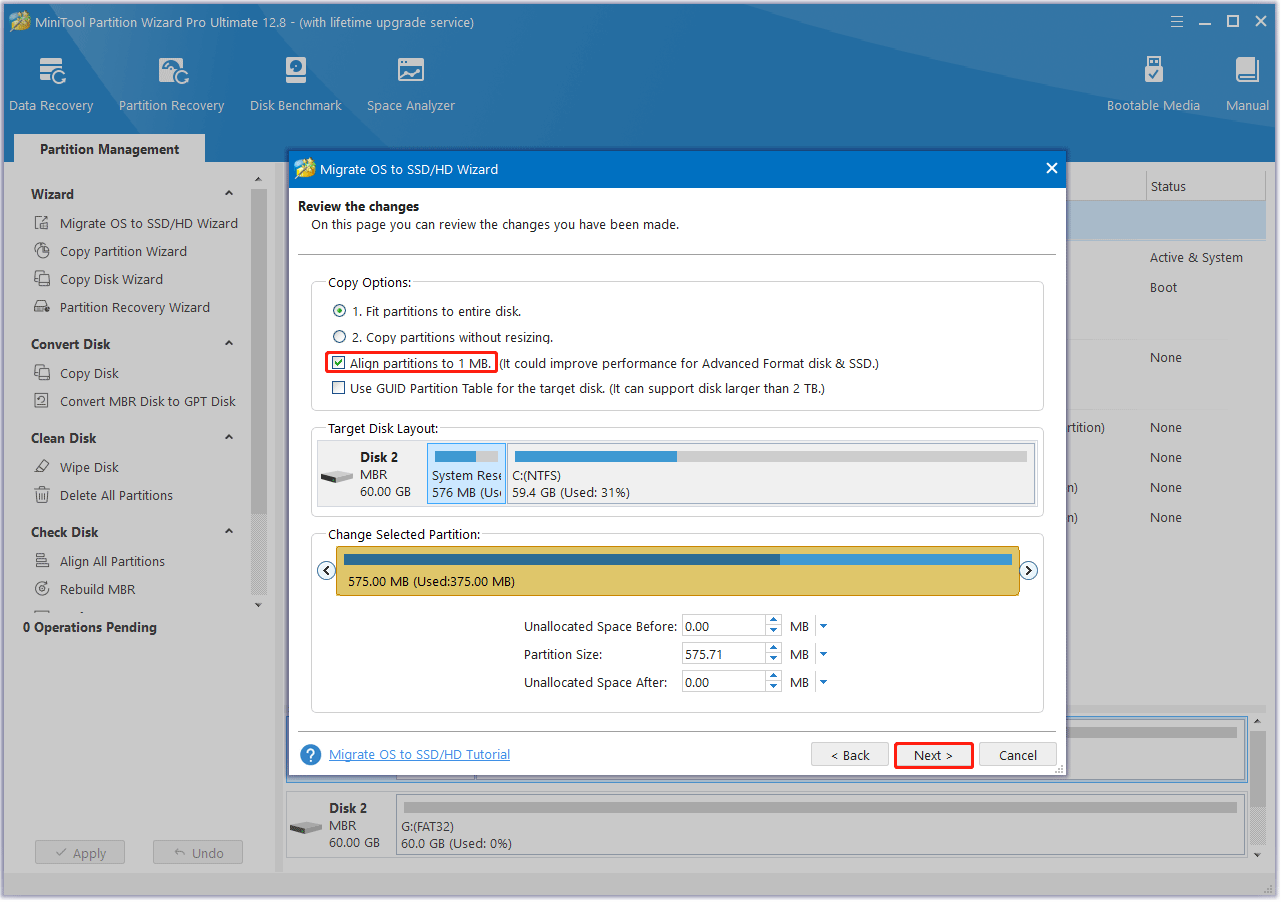
Step 4: Select the larger SSD as the destination disk and click on Next. Choose the copy options and configure the disk layout to change the default settings according to your needs. We recommended that you check the Align partitions to 1MB option to improve your SSD performance. Then click on Next.

Step 5: Read the note about how to boot from the new SSD and click on the Finish button. When you go back to the main interface, click on the Apply button to start the cloning process.
The cloning process will take some time and please wait patiently during the cloning process.
Related post: How to Clone a Hard Drive to SSD in Windows 11/10/8/7?
After completing the clone, you can shut down your Dell XPS 8930 PC, use the screwdriver to open the cover of your computer to remove the original hard drive, and then install the SSD in the original place.
If you don’t know how to install SSD to your PC, refer to this post – How to Install SSD in PC? A Detailed Guide Is Here for You!
Bottom Line
That’s the guide on the Dell XPS 8930 SSD upgrade. If you need to perform Dell XPS hard drive replacement, follow the instructions above. If you have any other ideas on this topic, leave a comment below.


User Comments :