As we all know, Clonezilla is a popular disk clone and backup utility that can help clone hard disks, back up and restore systems, etc. The tool supports a range of file systems and can be used on different platforms, including Windows, macOS, Linux, and ChromeOS.
However, people also encounter various issues when using the clone software, such as “Clonezilla fails with mismatched MBR and GPT”, “Clonezilla target disk is too small”, and Clonezilla unable to find NVMe drive. Here’s a true example from the Reddit forum:
Clonezilla unable to find NVMe drive? The laptop has Windows shipped on its disk, I want to clone that before overwriting it with Linux(which may not work as reliably due to the Comet Lake hardware, live distros often lack a new enough kernel to verify everything is working fine). However, it can't seem to identify the internal disk, detecting the external USB NTFS drive for the backup target is fine.https://www.reddit.com/r/linuxquestions/comments/eqa7vb/clonezilla_unable_to_find_laptop_nvme_drive/
Why Is Clonezilla Unable to Find NVMe Drive
What causes the Clonezilla NVMe not detected issue? According to user reports, the problem is mainly related to improper BIOS configuration. If your BIOS can’t detect the NVMe drive, Clonezilla won’t detect it. Besides, some factors like outdated device drivers, SATA mode in BIOS, and a temporary glitch can also lead to the NVMe drive not detecting Clonezilla.
How to Fix Clonezilla NVMe Drive Not Detected on Windows 10/11
How to fix Clonezilla unable to detect NVMe drive on Windows 10/11? Before we head to other slightly tricky solutions, make sure you are using the latest version of Clonezilla and back up all important data to avoid data loss or corruption.
# 1. Enable NVMe in BIOS
As discussed above, the main reason behind Clonezilla unable to detect NVMe drive is that your NVMe SSD is not detected by your BIOS. So, you should check if the NVMe drive is enabled in BIOS. Here we take the MSI BIOS for example.
Step 1. Disconnect all external storage devices and ensure the NVMe drive is installed on your PC correctly.
Step 2. Start up your computer and immediately press the F2 or Delete key when the first log screen appears. Then you will enter BIOS.
Step 3. In the BIOS setup menu, go to the Advanced tab, and select Storage Configuration or Storage > NVMe Configuration or NVMe RAID Configuration using the arrow keys.
Step 4. Highlight the NVMe drive and set its status to Enabled. Then press F10 and Enter keys to save changes and exit BIOS.
Once done, you can try cloning the SSD again and see if the Clonezilla not detecting NVMe drive problem gets solved.
# 2. Set the SATA Mode to AHCI
Many users from the Reddit forum reported that the Clonezilla NVMe drive not detected issue can be solved by setting the SATA mode to AHCI in BIOS. If this scenario also applies to you, you can try it. Here, you can refer to this post to enable the AHCI mode.
# 3. Update the Device Driver
Sometimes outdated device drivers like disk driver, chipset driver, and even controller driver can trigger the NVMe drive not detecting Clonezilla issue on Windows 10/11. So, we recommend you update all relevant drivers to the latest version.
Step 1. Press Win + X to open the context menu and select Device Manager.
Step 2. Expand the Disk drives category, and then right-click the SSD driver and select Update driver.
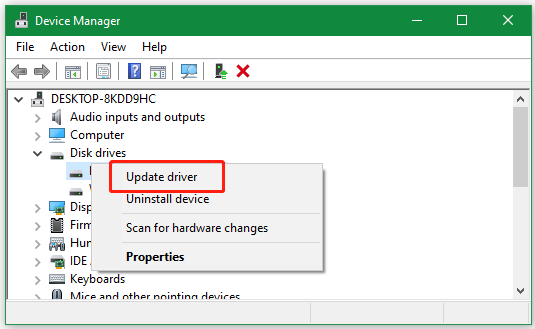
Step 3. Select the Search automatically for drivers option and follow the on-screen prompt to complete the update. Then you can repeat the same procedure to update other device drivers.
Alternatively, you can visit the official website of the NVMe SSD driver, download the latest driver, and install it manually on the computer.
# 4. Use an NVMe-to-USB Adapter
In addition, some users found that the Clonezilla not detecting NVMe drive issue can be fixed by using an NVMe-to-USB adapter if available. To do this work, you can connect the NVMe drive to a USB port using the adapter, and run the clone software to check if it can detect the drive via the connection.
# 5. Use an Alternative to Clonezilla
If none of the above solutions can fix Clonezilla unable to detect NVMe drive problem, you may consider using an alternative to Clonezilla. MiniTool Partition Wizard is also a powerful disk cloning and backup program that can clone a hard drive, migrate Windows OS to SSD, and copy partitions. With this tool, you can clone an NVMe SSD to an even smaller one without reinstalling OS. Moreover, it’s a multifunctional partition manager that can extend/resize/shrink/merge partitions, convert FAT32 to NTFS, change cluster size, check disk health, and so on.
MiniTool Partition Wizard DemoClick to Download100%Clean & Safe

Here comes the end of this post. You can apply one of them to resolve the Clonezilla NVMe not detected issue. If you have any other fixes to the problem, leave them in the following comment area.
About The Author

Position: Columnist
Ariel has been working as a highly professional computer-relevant technology editor at MiniTool for many years. She has a strong passion for researching all knowledge related to the computer's disk, partition, and Windows OS. Up till now, she has finished thousands of articles covering a broad range of topics and helped lots of users fix various problems. She focuses on the fields of disk management, OS backup, and PDF editing and provides her readers with insightful and informative content.
User Comments :