If the bottom of the laptop screen is black, it would be inconvenient to perform some operations. Fortunately, you can get rid of the laptop bottom black screen by taking some actions. Here, MiniTool Partition Wizard provides you with 4 fixes for the issue.
To avoid data loss due to unexpected errors, you’d better clone your hard drive periodically by using MiniTool Partition Wizard. Additionally, this free partition manager can also help you partition hard drives, migrate Windows 10, convert MBR to GPT, change cluster size, check disk space usage, recover data from hard drives with bad sectors, etc.
MiniTool Partition Wizard DemoClick to Download100%Clean & Safe
Now, apply the given methods in the post to fix the “laptop bottom black screen” issue.
Fix 1: Lower the Refresh Rate
According to user reports, the bottom of the laptop screen is black after they set a high refresh rate or resolution. So, you should lower the refresh rate when this issue occurs.
Step 1: Hold the Windows and I keys to open the Settings app.
Step 2: Click on System > Display > Advanced display settings.
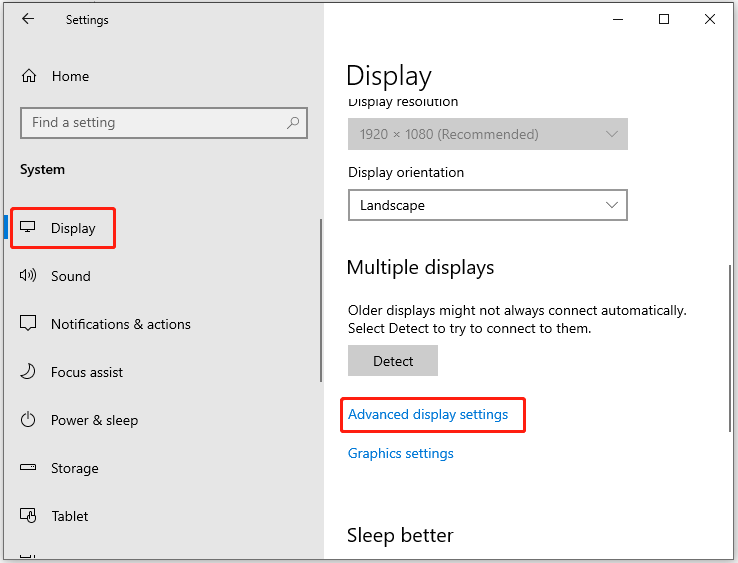
Step 3: Then click Display adapter properties for Display 1.
Step 4: In the Properties window, navigate to the Monitor tab. Then choose 60Hz or a lower screen refresh rate from the drop-down menu and click OK to save changes.
Fix 2: Change the Display Resolution and Scale
A misconfigured display resolution can cause a laptop bottom black screen. When the bottom of the laptop screen is black, you can configure the display settings for Windows to fix the issue.
Step 1: Open the Settings app on your computer.
Step 2: In the Settings window, click System > Display.
Step 3: On the right side of the window, click the down arrow icon next to Display resolution to open the drop-down menu. You’d better choose the Recommended resolution from the menu.
Step 4: Choose 100% or 125% from the Scale menu.
Also read: How to Fix Brown Screen of Death on Windows 10/11? Solved
Fix 3: Perform an SFC Scan
Corrupted system files are also responsible for the laptop bottom black screen issue. If the bottom of the laptop screen is black, run SFC to detect and fix corrupted system files. To do that, follow the steps below.
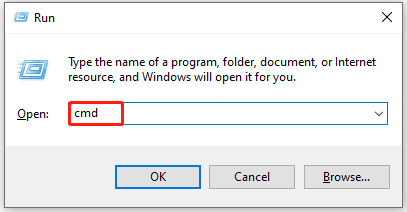
Step 1: Press the Windows and R keys to open the Run dialog window.
Step 2: Type cmd in the opened window and press Ctrl + Shift + Enter keys to run Command Prompt as administrator.
Step 3: Type sfc /scannow and hit Enter to execute the operation.
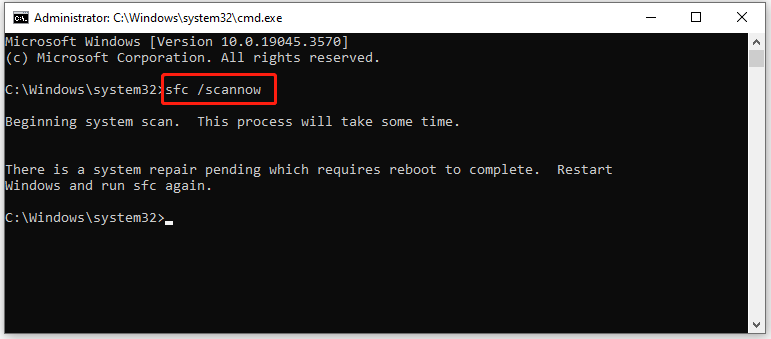
Step 4: Wait for the finish of the operation.
If SFC fails to work, try using DISM commands. After you run Command Prompt as administrator, type the commands below and hit Enter after each to carry out the operation.
- DISM /Online /Cleanup-Image /CheckHealth
- DISM /Online /Cleanup-Image /ScanHealth
- DISM /Online /Cleanup-Image /RestoreHealth
Fix 4: Update/Reinstall the Graphics Driver
When bottom laptop screen is black, try updating or reinstalling the graphics driver to troubleshoot the issue. Here are the detailed steps.
Step 1: Press the Windows and X keys to open the quick menu and then click the Device Manager option to continue.
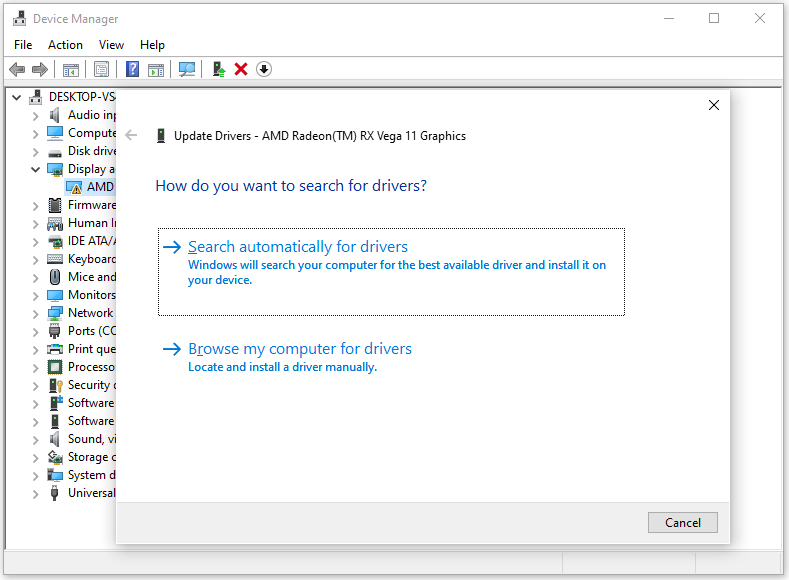
Step 2: Expand Display adapters, right-click on your graphics driver, and then choose Update driver.
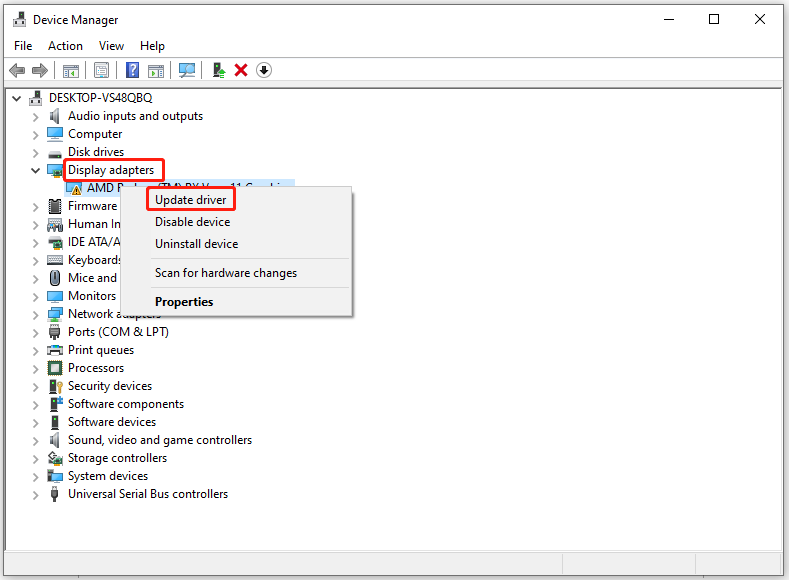
Step 3: In the next window, choose Search automatically for drivers and follow the on-screen instructions to finish the process. If you want to update the driver manually, select Browse my computer for drivers instead.
Related articles:

![Blue Screen When Playing Games on PC [5 Solutions]](https://images.minitool.com/partitionwizard.com/images/uploads/2023/11/blue-screen-when-playing-games-on-pc-thumbnail.jpg)
User Comments :