If you get a blue screen after installing new CPU or GPU, pay attention to this post in which Partition Magic offers you several troubleshooting methods. You can try them to troubleshoot the blue screen after GPU/CPU upgrade.
Blue screen is a common error on Windows 10/11 computers that can occur in various cases. Some frequently encountered BSOD cases are summarized as follows:
Laptop blue screen when unplugged
USB tethering causes blue screen
Blue screen when playing games on PC
Blue screen after installing drivers
Some SSDs are causing blue screen
Windows 11 blue screen when idle
If you receive a blue screen after installing new CPU or GPU, please take a look at this post because it walks you through the troubleshooting process.
MiniTool ShadowMaker TrialClick to Download100%Clean & Safe
MiniTool Partition Wizard DemoClick to Download100%Clean & Safe
Solution 1: Check If the CPU or GPU Is Compatible with Motherboard
Hardware incompatibility is the main cause of the blue screen after installing new CPU or GPU. You should check if the CPU or GPU is compatible with the motherboard once the issue occurs. To check if a graphical card (GPU) is compatible with the motherboard, you can refer to this guide.
To check if the CPU is compatible with the motherboard, you should consider these factors: socket type, chipset compatibility, and BIOS support. To be specific, the CPU and motherboard must have matching socket types to physically fit and connect.
The chipset of the motherboard decides which CPUs are supported. Besides, different chipsets offer different levels of support for CPU features. To recognize and initialize the CPU during the boot process, the motherboard’s BIOS should be compatible with the CPU.
Solution 2: Check If Any Pins of the CPU Are Bent
You may get a BSOD after GPU upgrade if any pins of the CPU are bent during the installation process. So, you’d better check that when the issue occurs. To do that, you need to turn off the computer and open the computer case. After you find any bent CPU pins, fix them immediately.
Solution 3: Check CPU and GPU Temperature
An overheating CPU or GPU is also responsible for the blue screen error. When you receive a blue screen after a new processor, check if the temperature of the CPU or GPU is too high. You can monitor the CPU and GPU temperature by using Windows built-in utilities or third-party tools.
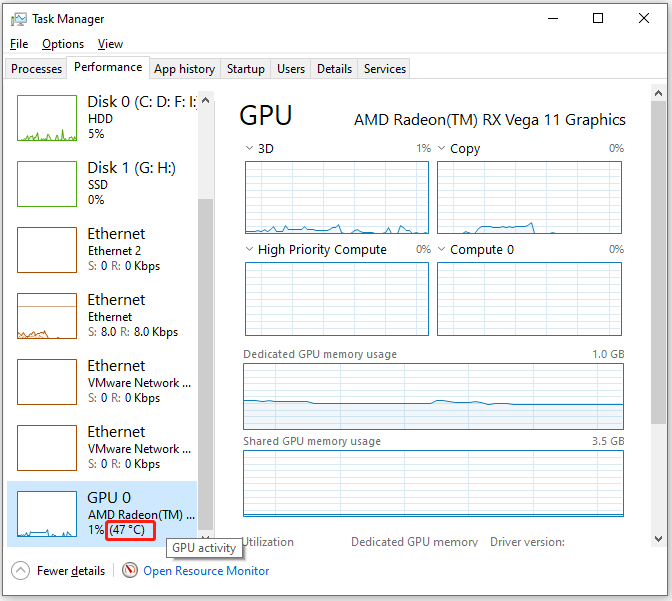
The Task Manager helps you check GPU temperature, while BIOS settings display the CPU temperature. To find the temperature of GPU via Task Manager, follow these instructions.
- Right-click the Windows icon to open the Start menu.
- Click on Task Manager.
- Navigate to the Performance tab in the Task Manager window.
- Scroll down the content in the left panel to locate the GPU. The temperature displays next to the GPU option.
Once you find that the CPU or GPU is overheating, you need to take some measures to lower the temperature like under-volting the GPU, disabling overclocking, etc.

Solution 4: Clear CMOS
Generally speaking, you need to reset the BIOS settings to the default after installing a CPU or GPU. Alternatively, you can also clear CMOS to reset the BIOS settings to the default values. Otherwise, you may encounter a blue screen after installing new CPU or GPU.
Here are the steps for clearing CMOS.
Step 1: Switch off the computer and unplug the power cable. By doing so, you can avoid electric shock.
Step 2: Locate the CMOS battery on the motherboard. The CMOS battery is a small coin-shaped battery.
Step 3: Remove it and wait for a few minutes.
Step 4: Then reinstall the battery properly.
Step 5: Switch on the computer and see if the blue screen disappears.
Solution 5: Update BIOS and Chipset Drivers
You should also update BIOS firmware to the latest version and install the latest version of the chipset driver after installing new hardware such as CPU, GPU, etc. Otherwise, you will receive a blue screen after installing new CPU or GPU.
You can download them from the official website of the PC’s manufacturer.
Step 1: Enter the safe mode with the instructions above. In this scenario, press F5 to enable safe mode with networking.
Step 2: Download the latest version of BIOS and chipset driver from the official website.
Step 3: Install the downloaded item manually.
Related articles:
Solution 6: Clean Install the Graphics Card Driver
You need to uninstall the currently installed graphics card driver before installing the new graphics card. Otherwise, issues like blue screen of death after GPU upgrade may occur. To solve the issue, you can clean install the graphics card driver.
Step 1: Enter safe mode with networking.
Step 2: Download the latest version of the graphics card driver from the official website of the GPU’s manufacturer.
Step 3: Download and install Display Driver Utility (DDU) on your PC.
Step 4: Launch DDU and use it to remove the graphics card driver completely.
Step 5: Run the installer file and follow the prompted instructions to install the latest version of the graphics card driver.
Also read: How to Fix Brown Screen of Death on Windows 10/11? Solved
Conclusion
This post collects 6 solutions to blue screen after installing new CPU or GPU. If you get a BSOD after GPU upgrade, try the offered methods in this post to fix it.
About The Author

Position: Columnist
Having writing articles about computer tech for a long time, I am rather experienced especially on the aspect of computer optimization, PC enhancement, as well as tech terms explanation. The habit of looking through tech forums makes me a great computer issues collector. And then, many articles related to these issues are released, which benefit plenty of users. Professional, effective, and innovative are always the pursuit of an editing worker.
User Comments :