Are you bothered by the black and white squares on the computer screen? If so, this post is worth reading. Here, MiniTool Partition Wizard offers you some tips and methods to get rid of black and white squares on the computer screen Windows 11.
Do Some Checks Before Troubleshooting the Issue
It’s recommended to perform some checks before you take action to get rid of black and white squares on the computer screen Windows 11. There are some checks you can conduct.
- Check if black and white squares on the computer screen Windows 11 disappears after a restart.
- Try a different monitor or laptop screen.
- Disable overclocking
- Check if cables connected to your laptop screen are loose or physically damaged.
- Check if the system panel is hot. If it’s overheating, shut down the PC and wait for some time to cool it down.
- Since accumulated dust could cause black and white squares on the computer screen, try cleaning the CPU panel of your desktop.
- Make sure that there’s no pending Windows Update.
- Try running a benchmark tool.
- Close the unnecessary programs & processes.
- Check if the video card is seated correctly.
- Run a malware scan.
- Press the Windows + Ctrl + Shift + B keys on the keyboard to reset the graphics driver.
Way 1: Run Hardware and Devices Troubleshooter
Step 1: Right-click on the Windows icon to open the Start menu.
Step 2: Click Windows PowerShell (Admin) on the menu.
Step 3: In the prompted window, type the command below and hit Enter.
msdt.exe -id DeviceDiagnostic
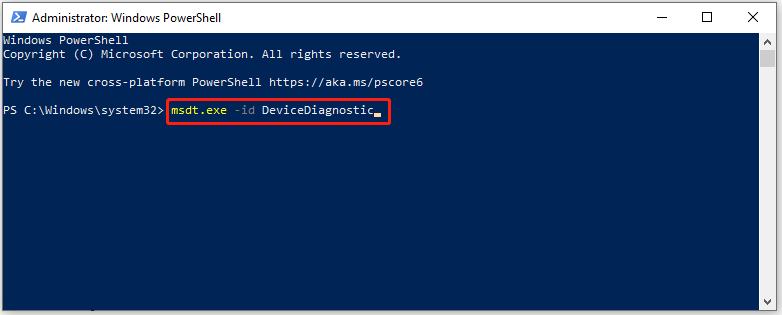
Step 4: Tap on the Advanced button in the elevated window.
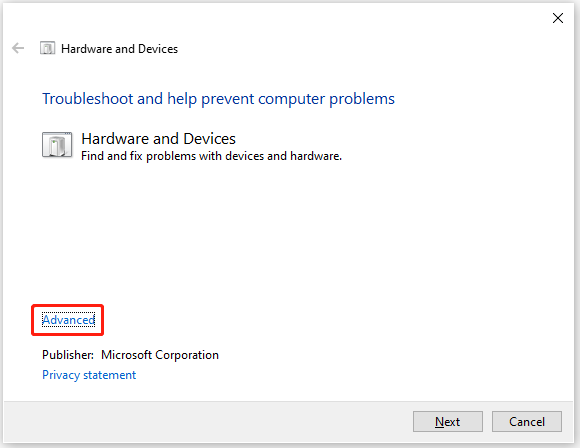
Step 5: Tick the Apply repairs automatically box and click Next.
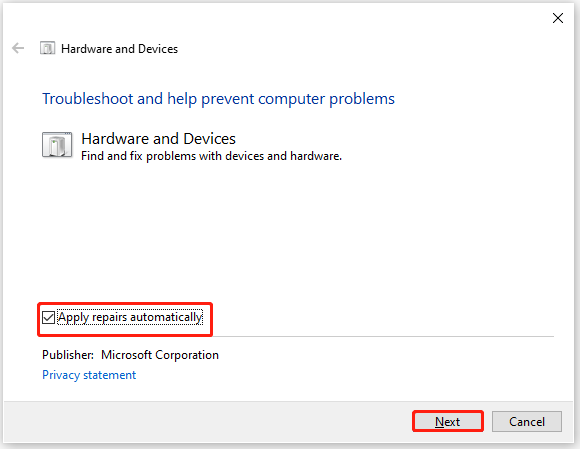
Step 6: Follow the on-screen instructions to finish the process.
Way 2: Update the Graphics Driver
You may see black and white squares on the computer screen due to outdated graphics drivers. If so, simply update the graphics driver with the steps below.
Step 1: Open the Run window, type devmgmt.msc, and hit Enter.
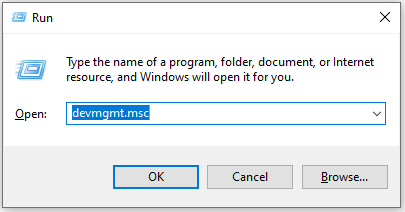
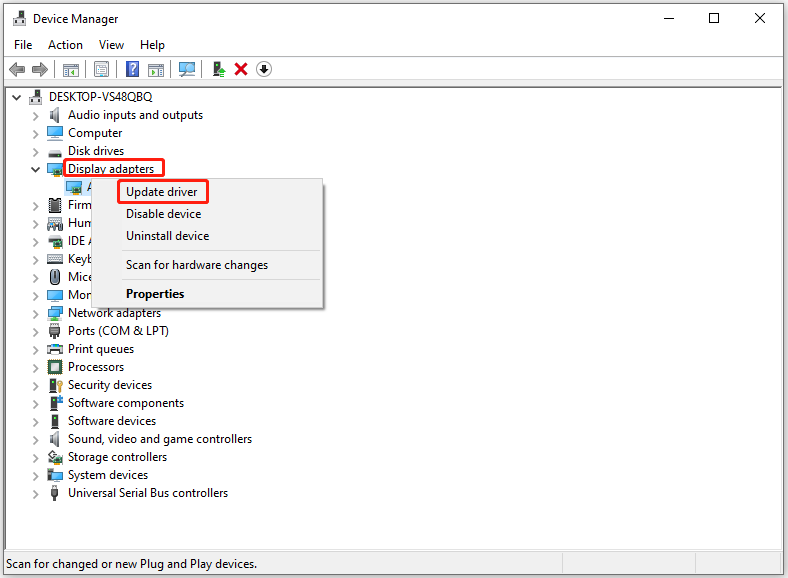
Step 2: In the Device Manager window, locate and expand Display adapters.
Step 3: Right-click on your graphics driver and choose Update driver.
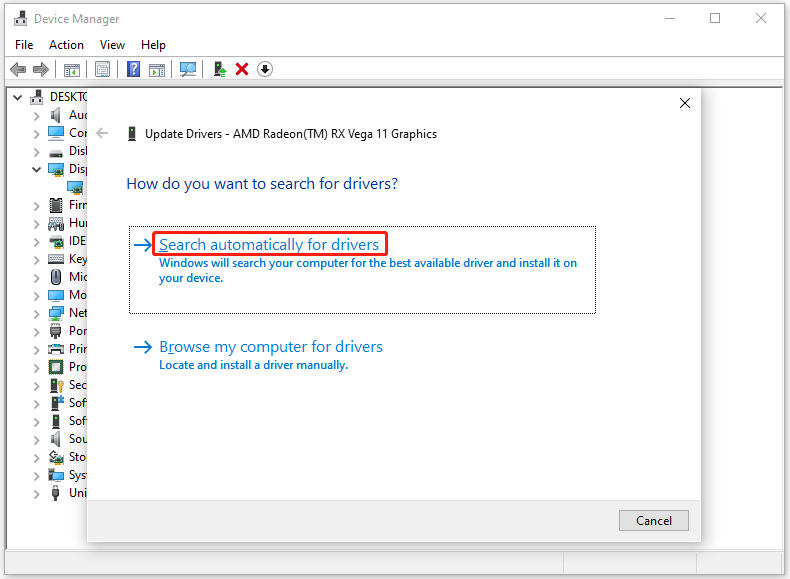
Step 4: Select a way to update the graphics driver. Here, we pick Search automatically for drivers. If you want to update the driver manually, click Browse my computer for drivers instead.
Also read: Top 4 Methods to Fix Computer Screen Black and White Issue
Way 3: Change the Resolution
Sometimes, black and white squares glitching on screen can be caused by incorrect display resolution settings. In this case, change the resolution settings by referring to these steps.
Step 1: Open Settings by pressing the Windows and I keys.
Step 2: Head to System and then click Display.
Step 3: Under Scale & layout, locate Display resolution and ensure that you have chosen the Recommended option from the drop-down menu.
Also read: Learn Common Gigabyte Beep Codes and Fix Them Effectively
Way 4: Disable Color Filter
Try disabling the color filter to get rid of black and white squares on the computer screen Windows 11. The following steps show you how to disable the color filter on Windows 11.
Step 1: Open the Settings app and navigate to Accessibility.
Step 2: Find and toggle off Color filters on the right side of the window.
Step 3: Move to the Keyboard shortcut for color filter option and disable it.
With the given tips and methods in the post, you can remove black and white squares on the computer screen. If you encounter errors related to hard drives or partitions, try using MiniTool Partition Wizard. It can detect bad sectors and file system corruption on the hard drive. If necessary, format the storage device or wipe the disk by using this partition manager.
MiniTool Partition Wizard FreeClick to Download100%Clean & Safe

![There Are No More Files Error on Windows 10 [5 Solutions]](https://images.minitool.com/partitionwizard.com/images/uploads/2023/08/there-are-no-more-files-on-windows-10-thumbnail.jpg)
User Comments :