Have you encountered the Bitdefender high CPU usage issue? If so, MiniTool Partition Wizard will offer you several feasible solutions to solve it. Read on to learn what Bitdefender is and get these solutions.
Bitdefender is antivirus software that protects every computer in your organization by stopping malware intrusions, network hackers, and tricky file-less attacks. Sometimes, some users find that Bitdefender takes up high CPU usage.
Why Does BitDefender Take up High CPU Usage?
Bdservicehost is the .exe file associated with the BitDefender software and contains key BitDefender virus protection components. Although the file size is not large, it does use an unusual amount of CPU and disk space in some cases. When this happens, you can optimize RAM and disk, or try to reduce bdservicehost.exe CPU/disk usage.
Other times, it might be because you have multiple programs running on your device. As it stands, opening resource-intensive programs or browsers such as Google Chrome also increases Bitdefender’s RAM usage.
If you encounter this issue, please check out our full guide on how to deal with Bitdefender high CPU usage.
Some related questions include:
- bdservicehost high memory usage
- Bitdefender virus shield high memory usage
- Bdservicehost.exe high disk usage
- Bitdefender GravityZone high memory usage
Fix 1. Run SFC and DISM
This Bitdefender high CPU usage issue can be caused due to corrupted or missing system files on your computer. Therefore, you can run SFC and DISM scans to resolve the issue. Proceed as follows:
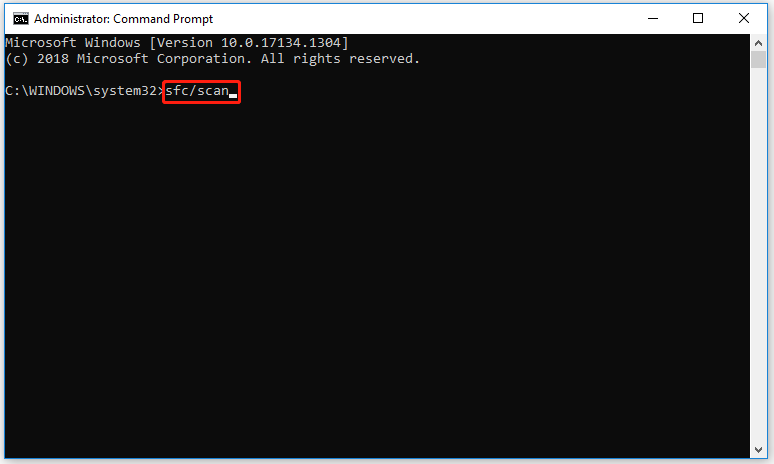
Step 1: Open the Command Prompt as an administrator.
Step 2: Type the following command, and then press Enter: sfc/scan.
If it doesn’t help, you may need to perform a DISM scan to restore system health. Open a command prompt with administrator privileges and enter the following command:
- DISM /Online /Cleanup-image /CheckHealth
- DISM /Online /Cleanup-image /RestoreHealth
In addition to corrupted or missing system files, disk errors can also be the cause of this issue. Although CHKDSK can be used to check the hard disk, this too often runs into various issues like CHKDSK being write-protected, CHKDSK getting stuck, etc. So, it’s highly recommended to use a powerful disk manager – MiniTool Partition Wizard to check the detected errors.
MiniTool Partition Wizard FreeClick to Download100%Clean & Safe
Download, and install MiniTool Partition Wizard on your computer and launch it to get its main interface. Then right-click the partition to be checked and select Check File System or Surface Test. Then follow the on-screen prompts to complete the operation. Read the following article to know more detailed information.
Fix 2. Perform a Clean Boot
You can try to perform a clean boot to solve this issue. To do that, follow these steps:
Step 1: Type MSConfig in the search bar and press Enter. On the General tab, check the Selective Startup box.
Step 2: Go to the Services tab. Tick the boxes related to Hide all Microsoft services and click Disable all.
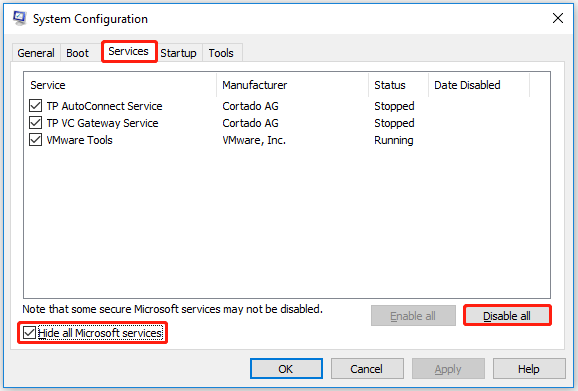
Step 4: Click Apply > OK to save the changes.
Fix 3. Change Processor Scheduling
You can prioritize running applications over background applications by changing processor scheduling.
Step 1: Type View advanced system settings in the Search bar and open it. In the System Properties windw, navigate to the Advanced tab and select Settings under the Performance submenu.
Step 2: In the Performance Options window, go to the Advanced tab and select Programs under the Adjust for best performance of section.
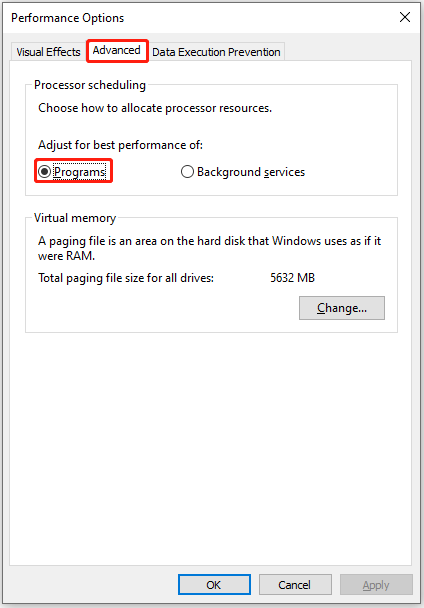
After that, click Apply > OK to save the changes.
Fix 4. Disable Superfetch
Superfetch is a program designed to optimize RAM and minimize startup time. However, in many cases, it takes up too much of your computer’s processing power to provide a smooth experience. In these cases, you can try disabling Superfetch. However, if disabling Superfetch has no effect, you should switch back.
Step 1: Type Services into Search and select the Services app.
Step 2: Right-click on Superfetch and then choose Stop.
Then, Superfetch will now be stopped until reboot.
If the above methods don’t work, you can also try to clear temporary files. Refer to this post: How to Delete/Clean Temporary Files in Windows 11? (5 Ways)
About The Author

Position: Columnist
Vega joined MiniTool as an editor after graduation. She enjoys helping people with computer problems, including disk management, data recovery, and more. She is constantly expanding her knowledge in related fields. And she will continue to bring more easy-to-understand professional articles to help people solve various problems on the PC. In her daily life, Vega enjoys hanging out with friends, shopping online and listening to music. She is someone who knows how to enjoy life.
User Comments :