BIOS is firmware in a computer and it is used to perform hardware initialization when the PC is powered on. A lot of users encounter various errors with BIOS, such as BIOS updating stuck, BIOS recovery error 500, BIOS application error 501, and ASUS BIOS recovery mode has been detected error.
Here’s a true example from the answers.microsoft.com which posted the Warning BIOS recovery mode has been detected error.
After installing an update on my new PC I get the message: "WARNING! BIOS Recovery mode has been detected, please put the file "Z240IC70.CAP" into HDD or a removable USB media device, and reset your computer. If you have done these. Please wait a moment and don't shut down the system!!! The system will automatically enter ASUS EZ Flash Utility."https://answers.microsoft.com/en-us/windows/forum/all/bios-recovery-mode-has-been-detected/c303dad3-e6ab-4cad-84c5-db9d930259b7
According to user reports, the “BIOS recovery mode has been detected error on ASUS” mainly when starting up the computer or updating BIOS. The main reason is that the BIOS firmware is outdated or corrupted. Besides, a faulty motherboard, incompatible USB flash drive, and corrupt system files are also responsible for the error.
Don’t worry. Here we summarize 6 effective solutions to fix the Warning BIOS recovery mode has been detected error on Windows 11/10.
Solution 1. Reformat the USB to FAT16/FAT32
First of all, you need to make sure the USB flash drive is FAT16 or FAT32 when updating BIOS. If not, you may encounter the BIOS recovery mode has been detected error on ASUS. How to format a USB to FAT16/FAT32? You can use a free USB formatter – MiniTool Partition Wizard. It breaks through the limitations of Windows, which can format a drive larger than 32GB to FAT16/FAT32/exFAT.
MiniTool Partition Wizard FreeClick to Download100%Clean & Safe
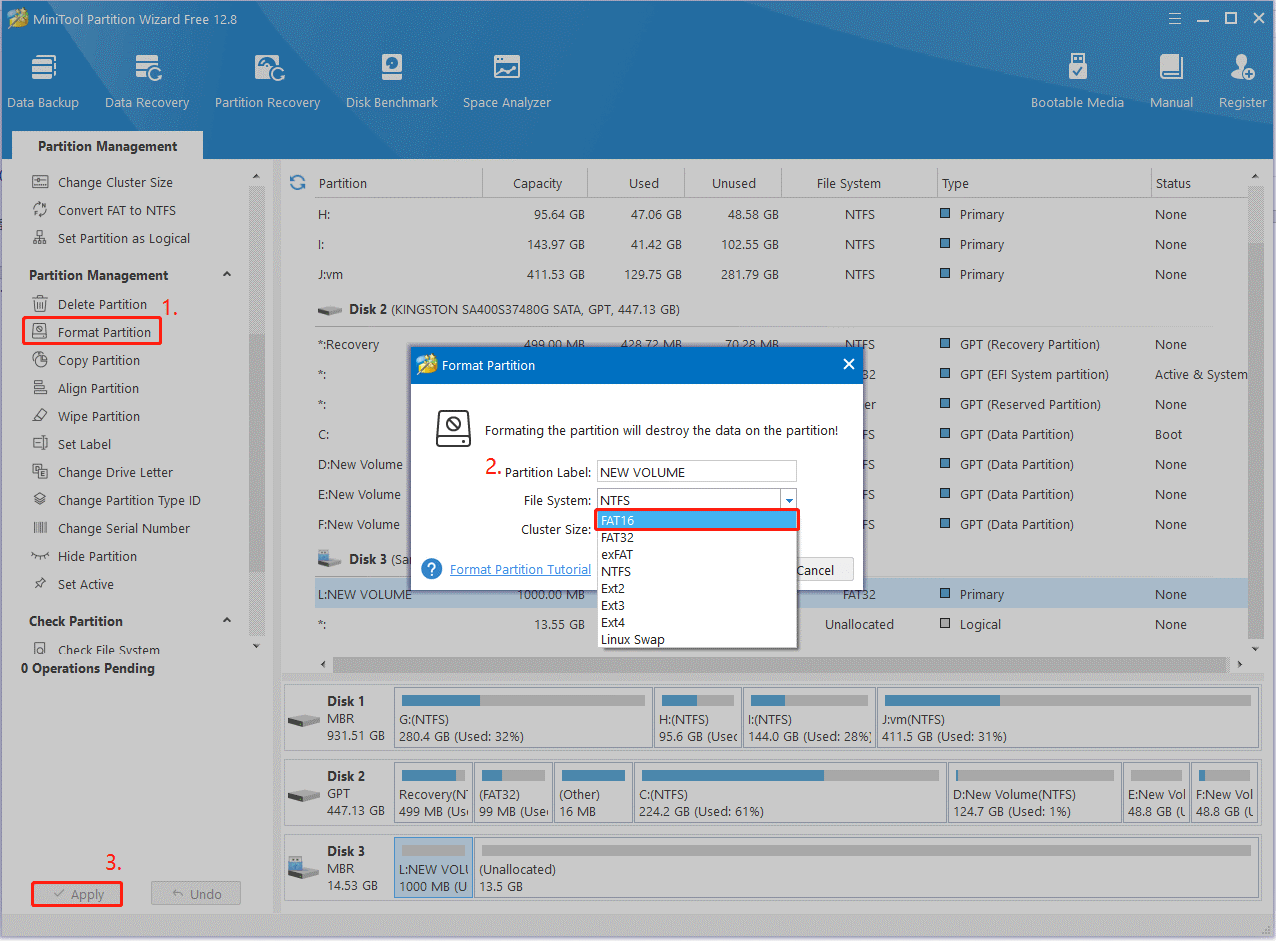
Step 1. Insert your USB drive into the Windows system properly and launch MiniTool Partition Wizard to enter its main interface.
Step 2. Select the USB partition from the disk map and click on Format Partition from the left action panel.
Step 3. Select FAT16/FAT32 from the File System drop-down menu and click OK. Then click Apply to execute the operation.

Solution 2. Recover the BIOS Using a USB Flash Drive
If the BIOS on your computer gets corrupt, you may receive the “Warning BIOS recovery mode has been detected” error. In this case, you can try recovering the BIOS with a USB.
Step 1. Prepare a working computer and FAT16/FAT32 USB flash drive as we showed above.
Step 2. Download the latest version of BIOS files according to your motherboard model from the ASUS Download Center and save it to the USB drive.
Step 3. Extract the BIOS file, double click the BIOSRenamer file to rename the BIOS file (.CAP). Then update the new BIOS file to the root directory of the USB flash drive.
Step 4. Plug the USB drive into the USB port of the motherboard and restart the affected computer. Then the motherboard will automatically detect whether there is a BIOS file in the drive and enter the EZ Flash application.
Step 5. When the EZ Flash screen appears, follow the on-screen prompts to update BIOS and check if the BIOS recovery mode has been detected error on ASUS gets fixed. Once completed, click OK and the computer will restart.
Step 6. Press F1 when prompted to enter the BIOS setup and press F5 and click OK to restore the default BIOS settings.
Solution 3. Perform a Startup Repair
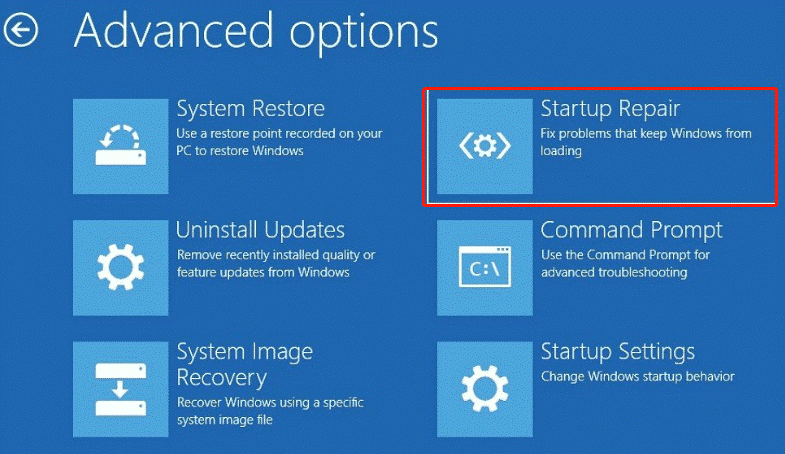
In addition, you can try performing a startup repair to fix the ASUS BIOS error. You can use a Windows installation media to repair that. Here’s a quick guide:
Step 1. Insert the Windows installation disc into your computer and restart it from the disc. Then press any key to boot from the media.
Step 2. Choose the language preference and go on until you arrive at the Install Now screen. Then click on Repair Your Computer to access the Advanced Settings menu.
Step 3. Select Troubleshoot to access Advanced Options and click Startup Repair in order to repair your system.

Solution 4. Reset BIOS
As discussed above, the ASUS BIOS recovery mode has been detected error can be caused by corrupt BIOS settings. In this case, you can try resetting the BIOS to its default settings. If you don’t know how to do that, you can refer to this article – How to Reset BIOS/CMOS in Windows 10.
Solution 5. Perform a System Restore
Some users reported that the Warning BIOS recovery mode has been detected error occurs after installing the latest Windows updates. To get rid of the error, you can try uninstalling the updates or performing a system restore. This can help undo all changes you recently made and revert your system to an earlier state.
Solution 6. Replace the Faulty Motherboard
If none of the above solutions fix the ASUS BIOS error, it may indicate that your motherboard gets bad. You need to consider replacing the faulty motherboard with a new one. You can read this guide – How to Install/Replace Motherboard [With Pictures].
Bottom Line
This post focuses on how to fix the BIOS recovery mode has been detected error on ASUS. It introduces 6 effective troubleshooting methods. You can try them one by one until the problem gets solved.

![BIOS Update Failed Not Enough Free Disk Space Error [Solved]](https://images.minitool.com/partitionwizard.com/images/uploads/2024/11/bios-update-failed-not-enough-free-disk-space-thumbnail.jpg)
User Comments :