ASRock BIOS Update Failed
ASRock Inc. is a manufacturer of motherboards, industrial PCs, and home theater PCs (HTPC). It is the world’s third-largest motherboard brand. If you are using an ASRock motherboard or PC, you may need to update the ASRock BIOS.
BIOS (Basic Input/Output System) is a type of firmware pre-installed on the computer’s motherboard. It is used to provide runtime services for operating systems and programs and to perform hardware initialization during the booting process (power-on startup). Updating BIOS can improve PC performance and stability, add support for new devices, etc.
In general, ASRock offers 4 ways to update the BIOS.
- Update ASRock BIOS in Windows: Go to the Support > BIOS page of the ASRock motherboard or PC, and then download the Windows version of the BIOS file. You will get an EXE file. Run this file and the ASRock BIOS will update automatically.
- Update ASRock BIOS in DOS: Download the DOS version of the BIOS file from the Support page. Create MS-DOS on a USB drive using Rufus. Place the BIOS update file into the USB drive. Boot the PC from the USB drive and then follow the wizard to update the BIOS.
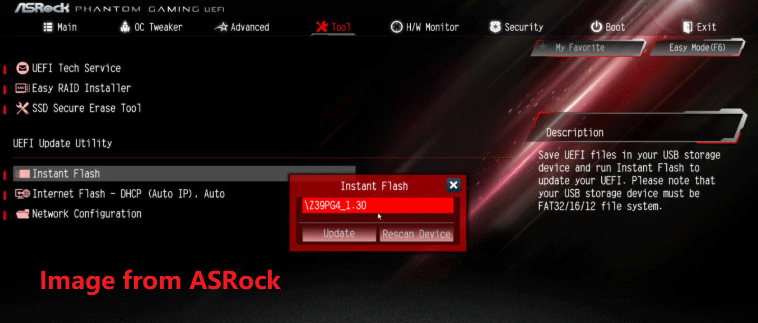
- Update ASRock BIOS from Firmware: Download the Instant Flash version of the BIOS file. Create a FAT32 USB drive and then place the BIOS file into the drive. Boot the computer from the USB drive and select Tool > Instant Flash. Select the BIOS file for installation.
- Update ASRock BIOS via FlashBack Button: This way is only available for high-end motherboards. It can flash BIOS when the BIOS is corrupt. To do that, download the Instant Flash version of the BIOS file, rename the BIOS file to creative.rom, and place it on a USB drive. Then, insert the USB drive and press the FlashBack button.
However, some people may encounter the ASRock BIOS update failed issue. Various errors may pop up, such as “Secure Flash check Fail!” and “No image file detected.”

How to Fix the ASRock BIOS Update Failed Issue
If the ASRock BIOS update fails, you can try the following methods to solve it.
Way 1. Fix Issues When Using the Windows Version
You should make sure the BIOS file is suitable for your motherboard. In addition, you should also make sure the network connection is fine and there is no power outage during the update process. If the BIOS update still fails, try other BIOS update ways.
Way 2. Fix Issues When Using the DOS Version
If you update ASRock BIOS via the DOS way, make sure the USB drive is formatted correctly, the BIOS files are in the root directory of the USB drive, and the Boot > CSM feature has been enabled.
In addition, DOS requires the filenames to meet the 8.3 naming format. This means that the filename “xxxx.” cannot be longer than 8 characters and that the suffix “.xxx” cannot be longer than three characters.
To know more details, you can read this post.
Way 3. Fix Issues When Using the Instant Flash Version
If you fail to update ASRock BIOS when using Instant Flash, you should check if the USB drive is formatted to FAT32 correctly. Even if the USB drive is larger than 32GB, it should be formatted to FAT32. To do that, you can use MiniTool PDF Editor Free.
If the file system of the USB drive is correct, you can try a small USB drive of around 1GB. Some people say small USB drives work like a charm.
Way 4. Fix the ASRock BIOS FlashBack Not Working Issues
Is your ASRock BIOS FlashBack not working? If so, the reasons may be as follows:
- The USB drive is not the MBR style.
- The USB drive is not the FAT32 file system.
- The BIOS file is not renamed correctly.
- The BIOS file is not in the root directory of the USB drive.
You need to troubleshoot the above issues one by one.
![How to Use BIOS FlashBack [ASUS, MSI, Gigabyte, ASRock Boards]](https://images.minitool.com/partitionwizard.com/images/uploads/2021/07/bios-flashback-thumbnail.png)
Bottom Line
Is your ASRock BIOS update failed? Don’t worry. This post offers solutions to this issue. You can try them one by one.
About The Author

Position: Columnist
Linda has been working as an editor at MiniTool for 5 years. She is always curious about computer knowledge and learns it crazily. Her articles are simple and easy to understand. Even people who do not understand computer can gain something. By the way, her special focuses are disk management, data recovery and PDF editing.
User Comments :