Are you experiencing the “access is denied in WMIC” issue in Windows 10/11? If so, you come to the right place. In this post, Partition Magic will offer some effective solutions to help you solve it.
What Is WMIC?
WMIC is a command-line and scripting interface that simplifies the use of Windows Management Instrumentation (WMI) and systems managed through WMI.
WMIC actually runs in two modes. The first is interactive, allowing commands to be entered one line at a time; the other is non-interactive, allowing commands to be scripted for use in batch files.
Starting with Windows 10 version 21H1, and starting with the 21H1 Semi-Annual Channel build of Windows Server, WMIC is deprecated. This utility has been replaced by Windows PowerShell for WMI.
But you can add the functionality back to your PC if you want. However, users who have added WMIC back to their Windows 11 computers have reported an error WMIC not recognized as an internal or external command.
Also read: WMIC Not Recognized on Windows 11? Here Is How to Fix It!
How to Fix Access Is Denied in WMIC?
What to do if you encounter the “WMIC access is denied” issue on Windows 10/11? Don’t worry. You can follow the methods below to solve it.
Method 1. Set DCOM Permissions
You need to set the correct DCOM permissions on your computer. Otherwise, you will continue to receive “Access Denied” errors when running WMIC commands. Follow these steps to set DCOM permissions on your Windows 11/10 PC:
Step 1: Type Dcomcnfg in the Search box to open the Component Service app.
Step 2: In the Component Service window, go to Component Services > Computers > My Computer.
Step 3: Right-click on My Computer and select Properties.
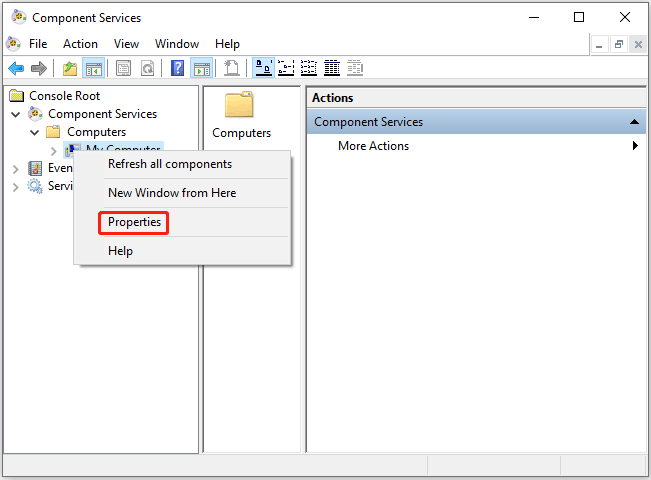
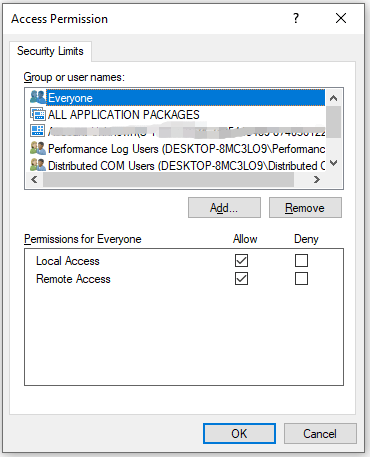
Step 4: Under the COM Security tab, click on Edit Limits under Access Permissions.
Step 5: Select Everyone and check both Local Access and Remote Access boxes under Allow.
Step 6: Then click on Edit Limits under Launch and Activation Permissions. Then select Everyone and check both Local Launch and Local Activation boxes under Allow.
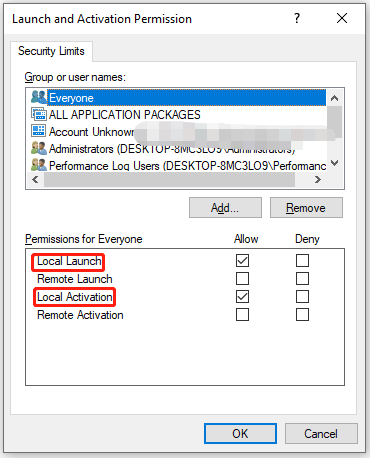
Step 7: Finally, click on OK to save the changes.
Method 2. Add Local Service in Local Group Policy Editor
To resolve the “access is denied in WMIC” issue, you need to check or verify the WMI Impersonation permissions. To do this, you can use the Local Group Policy Editor. Follow these steps:
Step 1: Press the Win + R key to open the Run dialog box. Then type gpedit.msc in it and press Enter.
Step 2: In the Local Group Policy Editor window, go to Computer Configuration > Windows Settings > Security Settings > Local Policies > User Rights Assignment.
Step 3: Double-click on the Impersonate a client after authentication settings. Then check if LOCAL SERVICE is included in the list.
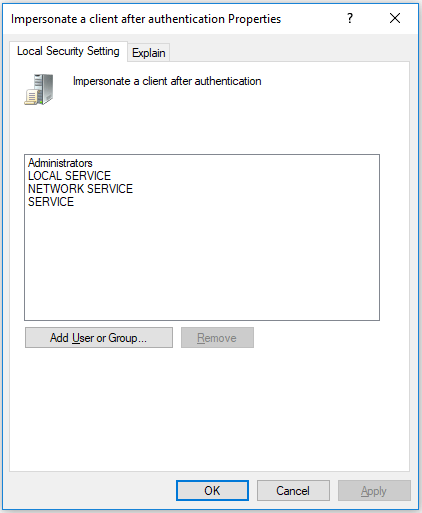
However, if it is not included, you need to add it to the same group. Click the Add User or Group button. Then search for Local Service and click the Check Names button. Then click the OK button.
Once done, you can close all windows, restart your computer, and check if you can run the WMIC command.
Method 3. Verify WMI Permissions
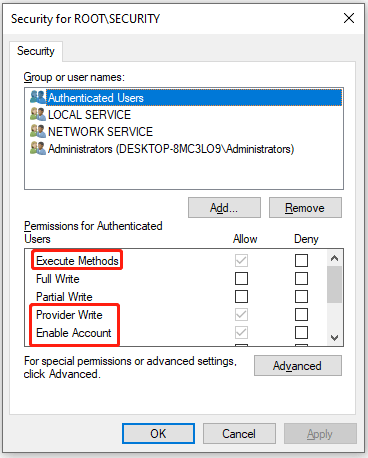
If these two solutions cannot solve the “access is denied when using WMIC” issue, then you need to verify WMI permissions. You need to make sure that the specific user has three permissions – Execute Methods, Provider Write, and Enable Account.
If the Authenticated User does not have these three permissions, you may not be able to access WMIC on your Windows 11 or Windows 10 machine. So, follow these steps to verify WMI permissions:
Step 1: Press the Win + R key to open the Run dialog box. Then type wmimgmt.msc in it and press Enter.
Step 2: In the Wmimgmt window, right-click on WMI Control and select Properties.
Step 3: Switch to the Security tab, expand Root, and click on SECURITY. Then click on Security.
Step 4: Select Authenticated Users and check the Execute Methods, Provides Write, and Enable Account box.
MiniTool Partition Wizard FreeClick to Download100%Clean & Safe
Bottom Line
Now, you have known how to fix the “access is denied in WMIC” issue on Windows 10/11. You can try the methods above to solve it.

![[4 Ways] How to Fix Blue Screen After Installing Wi-Fi Card?](https://images.minitool.com/partitionwizard.com/images/uploads/2024/08/blue-screen-after-installing-wifi-card-thumbnail.png)
User Comments :