Have you ever encountered the Windows update error 0x8024a22d on your Windows 11 PC? If so, you come to the right place. This post from MiniTool Partition Wizard provides several practical solutions to help you get rid of it.
Keeping Windows updated can keep away many basic and unnecessary errors, so it’s better for you to keep your Windows up to date. However, some people reported that they encountered the Windows update error 0x8024a22d when they tried to upgrade to Windows 11 version 22H2.
Here is an example from the techcommunity.microsoft.com:
Hi guys, I keep getting the 0x8024a22d error when I try to install 22h2. Error 0x8024a22d is what keeps popping and I can't find any source material on why this is and how to fix it... Any ideas? FTR- there's nothing that I can find on the Microsoft side either... not sure what's happening.https://techcommunity.microsoft.com/t5/windows-11/version-22h2-install-error-0x8024a22d/m-p/3640840
After investigating extensive user reports, I found that the error is usually caused of system files and Windows Update components. In addition, corrupted updates are another typical reason for causing this error. If you encounter the same error on your Windows computer, you can continue reading and get some helpful solutions.
![[Solved] Windows Host Process Rundll32.exe High CPU Usage](https://images.minitool.com/partitionwizard.com/images/uploads/2023/10/rundll32-exe-high-cpu-usage-thumbnail.png)
Fix 1. Run Windows Update Troubleshooter
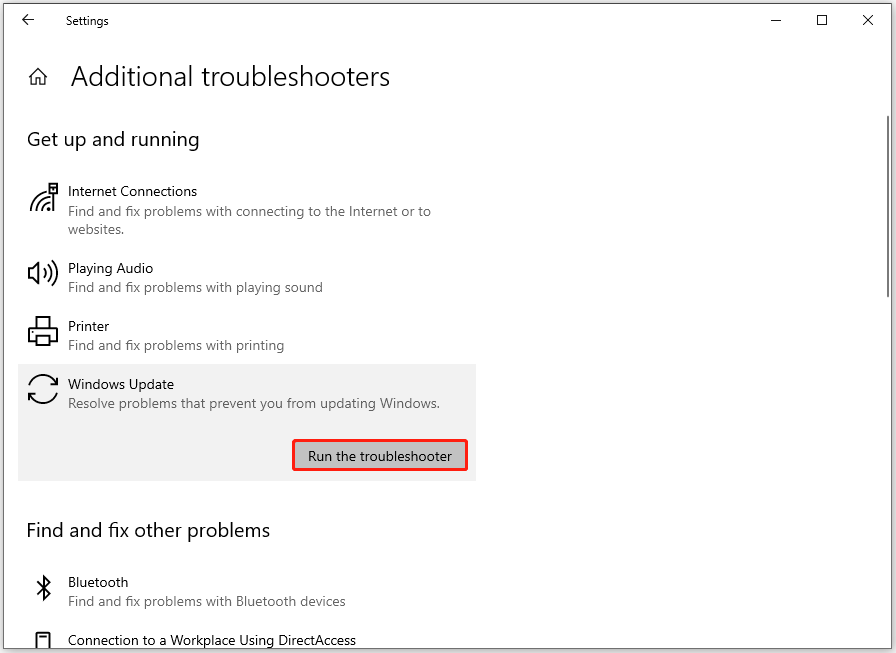
When you encounter update-related errors on your PC, running the Windows update troubleshooter is a good way to show that you are worth trying. Here’s the way:
- Press the Win + I keys simultaneously to open the Settings window.
- Navigate to Update & Security > Troubleshoot.
- Click the Additional troubleshooter link.
- Select Windows Update and click Run the troubleshooter.
- Once done, restart your PC and check if the error has been resolved.
Fix 2. Check All Update Services
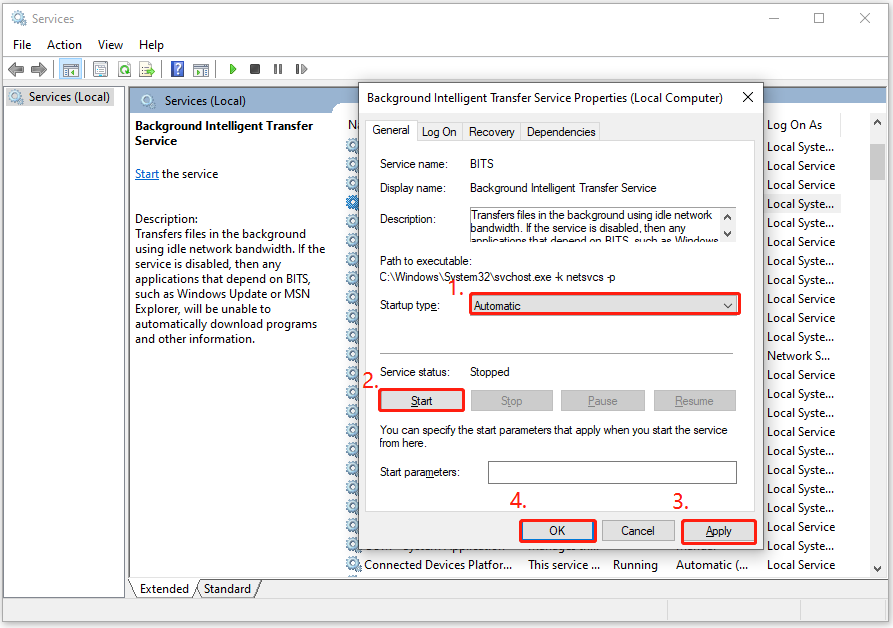
Windows update-related services are essential for proper Windows update installation. If these services are not correctly configured, it can easily cause various errors, including the error code 0x8024a22d. To resolve this issue, you can try restarting the services by following the steps mentioned below:
- Open the Run window, type “services.msc”, and then press Enter.
- In the Services window, double-click Windows Update from the list.
- From the Startup type field, select Automatic from its drop-down menu.
- Go to the “Service status” and click on Start.
- Then, click Apply and OK to save the changes.
- Next, do the same operations with Background Intelligent service.
- Once done, restart your PC and check if you fixed the Windows update error 0x8024a22d successfully.
Fix 3. Run SFC and DISM
Both System File Checker (SFC) and Deployment Image Servicing Management (DISM) can assist you in repairing system file corruption on your computer. So, if you suspect the Windows update error 0x8024a22d is caused by corrupted system files, you can run SFC and DISM by doing the following to fix the error:
- Open the Search window, and then type “cmd” in the search box.
- Click Run as administrator under the Command Prompt app.
- Type “sfc /scannow” and press the Enter key.
- After the process is completed, restart your computer to check if the error is fixed. If not, proceed by initiating a DISM scan.
- Run the Command Prompt as administrator on your computer again.
- Then type “DISM.exe /Online /Cleanup-image /Scanhealth” and press Enter.
- Type “DISM.exe /Online /Cleanup-image /Checkhealth” and press Enter.
- Type “DISM.exe /Online /Cleanup-image /Restorehealth” and press Enter.
- Type “Exit” and press the Enter key to close the Command Prompt window.
- Once done, restart your computer to check if the error code 0x8024a22d is fixed.
Further reading:
Disk errors can also cause the Windows update error 0x8024a22d. In this case, you can use a tool to help you scan and fix the disk errors. To do that, MiniTool Partition Wizard is a good choice. It provides the Check File System feature to scan and fix disk errors, and Surface Test to scan and mark bad sectors.
In addition, this professional and feature-rich partition manager can also help you format USB to FAT32, partition hard drive, convert MBR to GPT, do data recovery, and so on.
MiniTool Partition Wizard FreeClick to Download100%Clean & Safe
Fix 4. Repair Windows Update Components
If there is anything wrong with the Windows Update Components, you may also encounter the Windows update error 0x8024a22d. If you don’t know how to reset Windows Update Components, you can follow the guide in this post: How to Reset Windows Update Components in Windows 11/10?
Fix 5. Manually Download and Install Pending Updates
Some people who encounter the same error report that they fix the Windows update error 0x8024a22d successfully via installing Windows Update manually. You can also have a try. Here are the detailed steps:
- Open your browser, and then navigate to Microsoft Updates Catalog.
- Type the number of the update in the search box and press Enter.
- Find the file that matches your device’s System type.
- Then, click Download.
- Click the links in the pop-up window to start downloading the installation package.
- Double-click the execute file and follow the on-screen instructions to complete the installation process.
Fix 6. Enter Clean Boot and Upgrade Your PC
If none of the above fixes can help you fix the error code 0x8024a22d, you can try entering a clean boot and then upgrading your PC. If you don’t know how to enter the clean boot, you can refer to this post: How To Perform A Clean Boot On Your Windows 11 PC
Have A Try Now
How to fix the Windows update error 0x8024a22d on Windows 11 PC? Now, I believe that you already have known the answer. If you have better solutions to the problem, please share them with us in the following comment zone.
About The Author

Position: Columnist
Charlotte is a columnist who loves to help others solve errors in computer use. She is good at data recovery and disk & partition management, which includes copying partitions, formatting partitions, etc. Her articles are simple and easy to understand, so even people who know little about computers can understand. In her spare time, she likes reading books, listening to music, playing badminton, etc.