If you are bothered by the Windows update error 0x80246017, you come to the right place. In this place, MiniTool Partition Wizard analyzes the causes that may trigger the error and provides several effective solutions to fix the error.
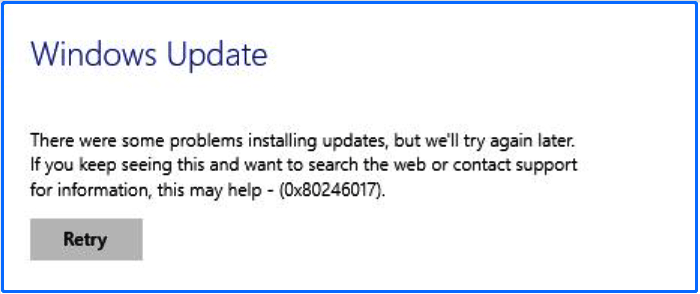
Sometimes, users encounter the Windows update error 0x80246017 on their computers. This error can occur when updating Windows 10 to a subsequent build or upgrading to Windows 11, as well as during the installation of KB4020102. The error code 0x80246017 is accompanied by the message: WU_E_DM_UNAUTHORIZED_LOCAL_USER. Here is an image of the error:
Have you also encountered the same error? Do you know how to fix the Windows update error 0x80246017? If you are curious about this error, please continue reading to get the causes of the error and several ways to troubleshoot it.
Causes of the Windows Update Error 0x80246017
After investigating extensive user reports and posts, I find the Windows update error 0x80246017 can mainly be caused by these reasons:
- Inconsistent or slow internet connections
- Corrupted system files
- Third-party interference
- Insufficient disk space
- Windows update service glitches
How to Fix the Windows Update Error 0x80246017?
Way 1. Try Some Basic Tricks
Before you try other advanced ways to fix the Windows 10/Windows 11 update error 0x80246017, you can try these basic tricks first:
- Check your internet connection
- Disable third-party antivirus
- Manually install the update
- Run Windows Update Troubleshooter
Way 2. Give Full Control to the System Volume Information Directory
The Windows update error 0x80246017 may happen because of insufficient permissions for the Windows Update service to access and modify the files in this directory. In this case, you can try granting full control of the system volume information directory to fix it. Here’s the way:
Step 1. Press the Win + R keys to open the Run window, type “cmd” and press Ctrl + Shift + Enter keys to run Command Prompt as administrator.
Step 2. In the elevated Command Prompt window, type the following command and press Enter.
cmd.exe /c takeown /f “C:\System Volume Information\*” /R /D Y && icacls “C:\System Volume Information\*” /grant:R SYSTEM:F /T /C /L
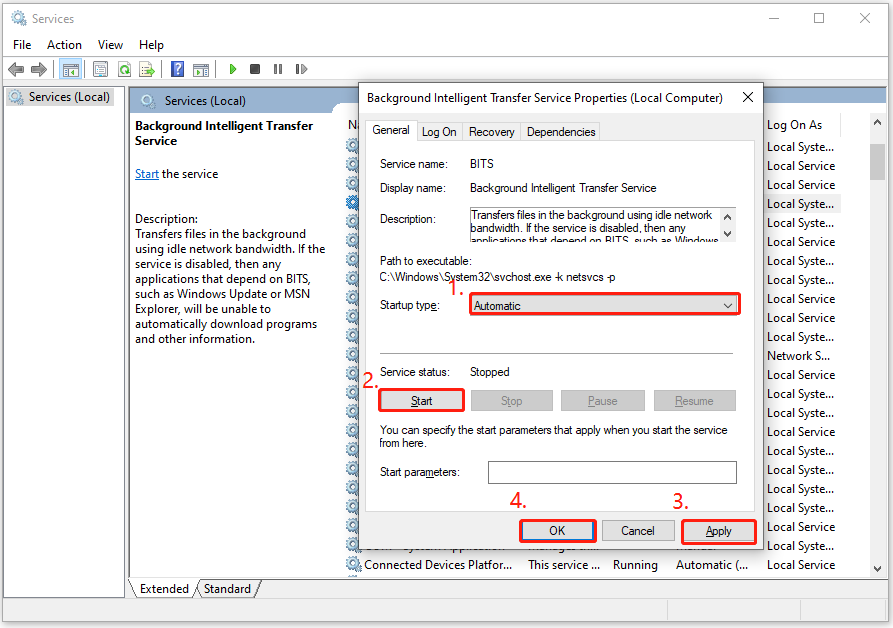
Way 3. Check the Windows Update-Related Services
If there is any Windows update-related service is disabled or encounters bugs, you can encounter the error code 0x80246017 easily. In this situation, you can try restarting the services by following the steps mentioned below:
- Open the Run window, type “services.msc”, and then press Enter.
- In the Services window, double-click Windows Update from the list.
- From the Startup type field, select Automatic from its drop-down menu.
- Go to the “Service status” and click on Start.
- Then, click Apply and OK to save the changes.
- Next, do the same operations with Background Intelligent service.
- Once done, restart your PC and check if you fixed the Windows update error 0x80246017 successfully.
Way 4. Free Up Disk Space
Sometimes the previous Windows installation files can also cause the Windows 10 0x80246017 and Windows 11 0x80246017. In this case, you can use the built-in Disk Cleanup tool to clear them. However, some people may encounter errors when using this tool, such as disk cleanup won’t open, disk cleanup not deleting files, etc.
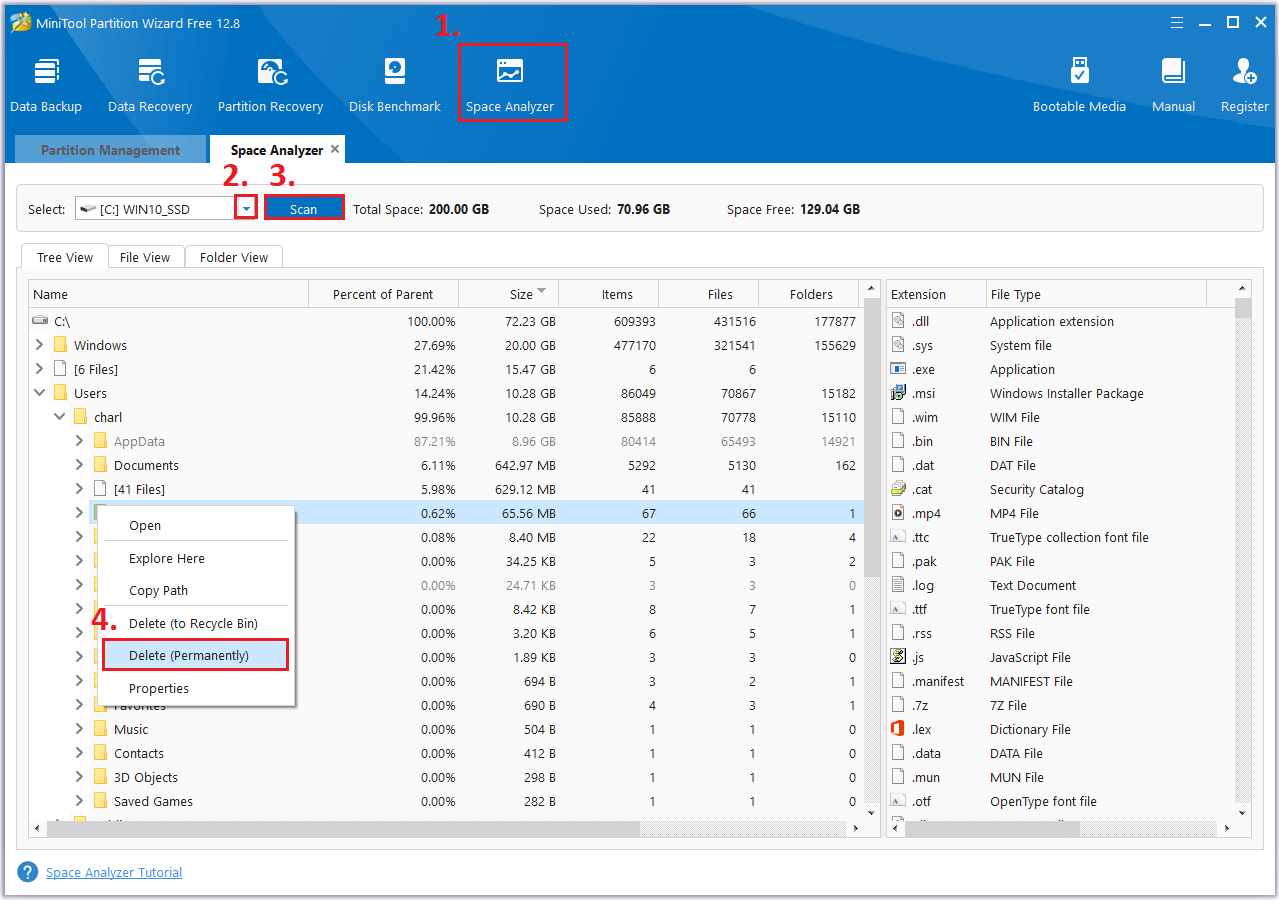
If you are also one of them, you can use MiniTool Partition Wizard as an alternative. It provides the Space Analyzer feature to scan a hard drive and give a better view of the hard drive space usage.
In addition, this multifunctional tool can also help you format SD card FAT32, convert MBR to GPT, recover data from hard drive, rebuild MBR, change cluster size, and more. Here’s how to use the Space Analyzer feature:
MiniTool Partition Wizard FreeClick to Download100%Clean & Safe
- Download and install the MiniTool Partition Wizard on your PC.
- Launch it into its main interface.
- Select the Space Analyzer feature from the top toolbar.
- Select your hard drive and click Scan.
- Right-click the file you don’t want and select Delete (Permanently).
Way 5. Reset the Windows Update Components
If there is something wrong with the Windows update components, you can also encounter the Windows 10 0x80246017 error or Windows 11 0x80246017 error. So, you can try resetting the Windows update components to fix the error. If you don’t know how to reset Windows Update Components, you can follow the guide in this post: How to Reset Windows Update Components in Windows 11/10?
Way 6. Reset Registry Key Values
Some people report that resetting some Registry key values helps them fix the Windows 10/Windows 11 update error 0x80246017. You can also have a try. To do that, you can just follow these instructions:
Step 1. Open the Run window, type “regedit” and press Enter to open the Registry Editor window.
Step 2. Navigate to the following path:
HKEY_LOCAL_MACHINE\SOFTWARE\Microsoft\WindowsSelfHost\Applicability
Step 3. Find BranchName and check if it shows FBL_AWESOME1501. If it doesn’t, change it.
Step 4. Locate TresholdRiskLevel and change it to low, continue to find TresholdInternal and TresholdOptedIn, and then delete them.
Step 5. Once done, close the Registry Editor windows, restart your PC, and then check if the error has been resolved.
In Conclusion
This post provides 6 effective ways to fix the Windows update error code 0x80246017. No matter if you encounter the error on Windows 10 or Windows 11, you can try these ways.
About The Author

Position: Columnist
Charlotte is a columnist who loves to help others solve errors in computer use. She is good at data recovery and disk & partition management, which includes copying partitions, formatting partitions, etc. Her articles are simple and easy to understand, so even people who know little about computers can understand. In her spare time, she likes reading books, listening to music, playing badminton, etc.
User Comments :