Have you ever encountered the error code 0x800f0983 on your computer? If you have, don’t panic. In this post, MiniTool Partition Wizard tells you a step-by-step guide to fix this issue.
The Windows update error 0x800f0983 may occur due to various reasons, such as corrupted system files, issues with Windows Update components, software conflicts, etc. How to troubleshoot this problem? There are some methods you can try.
Method 1. Run the Windows Update Troubleshooter
Windows Update troubleshooter is a built-in tool that can diagnose and resolve common Windows Update issues. To run this tool, follow these steps:
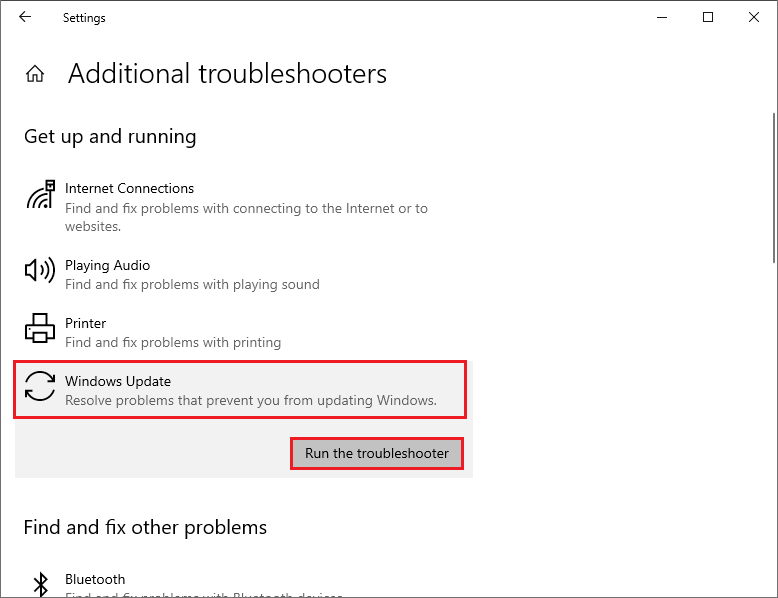
Step 1. Press Win + I to open Settings. In the pop-up window, click Update & Security > Troubleshoot > Additional troubleshooters.
Step 2. In the next interface, click Windows Update and select Run the troubleshooter.

Step 3. Then follow the on-screen instructions to complete the troubleshooting process. Once done, reboot your computer and try to install the updates again.
Method 2. Reset Windows Update Components
Sometimes, Windows Update components may get damaged or misconfigured, causing the error code 0x800f0983. You can fix this issue by resetting the Windows Update components with the following steps.
Step 1. Press Win + R to open the Run command box and type cmd. Then press Ctrl + Shift + Enter to run Command Prompt as administrator.
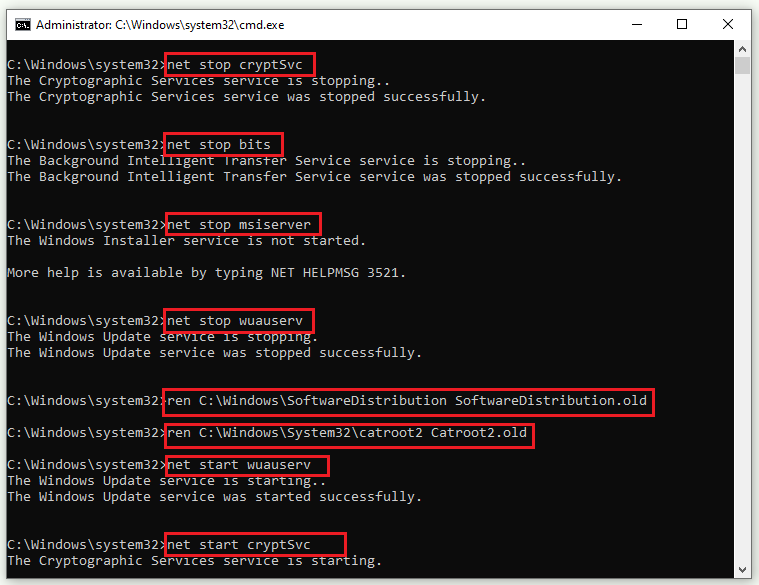
Step 2. Then run the following commands and press Enter after each one.
net stop cryptsvc
net stop bits
net stop msiserver
net stop wuauserv
ren C:WindowsSoftwareDistribution SoftwareDistribution.old
ren C:WindowsSystem32catroot2 Catroot2.old
net stop cryptsvc
net start bits
net stop msiserver
net start wuauserv

Step 3. Once the process completes, restart your system and check if the issue disappears.
Method 3. Run SFC
System File Checker (SFC) is a Windows built-in utility that can scan and restore corrupted system files. You can run this SFC scan to get rid of the error code 0x800f0983.
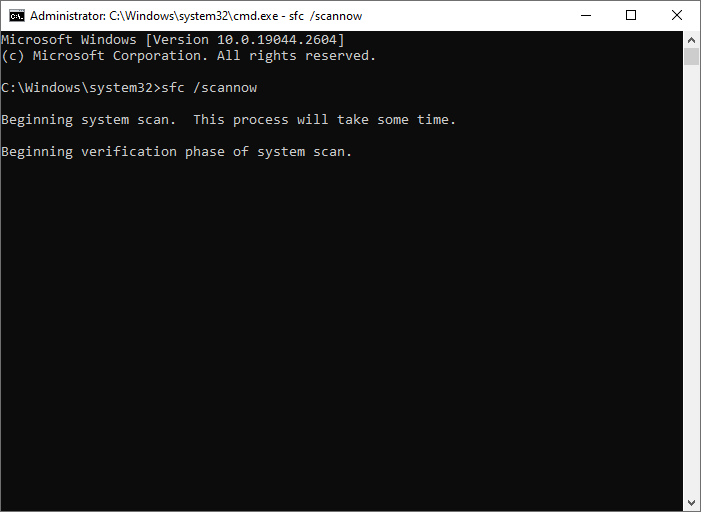
Step 1. Run Command Prompt as administrator. Then type sfc /scannow and press Enter.

Step 2. Once the process ends up, reboot your PC and check if the issue is fixed.
You can also use MiniTool Partition Wizard to check file system errors and bad sectors. After downloading MiniTool Partition Wizard, launch it, right-click the partition to be checked, and select Check File System or Surface Test. You can refer to this guide.
MiniTool Partition Wizard FreeClick to Download100%Clean & Safe
Method 4. Manually Download and Install the Update
To get rid of the Windows update error 0x800f0983, you can try manually downloading and installing the latest Windows updates with this guide: [Tutorial] How to Download & Install Windows 10 Updates Manually.
Method 5. Perform a Clean Install
If none of the above ways work, you may need to perform a clean install of Windows 10. This will erase everything on your system drive and install a fresh copy of Windows 10. Before operating, make sure that you back up your important data.
Step 1. Go to https://www.microsoft.com/en-us/software-download/windows10.
Step 2. Then select Download Now and run it as an administrator.
Step 3. Accept the license terms and select Create installation media (USB flash drive, DVD, or ISO file) for another PC.
Step 4. Then follow the on-screen instructions to create a bootable USB or DVD with Windows 10 installation files.
Step 5. Once done, insert the USB or DVD into your computer and set your device to start with the USB or DVD.
Step 6. Then follow the on-screen wizard to install Windows 10 on your system drive.
Step 7. Once done, restart your computer and activate Windows 10 with your product key.
Also read: [Illustrated Guide] How to Clean Install Windows 10 21H1 on PC?
Bottom Line
Now, this post comes to an end. Do you have any suggestions or nice methods to fix the Windows update error 0x800f0983? You can feel free to share them with us in the following comment part.

User Comments :