This post illustrates what Windows Storage Spaces is and how to create/resize/delete it. The Storage Spaces Windows 10 shows you how to use multiple hard drives efficiently. Start reading this post of MiniTool to explore the details!
What Is Windows Storage Spaces
Storage Spaces, a technology built in Windows and Windows Server, helps you protect data from drive failures and increase storage space for the data. It usually stores extra copies of your data, so if one of your drives fails, you still have an intact copy of your data. If you run low on capacity, just add more drives to the storage pool.
The Windows 10 Storage Spaces feature in Windows 10 allows you to group three or more drives together into a storage pool and use capacity from that pool to create Storage Spaces. It is a software-configured RAID setup in OS. It is conceptually similar to RAID. Differently, RAID is implemented in software.
Storage Spaces are virtual drives that you can see in the File Explorer and use them like other drives. You can create spaces with an equal, smaller, or larger capacity than the physical capacity of your PC.
Further reading:
- In addition to Storage Spaces, features like system image recovery, system restore, backup and restore, and file history can help you protect your important data as well.
- You need to know the disks that have been added to the pool are not individually available anymore from within Windows as they are virtualized and dedicated entirely to the pool.
The Features of Windows Storage Spaces
As you can combine multiple hard drives into a pool, you don’t have to spread files across multiple drives in a disorganized manner. On the contrary, you can store the files in a single place with an organized way.
Besides, the Storage Pool Windows 10 can create a big network drive with a lot of space for storing data. It is more efficient than sharing multiple drives on the same network. With Storage Spaces, you can manage data better. For instance, if you have several USB drives connected to one PC, combine them into a single logical drive. Then you are able to organize these drives in a single place.
Resiliency is another benefit of Windows Storage Spaces. It means that you won’t suffer from data loss because of hard drive failure or other issues with one of drives in the Storage Pool. Here are 4 types of resiliency.
- Simple: The data is stored only as one copy. There is no resiliency from data failures by itself. This type of Storage Spaces can be made with only one drive.
- Two-way mirror: Two copies of data are written on two different drives so that data can be protected from a single drive failure. Two drives are required for it.
- Three-way mirror: It writes three copies in three different drives. Hence, your data will be safe even if you encounter two drive failures.
- Parity: Storage Spaces writes data with parity information on an available drive to protect against any single drive failure. This kind of resilience is similar to the standard RAID 5 technology.
How to Create Storage Spaces
The number of Storage Spaces Windows 10 that you can create depends on the physical storage of your computer. It means that you can’t create as many Storage Spaces as you like to store the data.
How to create Windows Storage Spaces? Detailed steps are shown as follows.
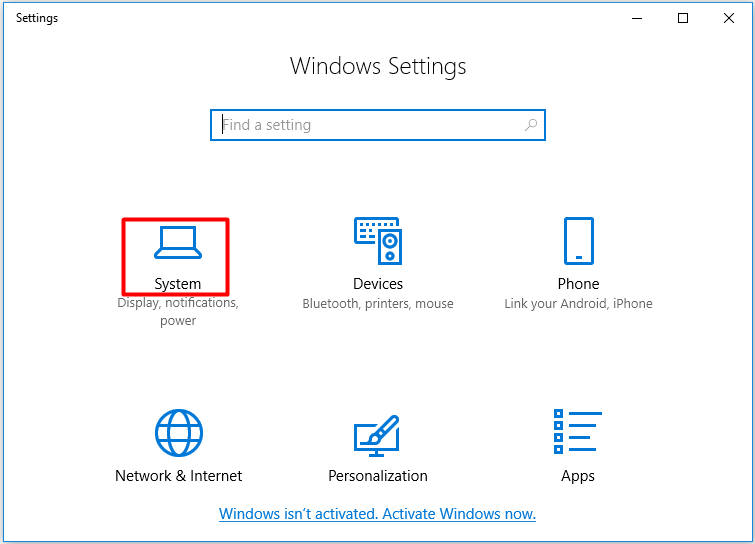
Step 1: Open Settings by pressing Windows and I keys and then click System.
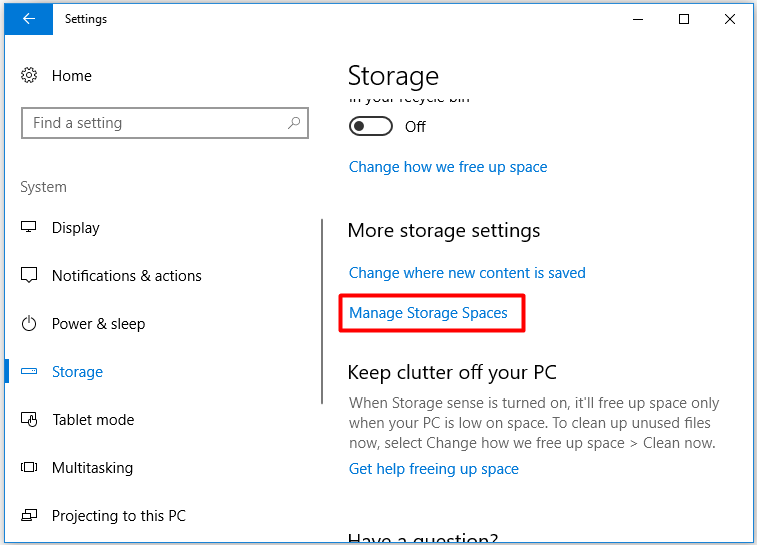
Step 2: After clicking the Storage option in the left pane, move to the right side of the window. Scroll down the content to find and click on Manage Storage Spaces.
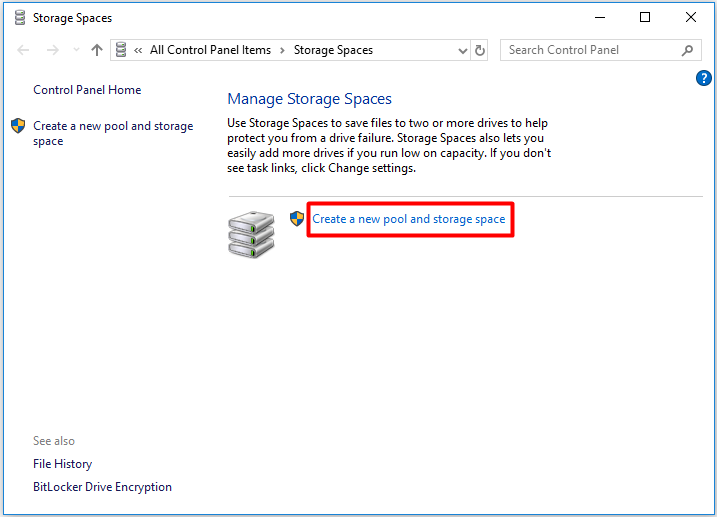
Step 3: In the pop-up window, click Create a new pool and storage space to continue the operation.
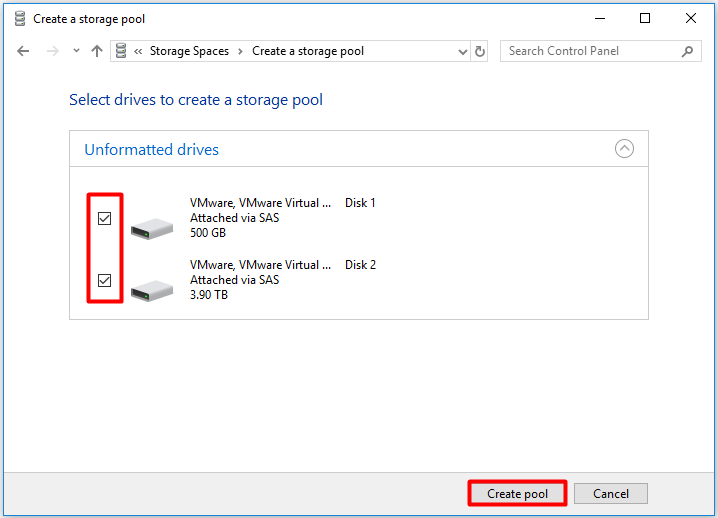
Step 4: In the next window, you should choose drives from the listed drives and then click Create pool. You can decide the number of drives for the creation of Windows Storage Spaces. Certainly, the total number will not exceed the amount of available drives. You need to know that the displayed drives are unformatted drives on your computer.
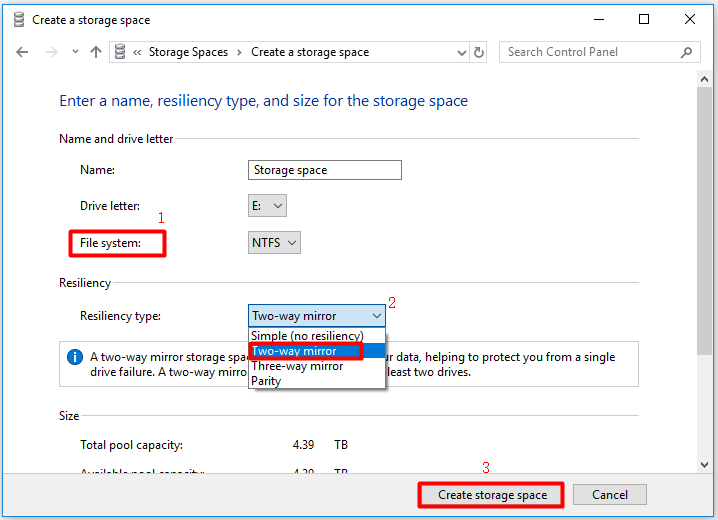
Step 5: You can see and configure some settings for the created Storage Spaces Windows 10 in the prompted window.
- Choose a Drive letter and select the File system.
- Pick a resiliency type according to the number of your drives. (Here you have two drives, so you should select Two-way mirror.)
- Click on the Create storage space button.
Step 6: Now, you need to wait for the finish of the process.
How to Resize Storage Spaces Windows 10
With the above steps, you can create Windows Storage Spaces with ease. If you want to resize the Storage Pool, you have two choices. You can do that via Control Panel or a professional partition manager – MiniTool Partition Wizard.
Option 1: Control Panel
Step 1: Press Windows and R keys to open the Run window, and then input control and hit Enter to open Control Panel. Alternatively, you can also type control in the search bar and click on Control Panel from search results.
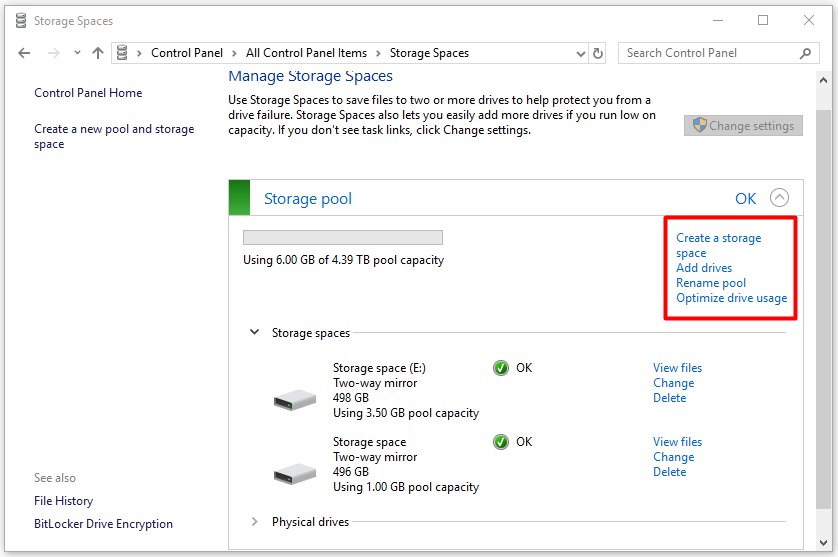
Step 2: Navigate to the Storage Spaces. Then you will see the picture below. To extend Storage Spaces, click on the Add drives option. Then follow the on-screen instruction to finish the process.
Option 2: MiniTool Partition Wizard
As mentioned earlier, Storage Spaces Windows 10 appears as a regular storage on the computer. Hence, you can also manage them as other partitions. As an all-in-one partition manager, MiniTool Partition Wizard allows you to manage Storage Spaces easily.
For instance, if you want to resize Windows 10 Storage Spaces, the Move/Resize Partition and Extend Partition features of this program can help you. To rename the Storage Spaces, use the Set Label option. How to resize the Storage Pool Windows 10? Here’s the tutorial.
MiniTool Partition Wizard FreeClick to Download100%Clean & Safe
Step 1: Launch MiniTool Partition Wizard to access its main interface.
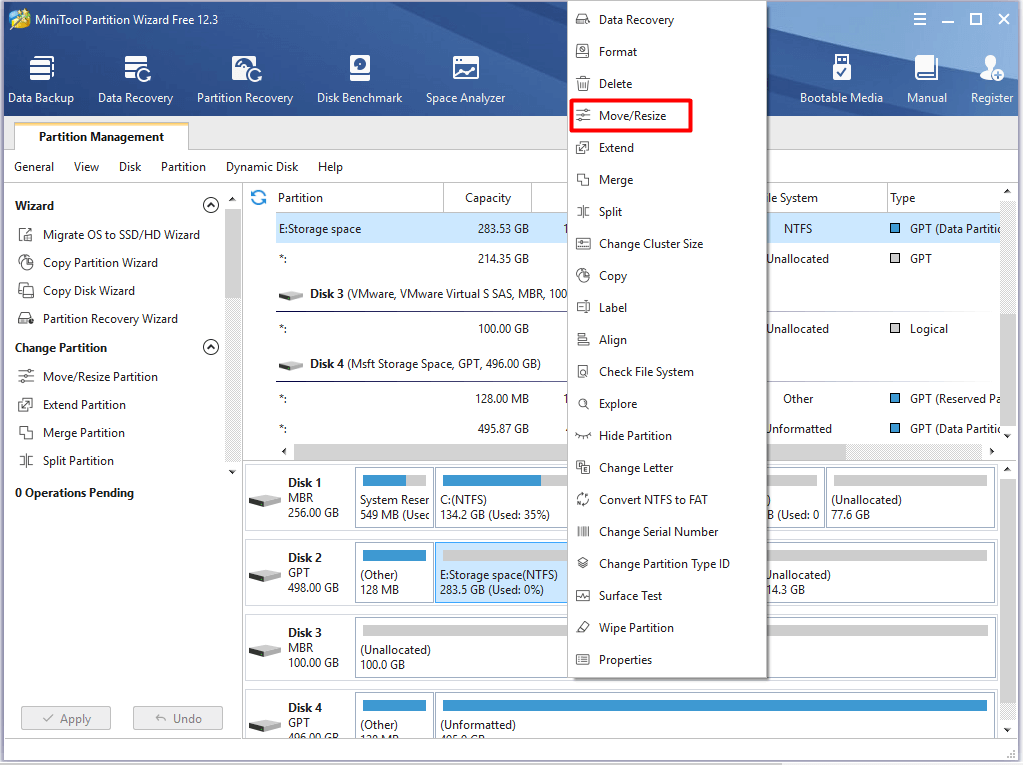
Step 2: Right-click on your Storage Spaces from disk map and click the Move/Resize option in the pop-up menu.
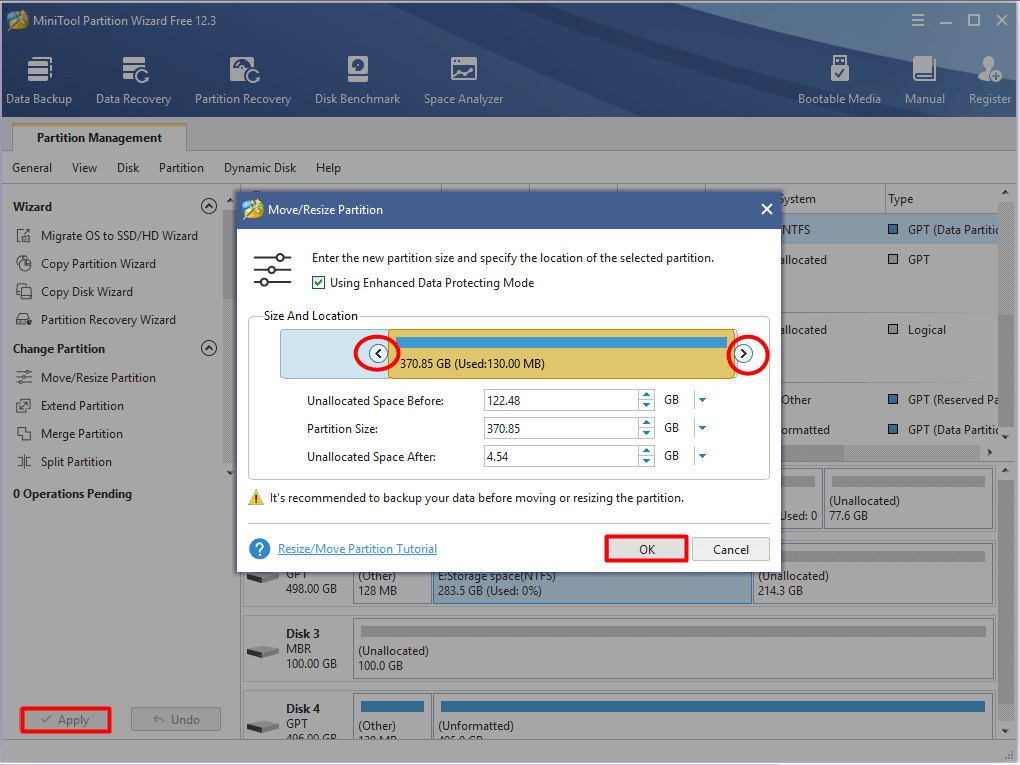
Step 3: In the elevated window, drag the two arrows to change the position and size of Storages Spaces. Then click the OK and Apply buttons to execute the operation.
Further reading:
In addition to resizing partition, MiniTool Partition Wizard allows you to merge, split, wipe, format, and do other operations with Windows Storage Spaces easily.
How to Delete Windows Store Spaces
Though Storage Spaces Windows 10 brings you some benefits, it also has some drawbacks like slow write speed and space waste. Due to these reasons, you may want to delete Windows Storage Spaces. How to do that? There are 2 methods for you.
Method 1: Delete Storage Pool Windows 10 via Control Panel
Step 1: Open Run window by holding Windows and R keys, and then type control and click OK.
Step 2: In the next window, click on the Storage Spaces option.
Step 3: Click Delete behind the Storage Spaces.
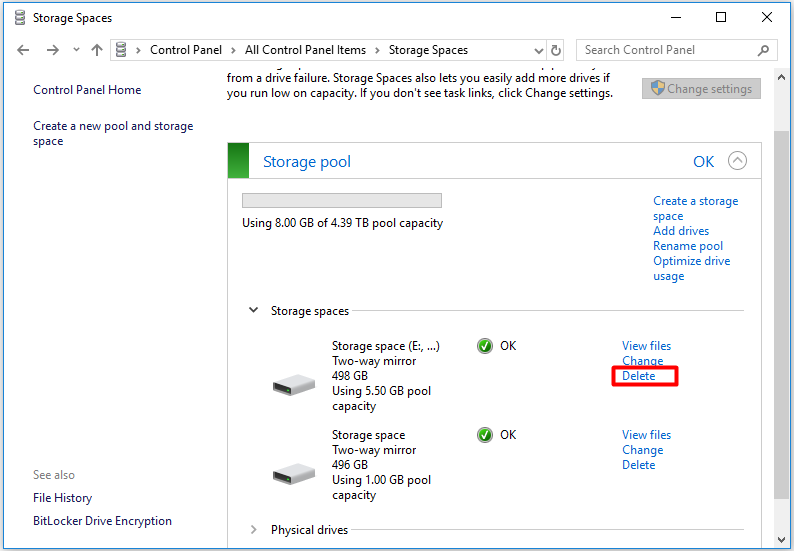
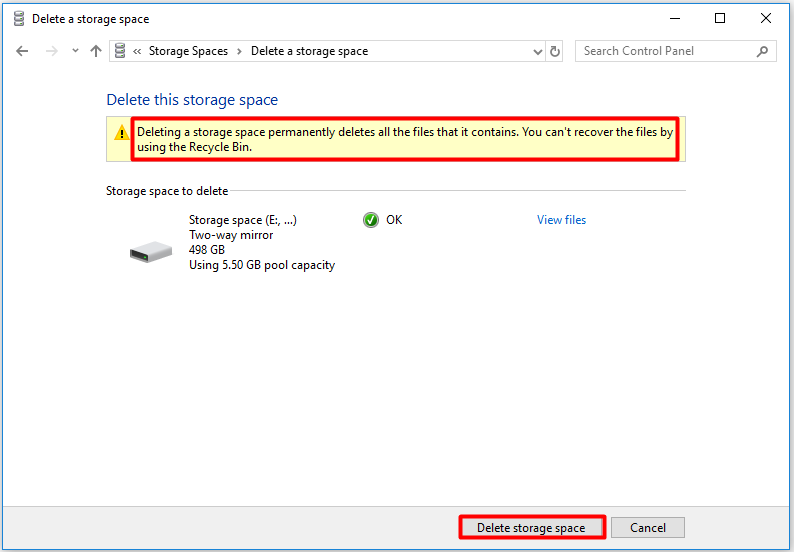
Step 4: Click Delete storage space and then follow the on-screen instruction to finish the operation.
Method 2: Delete Storage Pool Windows 10 via MiniTool Partition Wizard
MiniTool Partition Wizard enables you to delete Windows Storage Spaces within a few clicks. It is very easy to operate.
MiniTool Partition Wizard FreeClick to Download100%Clean & Safe
Step 1: Launch MiniTool Partition Wizard and go to its main interface.
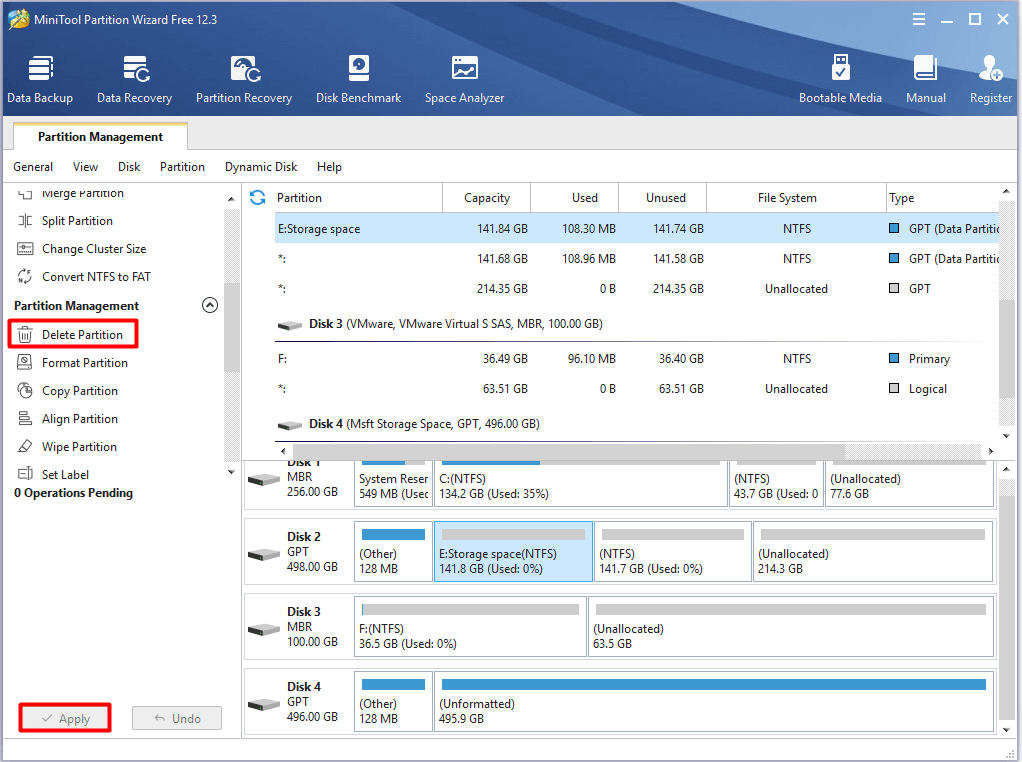
Step 2: Click the Storage Spaces from disk map and then click the Delete Partition option in the left pane.
Step 3: Click the Apply button to carry out the operation.
Conclusion
To sum up, this post tells you the definition and features of Windows Storage Spaces. Based on that, it shows you how to create, resize, and delete the Storage Pool Windows 10. In a nutshell, it is a full guide on Windows 10 Storage Spaces.
If you have any thoughts on the Storage Spaces Windows 10, please write down in the following comment area. For any questions during the use of MiniTool Partition Wizard, please directly send us an email via [email protected]. We will get back to you as soon as possible.



User Comments :