About Windows 11
Windows 11 is an operating system (OS) designed as the successor to Windows 10. Since Microsoft released Windows 11 in late 2021, a lot of users have upgraded their Windows 10 to Windows 11 immediately.

Windows 11 has a brand new outlook and some new or changed features, compared with Windows 10. If you have a Windows 10 PC, you can upgrade it to Windows 11 free as long as it meets the Windows 11 system requirements.
However, Windows 11 also comes with some bugs, as a new operating system. For detailed information, you can refer to our previous post: 13 Window 11 Bugs/Errors/Issues/Problems and Their Fixes.
Windows 11 Bug Leaves User Data After Factory Reset
Recently, some users reported a big security flaw on Windows 11.
If you want to sell your computer or throw away your old hard drive, you will need to remove all the data on it first to prevent others from accessing your personal information. And on Windows 11, you can do it by factory resetting your system.
You just need to go to Settings > Recovery > Reset PC. While resetting the system, Windows 11 provides you with 2 options: keep your files, or remove everything. If you need to destroy your personal files on the system, you need to select the second option. However, a Windows 11 bug leaves user data after a factory reset, which means your personal files cannot be removed completely.
The issue mainly happens to users who used the OneDrive service. Even after factory reset, the personal data from OneDrive has still been kept in a Windows.old folder and it includes all the locally saved files. And others can access those files via Command Prompt.
How to Wipe Data on Windows 11 Completely
Unfortunately, Microsoft hasn’t offered a solution to this Windows data-wiping bug for now. You can stay tuned for new Windows 11 updates, and the bug might be fixed in the future.
If you want to wipe all the files on your Windows 11 PC immediately, MiniTool Partition Wizard is recommended instead of the Windows 11 factory reset. It is a reliable and professional partition and disk management tool. With this tool, you can create, move, resize, delete, and wipe partitions free. It also provides many advanced features for subscribed users.
If you want to wipe a non-OS disk, you can do it with MiniTool Partition Wizard free. If the desired disk contains the system running currently, you need to upgrade to MiniTool Partition Wizard Pro or a higher edition and then use the bootable version to wipe data.
Don’t worry if you are confused. Here are the detailed steps.
Step 1: Prepare a USB flash drive that contains no important files and connect it to your PC. If there are important files, please back them up in advance.
Step 2: Download and install MiniTool Partition Wizard. Then run the program and click the Bootable Media feature and create a bootable USB drive following the guide.
MiniTool Partition Wizard DemoClick to Download100%Clean & Safe
Step 3: Boot from the bootable USB flash drive.
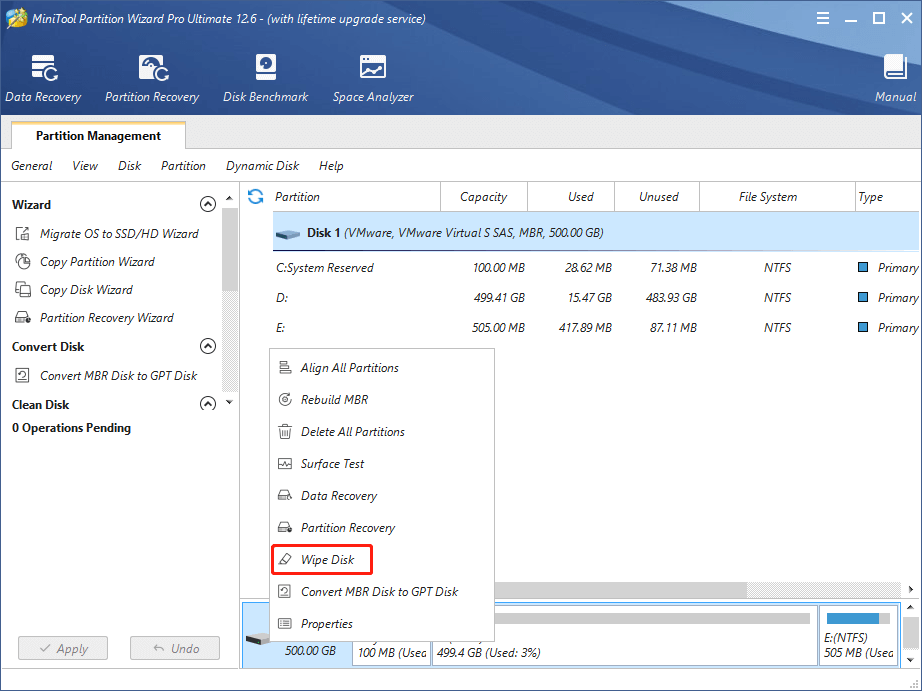
Step 4: When you get the main interface of MiniTool Partition Wizard, right-click the target disk and select Wipe Disk.

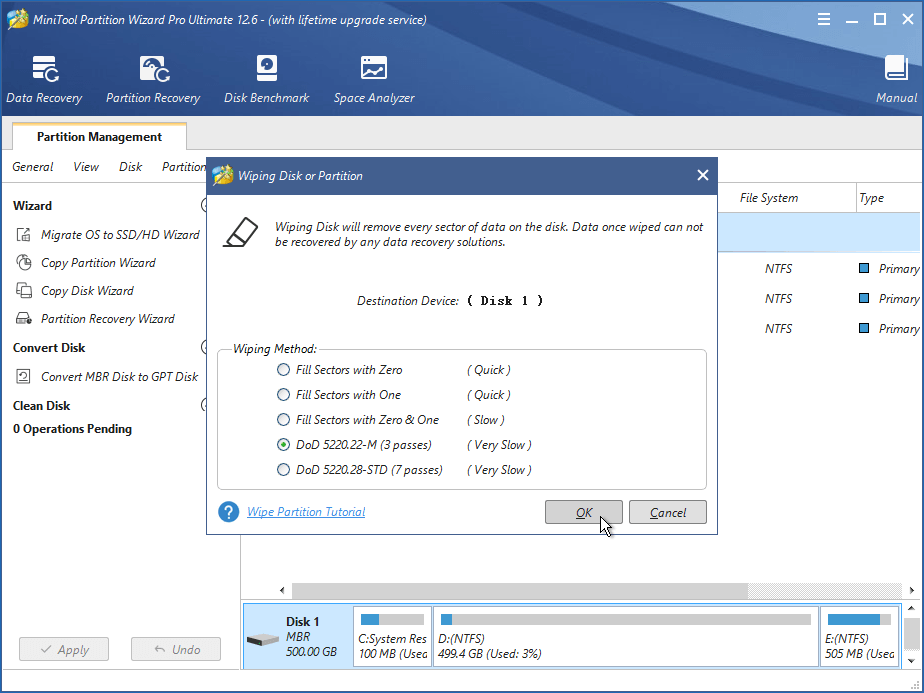
Step 5: In the pop-up window, select a wiping method and click OK. The slower method can wipe your data more deeply.

Step 6: Click the Apply button to start wiping data on your Windows 11.
Once the process is finished, all the data on the disk will be removed and it will quite hard to be recovered by any data recovery programs.

User Comments :