An Overview of Windows 11 Black Screen
What is black screen of death Windows 11
Black Screen of Death is a term that is often used to illustrate the error occurring while running MS-DOS and Microsoft Windows. As implied by its name, black screen of death will show you an entire black screen when it happens.
The specific symptoms of the error vary in different cases. For instance, you may also see a cursor beside the black screen. Sometimes, the colour of the screen changes from blue to black.
Common Windows 11 black screen issues
Here, we summarize several common-to-see Windows 11 black screen cases as follows.
- Windows 11 black screen of death
- Windows black screen with cursor
- Windows 11 black screen after login
- Windows 11 blue screen to go black screen
Causes for Windows 11 black screen
Multiple factors can cause the black screen of death Windows 11 error. We list them in the below. You can take them for reference.
- Loose connections on the Windows 11 PC
- Improper protection settings
- The incompatibility of applications on Windows 11
- Problematic applications
- The outdated graphics driver
- Hardware issues with the Windows 11
The Full Guide to Fix the Dell Laptop Black Screen Issue
Top 9 Methods to Solve Windows 11 Black Screen
To fix the black screen of death Windows 11 error, you can apply one of the following methods.
Method 1: Use a Shortcut to Check the Responsiveness of PC
Before trying other solutions, you should check if your Windows 11 PC is responsive. You just need to hold the Windows + Ctrl + Shift + B keys at the same time to learn the fact. Through this operation, your graphics driver will be restarted and make a beep sound.
If the graphics driver is the cause for the black screen error, it can be resolved by this operation. In addition, you can know if your PC is responsive via the beep sound. Then you can try other methods if this method fails to work.
Method 2: Check the Connectivity of Peripherals
According to user reports, the Windows 11 black screen error often occurs due to the connectivity with the monitor. Hence, we recommend you check the connection of monitor. If the connection is loose, you need to disconnect and reconnect it.
If the cable has damages, you should replace it with another one. If there is more than one monitor connected to your PC, disconnect them and only keep one.
Also read: Dell Command Update Won’t Open? Try These Methods Now
Method 3: Clean Your PC
The overheating system is also responsible for the black screen of death Windows 11 error. The system will keep cool when the CPU fan works properly. However, if dust piles up or the CPU fan error occurs, the performance of fan will drop. Then your computer gets overheating, causing Windows 11 black screen issue.
In this case, you can try cleaning your CPU fan, graphics card, as well as RAM and power supply unit with a piece of cloth. To cool down your PC, you can also put it in a place with enough air circulation.
Also read: How to Clean up Your Computer? Top 8 Methods for You
Method 4: Modify Projection Settings
If there’s nothing wrong with the monitor, you can check if your projection settings are wrong as improper settings can cause Windows 11 black screen too. You can check and modify projection settings with the following steps.
Step 1: Open the Projection Settings by pressing Windows and P keys. From the prompted menu, you can see four options (PC screen only, Duplicate, Extend, and Second screen only). In normal cases, the PC screen only option is the default option. If the option is set to others, you may encounter black or blank screen issue.
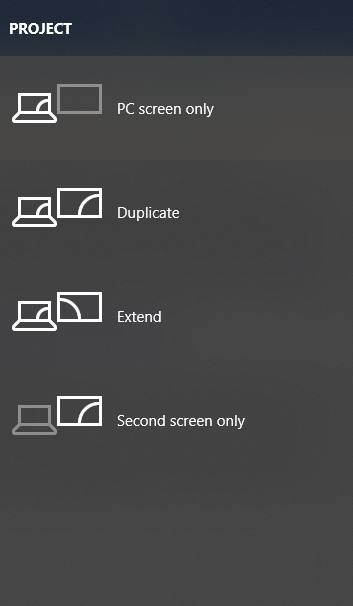
Step 2: To change the projection settings, press the down arrow key to move to other options. As the screen turns black, you can’t see the options. Fortunately, you can still change the settings by making use of the arrow and Enter keys. Bring down the highlighter one by one until the option is set to the PC screen only.
Also read: Here Are Ways to Fix Black Screen Error When Booting Windows
Method 5: Remove Recent Updates
Though Windows updates can fix known bugs and bring new features, they sometimes trigger errors. According to user reports, the black screen error can occur after a system update. In this case, you need to roll back those updates.
To view and uninstall updates, you can follow these steps.
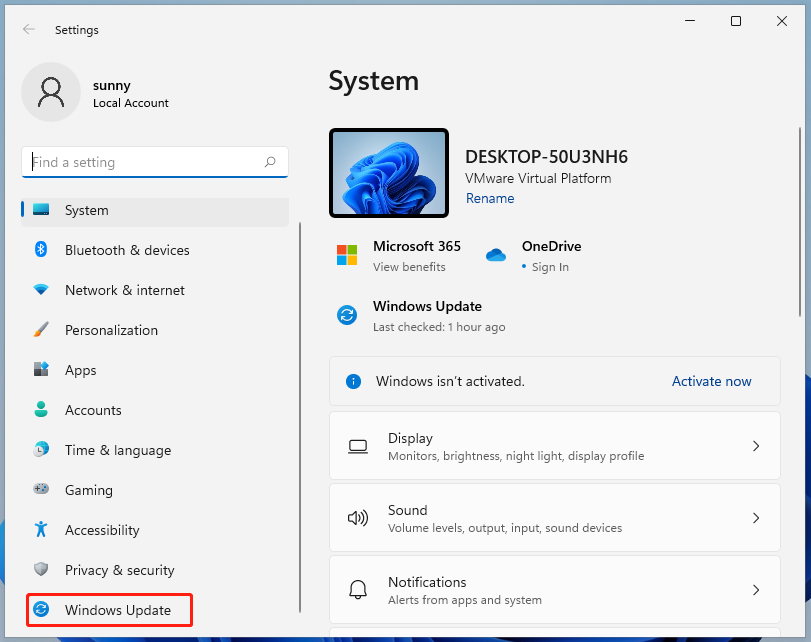
Step 1: Open Settings by pressing Windows + I keys, and then click Windows Update in the left pane.
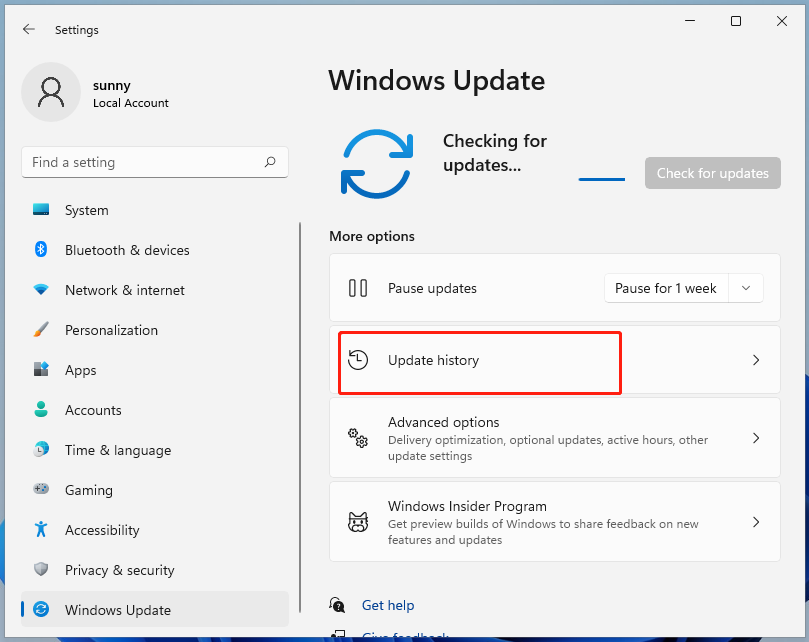
Step 2: Click Update history to continue the process.
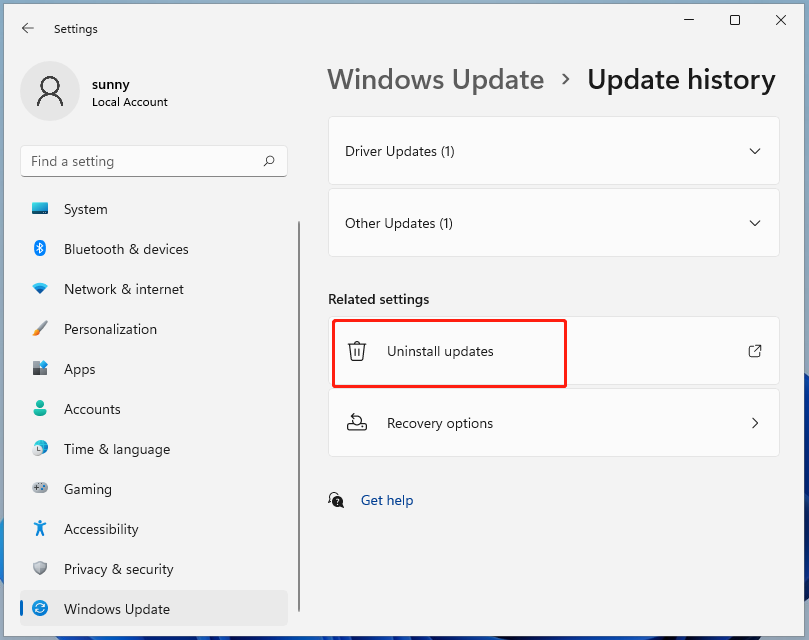
Step 3: In this next window, you can see the update history. To remove the new updates, click the Uninstall updates option under the Related settings section.
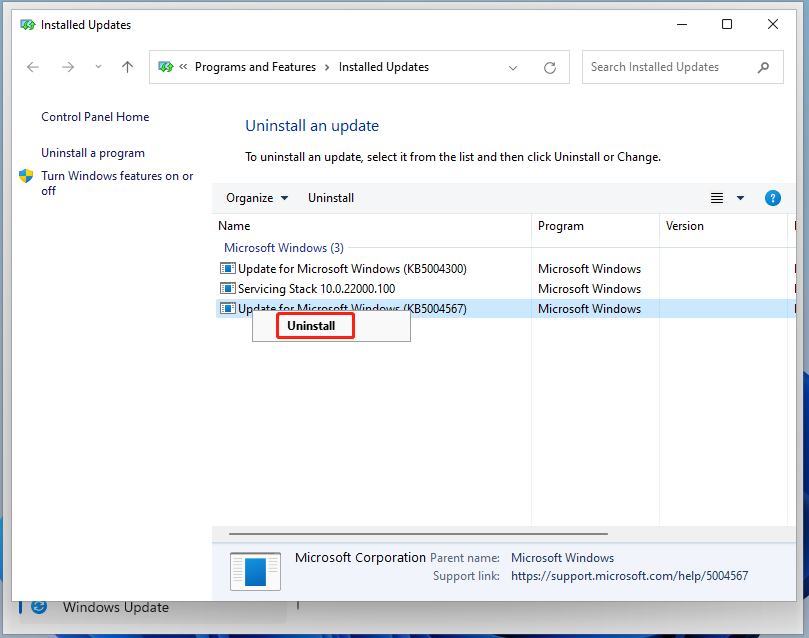
Step 4: In the Installed Updates window, you can see all the installed update versions. Right-click on the recently installed update and click Uninstall. Then confirm and follow the on-screen instruction to finish the uninstallation.
Method 6: Scan for Virus or Malware
Virus or malware can damage system files and cause Windows 11 black screen after login. To check if it’s the reason for the black screen, you can perform a virus scan. Both the third-party antivirus software and Windows embedded program – Windows Defender are capable of doing that.
Here, we show you how to run virus scan through Windows Defender on Windows 11.
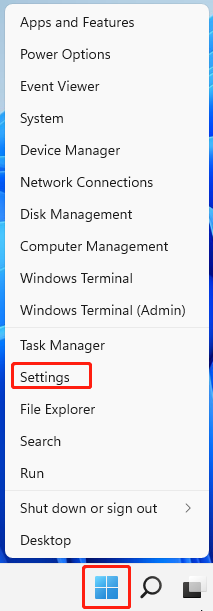
Step 1: Right-click on the Windows icon on the desktop and click Settings.
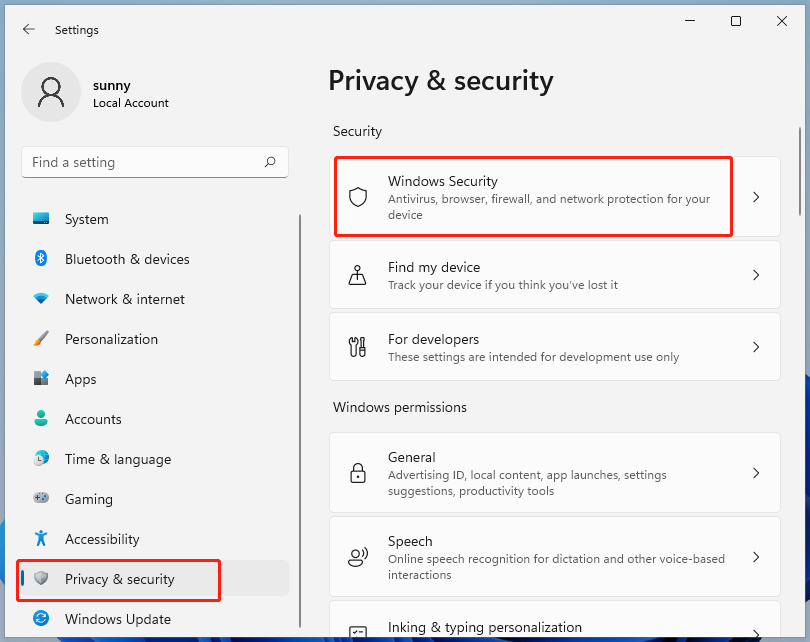
Step 2: In the Settings window, tap Privacy & security > Windows Security option.
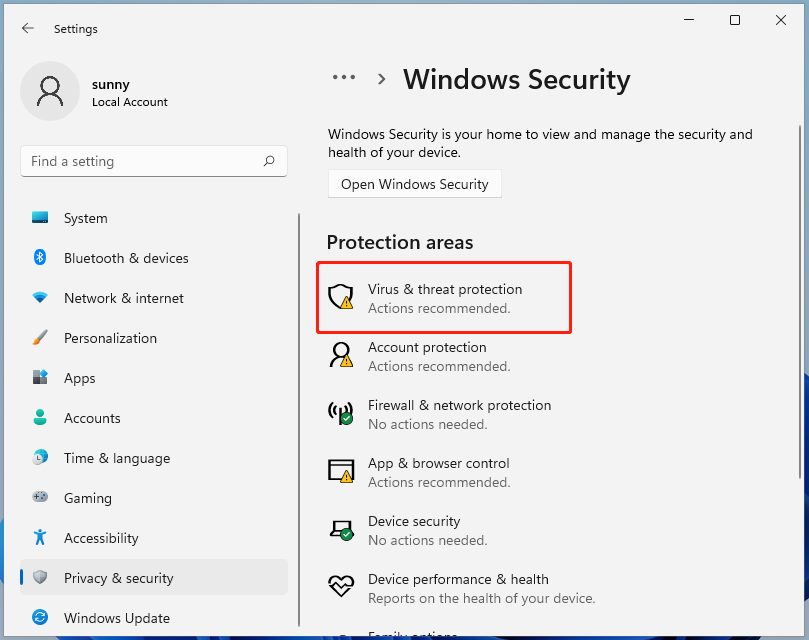
Step 3: Tap the Virus & threat protection option.
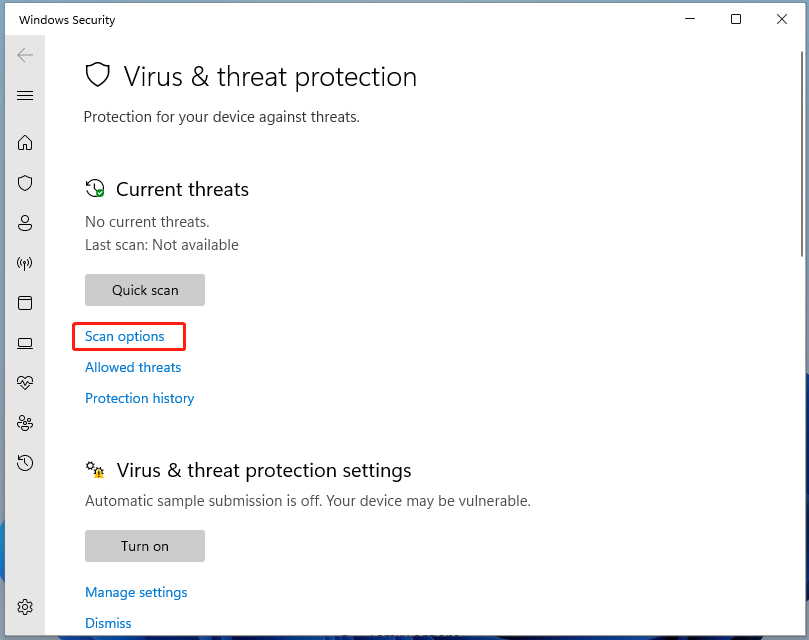
Step 4: To get more scan choices, click Scan options. Alternatively, you can also directly click on the Quick scan option to start the process.
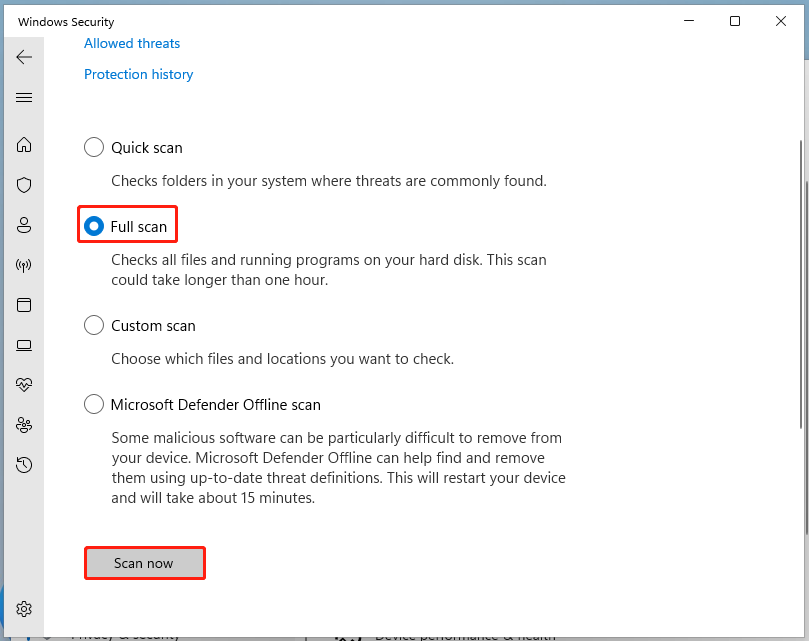
Step 5: In the next window, select a scan mode according to your demand and click Scan now to begin the process.
Method 7: Run SFC
Damaged or corrupted system files can result in the Windows black screen with cursor error as well. For that, Windows’ built-in program – SFC (system file checker) can help you detect and fix the damaged system files.
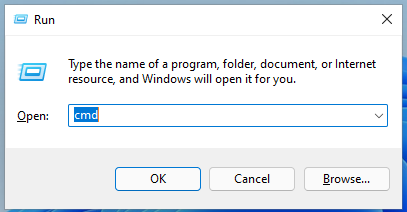
Step 1: Open the Run dialog box, and then input cmd and press Ctrl + Shift + Enter keys. By doing so, you can run Command Prompt as administrator.
Step 2: In the elevated window, type sfc /scannow and hit the Enter key to start the process. As shown in the picture below, you can view the scan process. You’d better not interrupt the process and wait for the finish of the process instead.

Method 8: Update Graphics Drivers
The Windows black screen with cursor error also occurs if the graphics driver is outdated. In this case, you can update the graphics driver with the steps below.
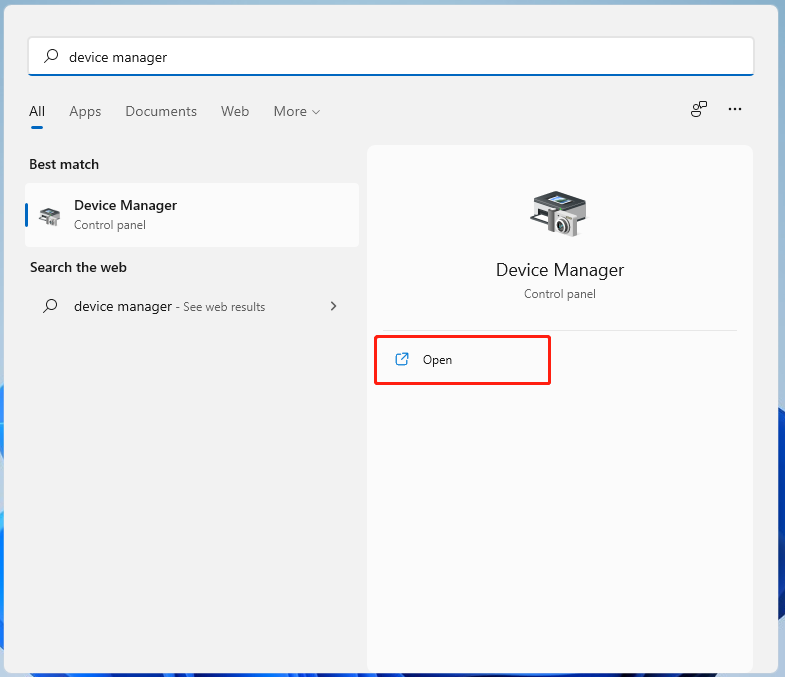
Step 1: Click on the Search icon on the desktop and then type device manager in the prompted window. Tap Open or Device Manager to continue.
Step 2: Expand Display adapters by double-clicking on it. Then right-click on your graphics driver listed under the expanded option and click Update driver.
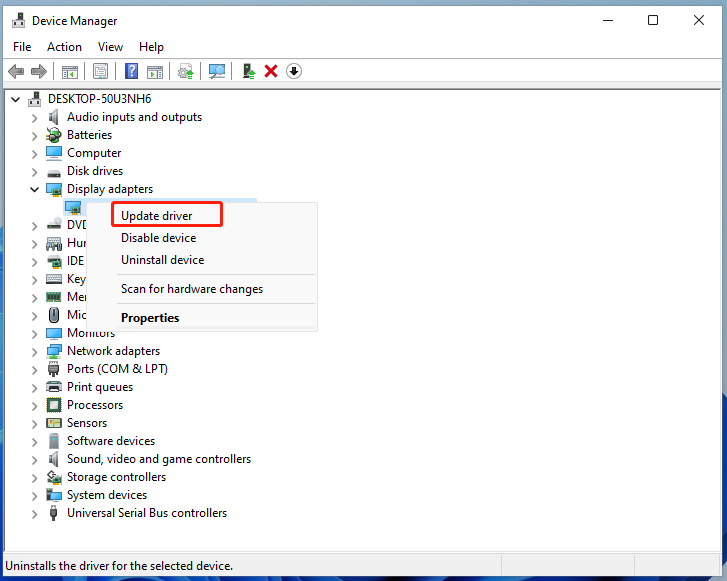
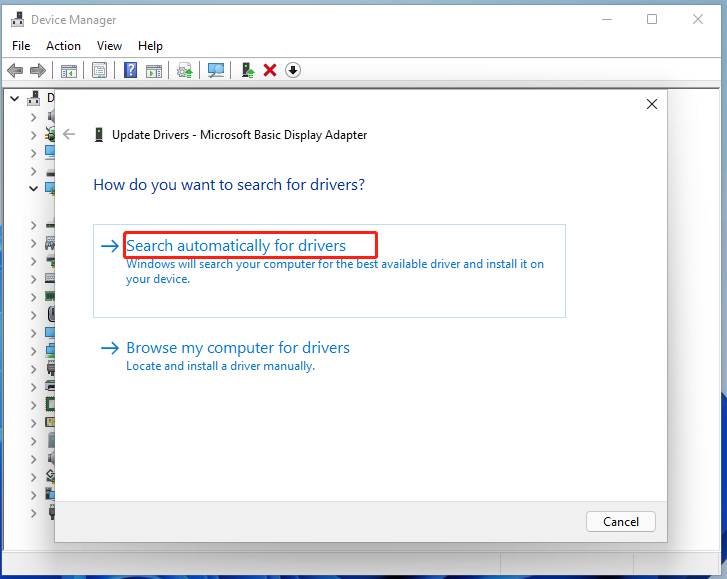
Step 3: In the next window, you can either click on Search automatically for drivers or Browse my computer for drivers to update your driver.
Method 9: Boot into Safe Mode
Try troubleshooting the Windows 11 black screen error by booting your PC into safe mode. Here are detailed steps.
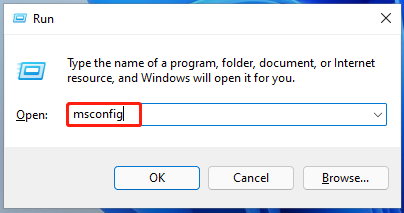
Step 1: Open the Run window by pressing Windows and R keys, and then input msconfig and hit Enter.
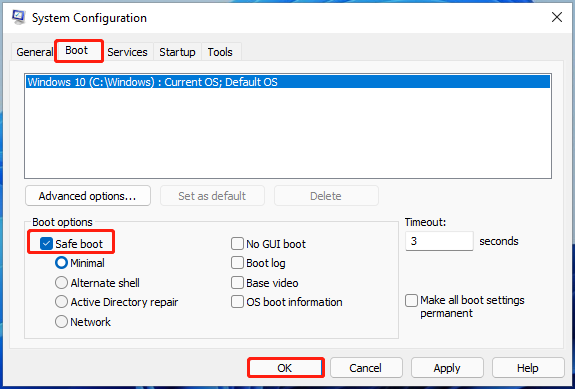
Step 2: After opening the System Configuration window, choose the safe boot option and click OK to save the changes.
Step 3: Click Restart to confirm the operation.
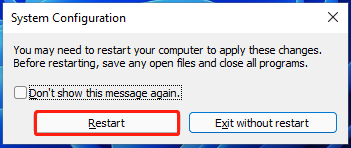
Step 4: Then your computer will restart and boot into safe mode. If your Windows 11 PC can work properly in this mode, it indicates other installed services or programs on your computer cause the black screen of death Windows 11 error. It is because that only basic Windows configuration and applications run in the safe mode.
Step 5: Exit safe mode and then run other programs one by one until the black screen error appears again. Then uninstall the faulty program.
Recover Missing Data after Windows 11 Black Screen
If Windows 11 black screen error occurs suddenly, you may lose your data. After fixing the error, you can recover data immediately. MiniTool Partition Wizard can help you recover missing data because of power failure, accidental deletion, system update, OS corruption, hard drive failure, etc.
To recover data with MiniTool Partition Wizard, follow the given steps.
MiniTool Partition Wizard DemoClick to Download100%Clean & Safe
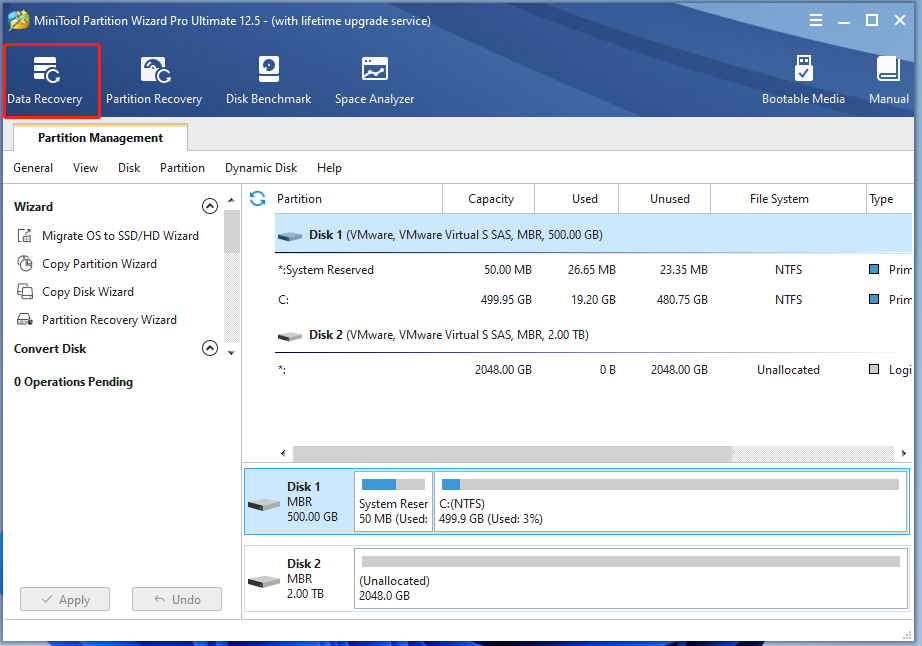
Step 1: Launch MiniTool Partition Wizard to enter its main interface.
Step 2: Click on the Data Recovery option on the top bar.
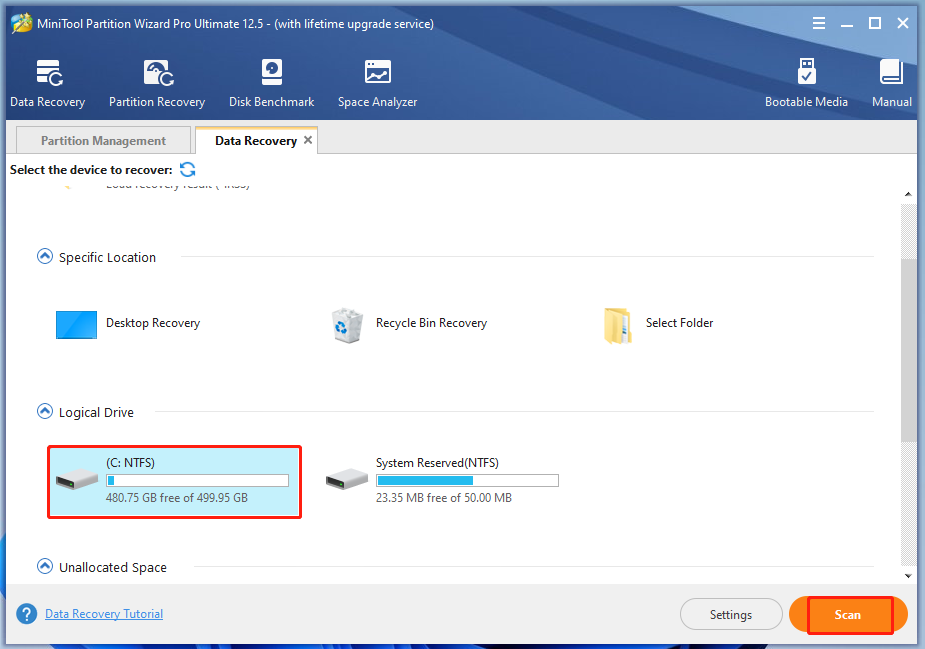
Step 3: In the next window, click on the drive that you want to recover missing data from and click the Scan button.
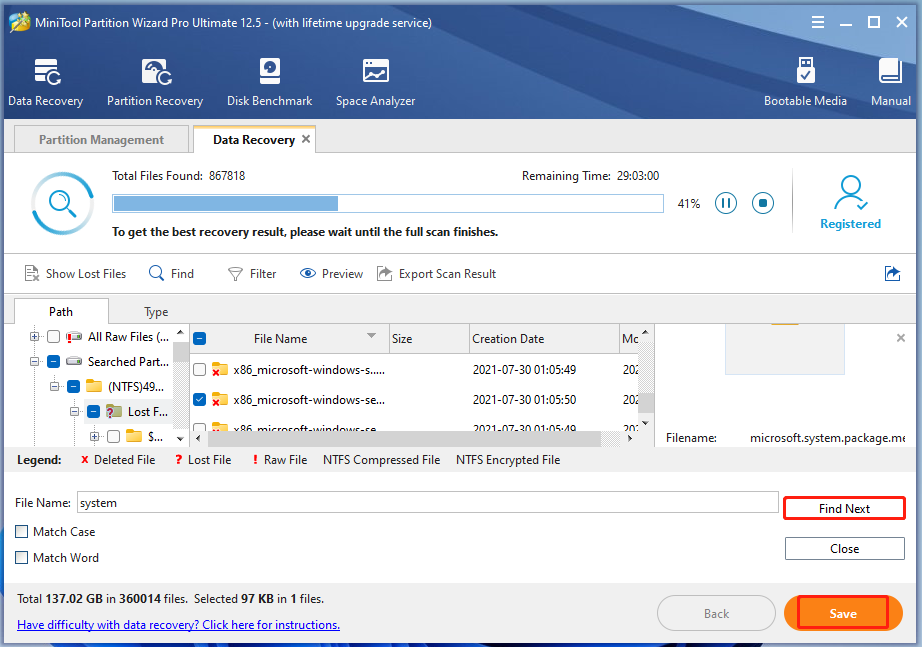
Step 4: After you click the Scan button, the scan process starts. Once the files are found, they will appear on the window. If you see the target file, you can pause the process. Choose the file and tap the Save button.
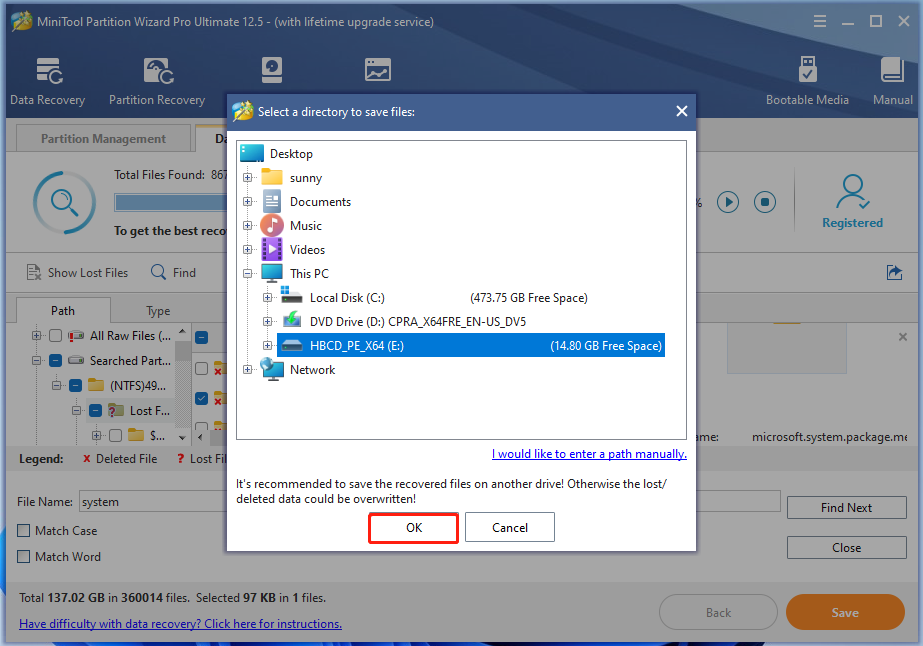
Step 5: In the elevated window, select a destination for the recovered files and then tap OK.
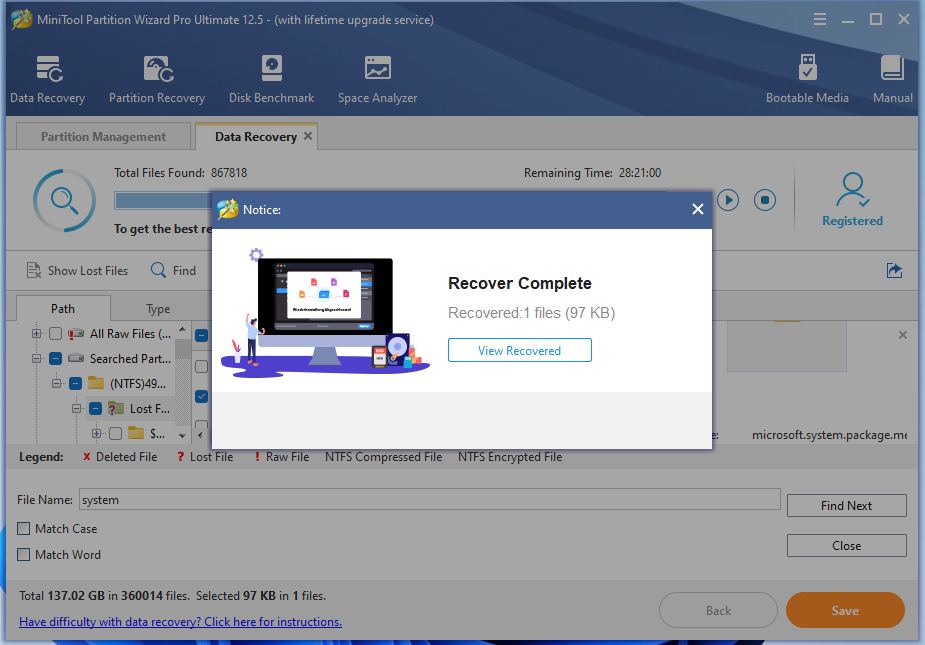
Step 6: Then MiniTool Partition Wizard will save the recovered files to the destination. When it finishes, you will see “Recover Complete”.
As you see, MiniTool Partition Wizard enables you to recover missing data easily. If you lose data by accident, try recovering data with it.
MiniTool Partition Wizard DemoClick to Download100%Clean & Safe
Wrap Up
To sum up, this post introduces some basic information about Windows 11 black screen and then provides you with methods to fix the issue. Moreover, it shows you how to recover missing data after solving the black screen error.
Here comes to the end of the post. For any questions about MiniTool Partition Wizard, directly contact us by sending an email via [email protected].

User Comments :