USB flash drive can become corrupt or damaged sometimes. This article will show you how to recover data from a corrupted USB drive and how to repair USB drive with 5 reliable USB flash drive repair methods.
A USB flash drive is also known as a thumb drive, pen drive, gig stick, USB stick, or a jump drive. It is often used for data storage, data backup, and data transfer between computers. It is very popular and widely used nowadays.
However, sometimes USB drive can get errors due to reasons like unexpected system shut down, improper removal, virus attack and so on. When your USB drive is corrupted or become not recognized, how to fix USB drive? How to recover data from it?
If you don’t know, don’t worry. The following contents will show you the answer.
Quick Video Guide:
How to Recover Data from the USB Storage
When your USB is corrupted or damaged, you may try various repairs on the Internet to repair USB stick. However, not all of the USB repair tools and fixes are reliable. And some mistaken operations will make it harder to recover data from USB drive.
So the most important thing is to recover the lost data from it as soon as possible. And to make sure the data can be recovered, keep in mind that stop using the USB drive immediately after your USB drive is corrupted or damaged.
There are various USB data recovery tools on the Internet. Here I recommend you to use the professional USB partition manager – MiniTool Partition Wizard Pro Ultimate.
It can recover all kinds of files on your USB, such as documents, photos, audio, music, videos, emails, archives, etc. and it supports all Windows versions including Windows10/8/8.1/7/XP.
Before doing the job, you need to get this tool by clicking the follow button.
Now, you can follow the steps as below to recover data from USB.
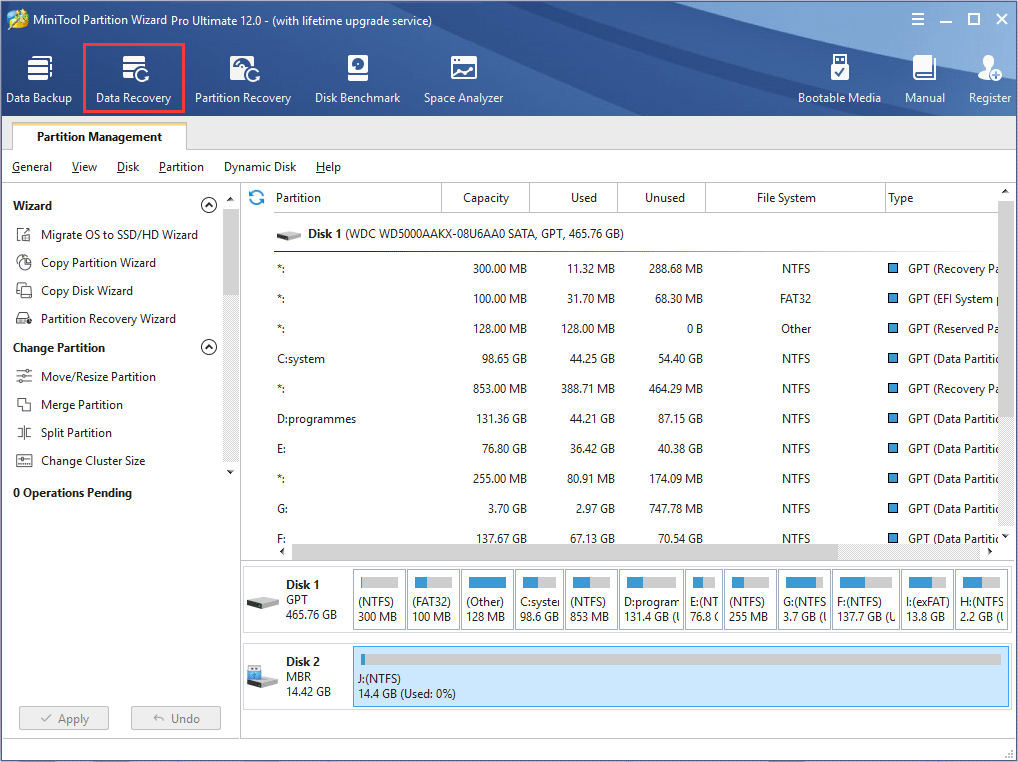
Step 1. Launch Data Recovery.
- Connect the USB to your PC.
- Launch MiniTool Partition Wizard Pro Ultimate.
- Click Data Recovery.
Step 2.Scan the USB drive.
- Select the partition on the drive.
- Click Scan on the lower right corner.
- If the target partition is not listed, you can click the refresh icon on the top to refresh the interface.
- If you just want to recover some specified file types on your USB drive, you can click Settings button near the Scan button to set parameters.
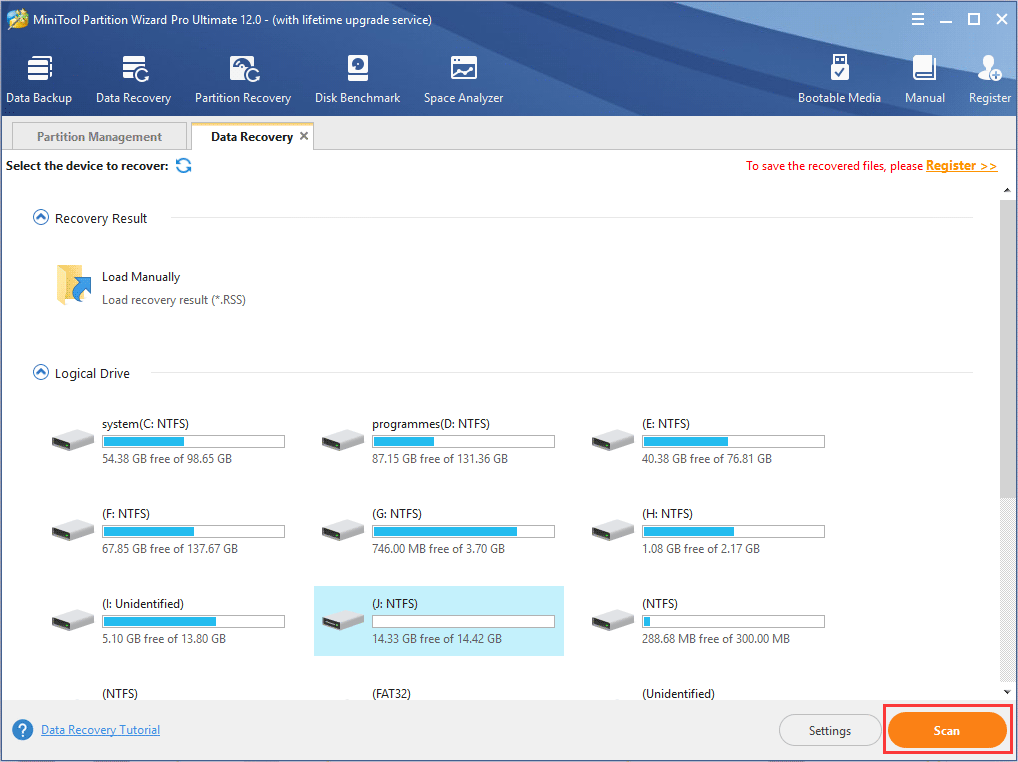
Here is a brief introduction of the different parts of this feature:
- Recovery Result: this part will show the record of the last scanning result and you can also manually load scanning result and check needed data to recover.
- Logical Drive: this part will show all existing partitions on your computer, including the partition on SSD, SD card and USB drive.
- Hard Disk: this part will list all disks detected on your computer, such as USB, SSD and HDD. At this part, you can also select one to scan.
- If there is any unallocated space or lost partition on your computer, the Lost Partition and Unallocated space parts will be listed as well.
Step 3. Check needed files in the scan result.
1. Wait for the scanning process completed.
You can pause or stop it manually if you find the items you want but the scanning process is not finished yet.
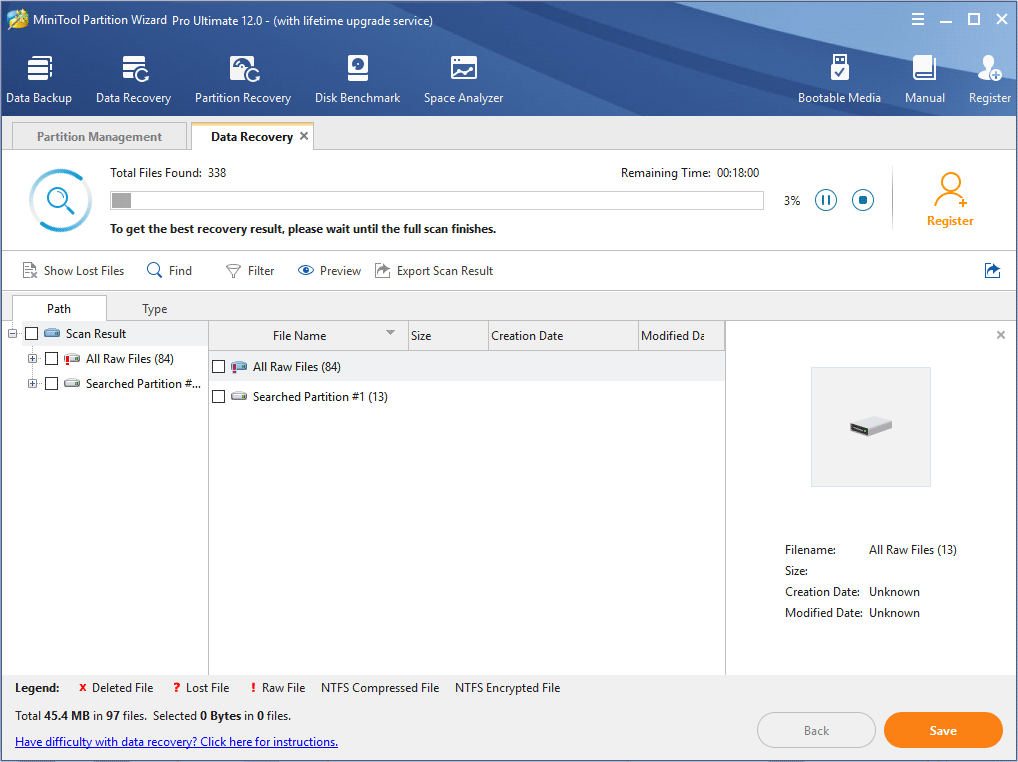
2. Find your needed data from the scan result.
You can utilize the Show lost files, Find and Filter tool to find lost files quickly.
- Show Lost Files: This feature enables the utilioty only show lost items on the USB drive.
- Find: This feature can help you find the file you want by typing the specific file name. To search a file by file name exactly, you can check Match Case (type the file name’s uppercase and lowercase letters correctly) or Match Word (type the complete file name including file extension).
- Filter: This feature can help users search files by filename/extension, size, the creation or modification date, which can help to find needed data effectively.
- Check needed files to recover. You can preview the scanning results.
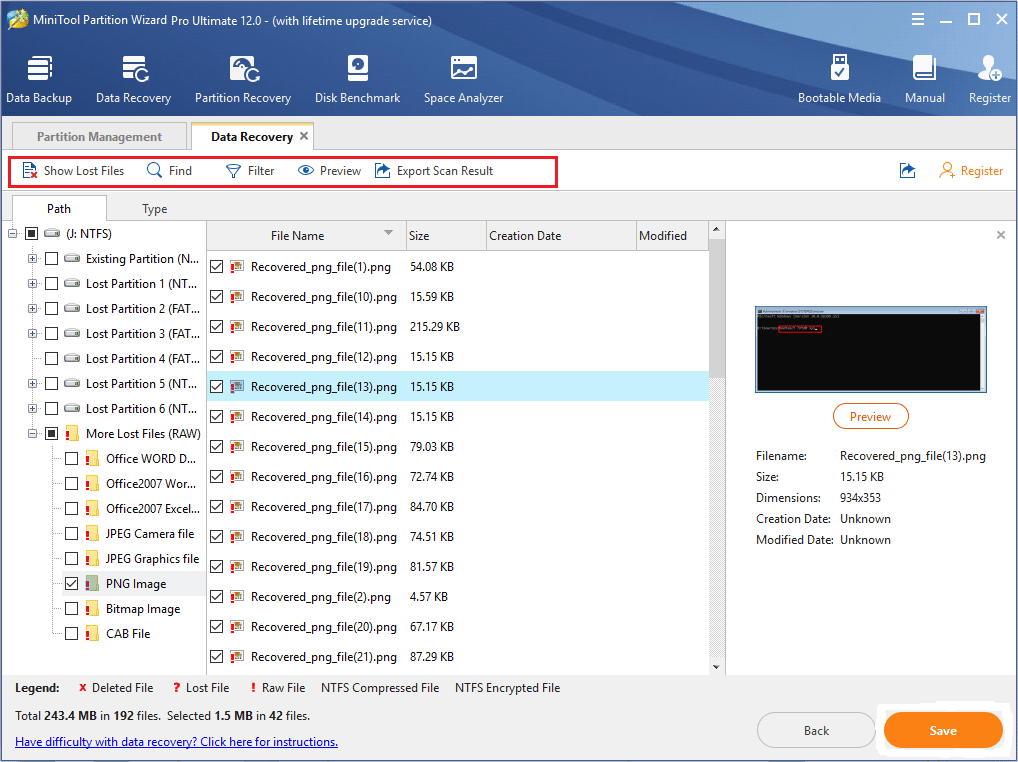
- Preview feature enables users to preview a picture or .txt file which should be smaller than 20MB.
- Export Scan Result enables users to export the scan result and save it as .rss
Step 4. Save files to a safe place.
- Click Save button on the lower right corner.
- Choose a directory to save selected files. It is recommended to save the recovered files on another drive. Otherwise, the lost/deleted data could be overwritten.
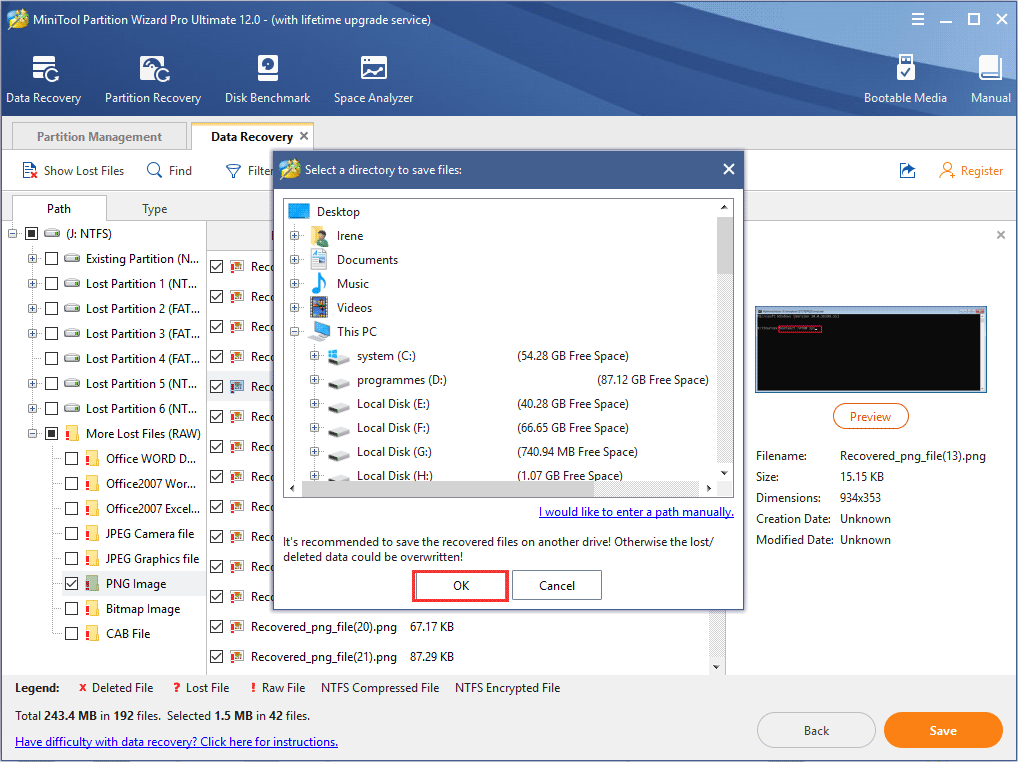
After the files are saved successfully, you can go to the device to check if your files can be opened normally.
You see, MiniTool Partition Wizard Pro Ultimate makes USB data recovery as a breeze. Just get it now to recover data from corrupted/unrecognized USB.
After recovering your important files, you can try the following fixes at ease.
Top 5 Quick Fixes to Repair USB Storages Immediately
Solution 1. Try Another USB Port
If your USB storage cannot be recognized or not detectable on your computer, you can try to plug it into another port firstly.
Sometimes it could be possible that your USB drive is not corrupted but the port itself is damaged. So, you can try other one when your USB drive is not recognized on your computer.
Solution 2. Reinstall the USB Drive
This way is helpful for users who don’t know how to fix a USB that is not recognized. For example, if your computer shows USB Device Not Recognized error message, you can consider trying this fix firstly.
Your PC will not be able to detect your USB if the drivers that run your drive get corrupted. You can reinstall drivers to see if the USB drive can be recognized.
Step 1. Launch Device Manager.
You can follow one of the two instructions as below to launch it.
- Right-click Windows start menu and choose Device Manager.
- Input Device Manager in the Windows search box and click the best match.
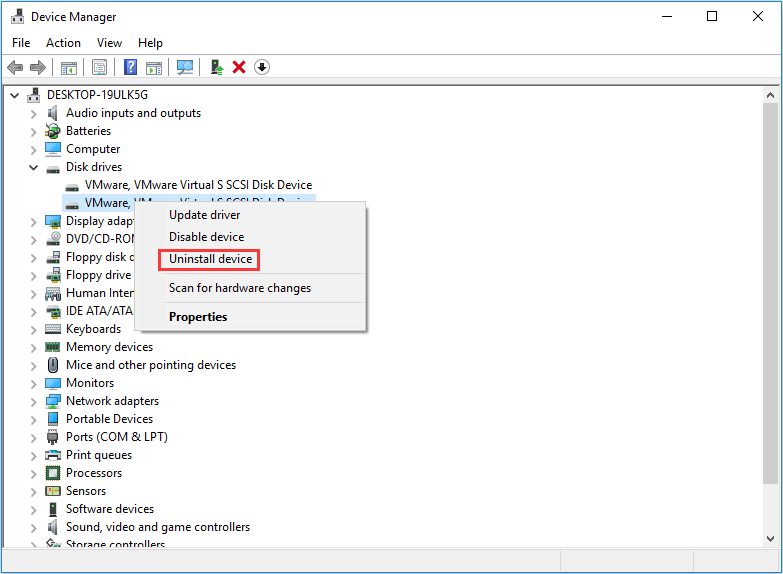
Step 2. Uninstall the device.
- Find Disk drives and double-click it.
- Select the drive that you encounter corrupt master file table error.
- Right-click it and choose Uninstall device.
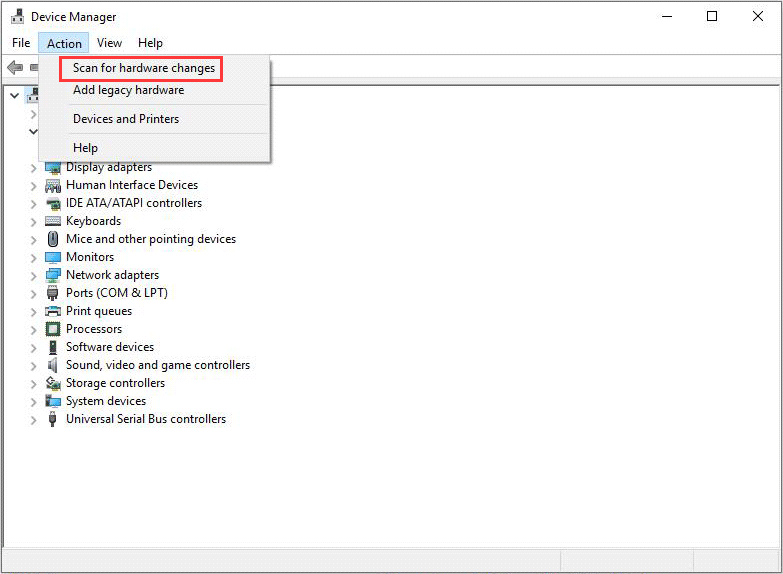
Step 3. Reinstall the drive.
- Click Scan for hardware changes under Action bar.
- Wait for the uninstalled disk to be detected and reinstalled.
- Restart your computer.
After that, you can check if you are able to use the USB as normal.
Solution 3. Change Drive Letter
If your USB is detected but not showing in Windows Explorer, the files stored on the USB can’t be opened. Under this situation, you need repair USB by assigning it a drive letter. It’s very simple. Here are detailed steps and screenshots for your reference.
Step 1. Open Disk Management in Windows 10.
Here are two ways for you to open Disk Management in Windows 10.
- Right-click the Windows Startmenu and select Disk Management.
- Press Win + R key to open Run box and then input msc and hit Enter.
Step 2. Change Drive Letter.
1. Select the target partition in Disk Management.
2. Right-click it and choose Change drive letter and path….
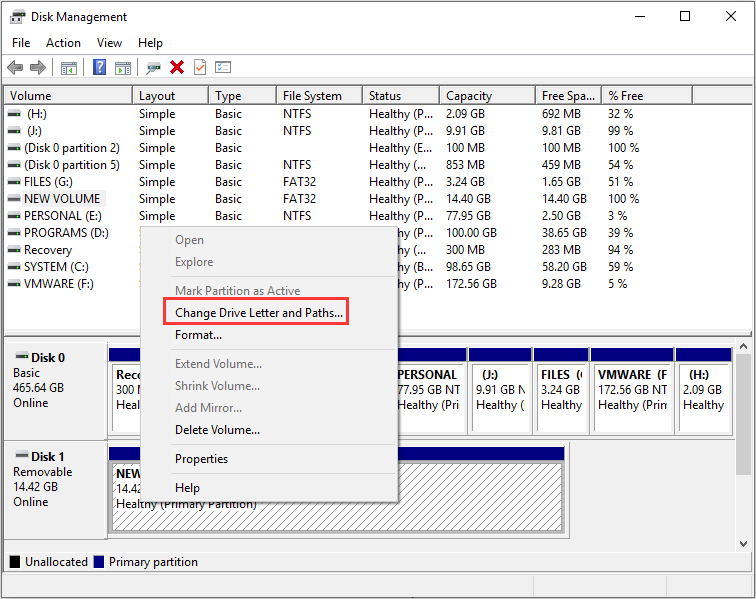
3. Click Add to add a new drive letter. You can use this way to add drive letters for all needed partitions.
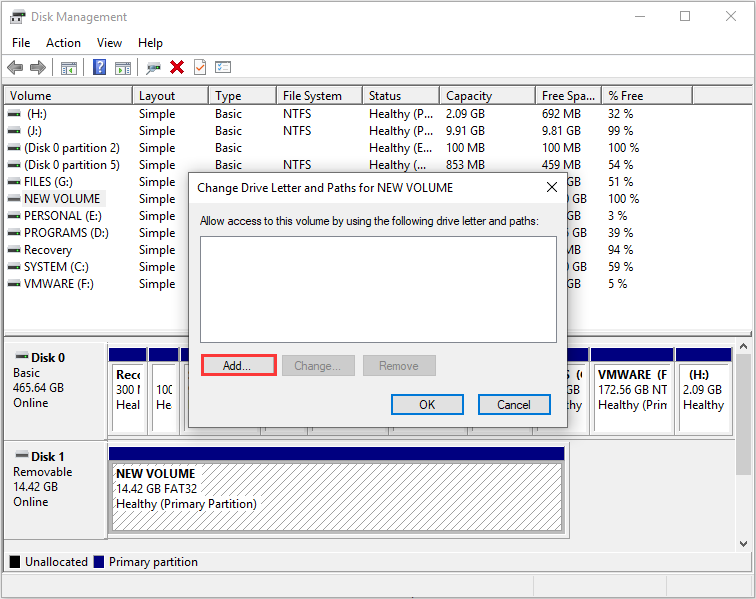
4. Then click OK.
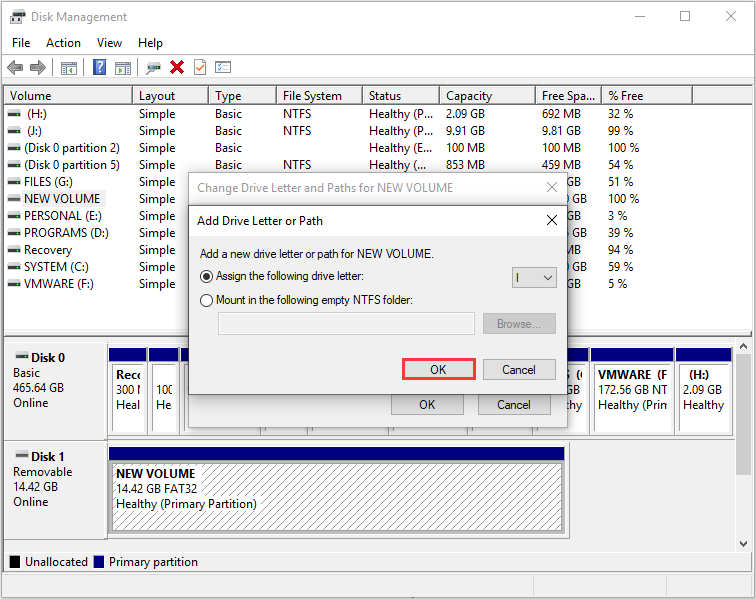
After that, you can go back the main interface to check if the USB device goes back to normal.
Solution 4. Check File System
Sometimes because of file system errors, you are unable to use the data on your USB. For example, many users encounter the error you need to format the disk before you can use it when they try to open their USB storage.
In this case, you can check and fix these errors with MiniTool Partition Wizard Free Edition to fix USB storages.
Download the USB repair tool by clicking the following button. If you have got the MiniTool Partition Wizard Pro Ultimate before, then you don’t need to download the free edition at here. Just go ahead now.
MiniTool Partition Wizard FreeClick to Download100%Clean & Safe
Step 1. Choose the partition on your USB drive.
- Launch MiniTool Partition Wizard Free Edition.
- Select the target partition.
- Choose Check File System from the left action panel.
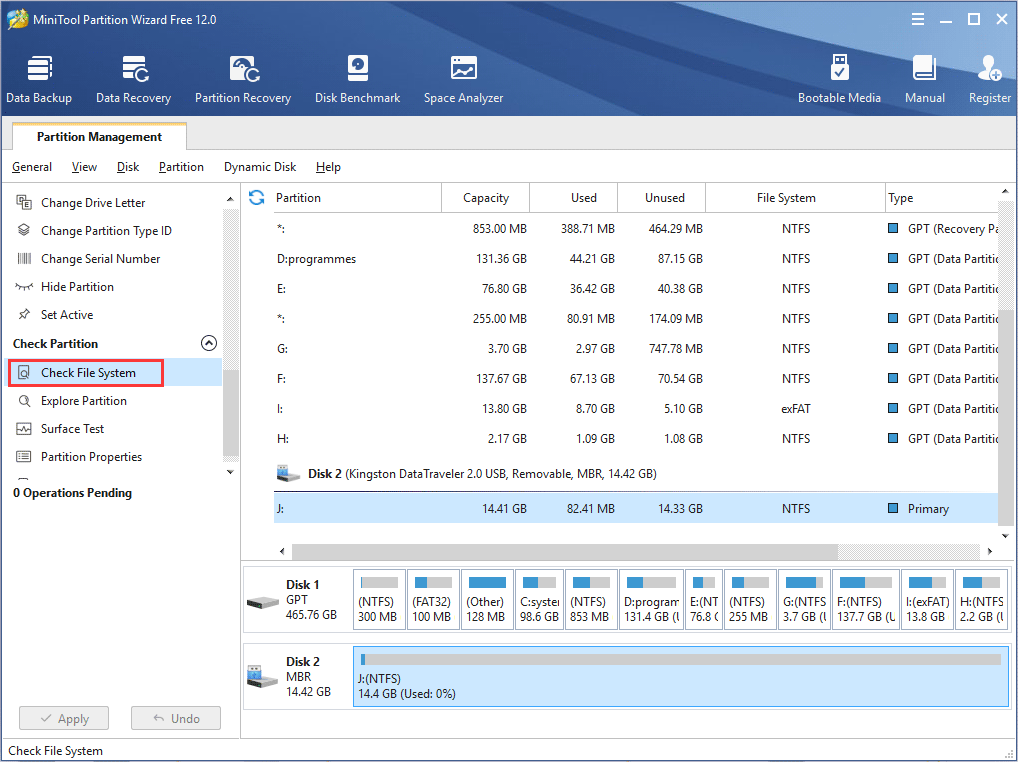
Step 2. Check and fix file system error.
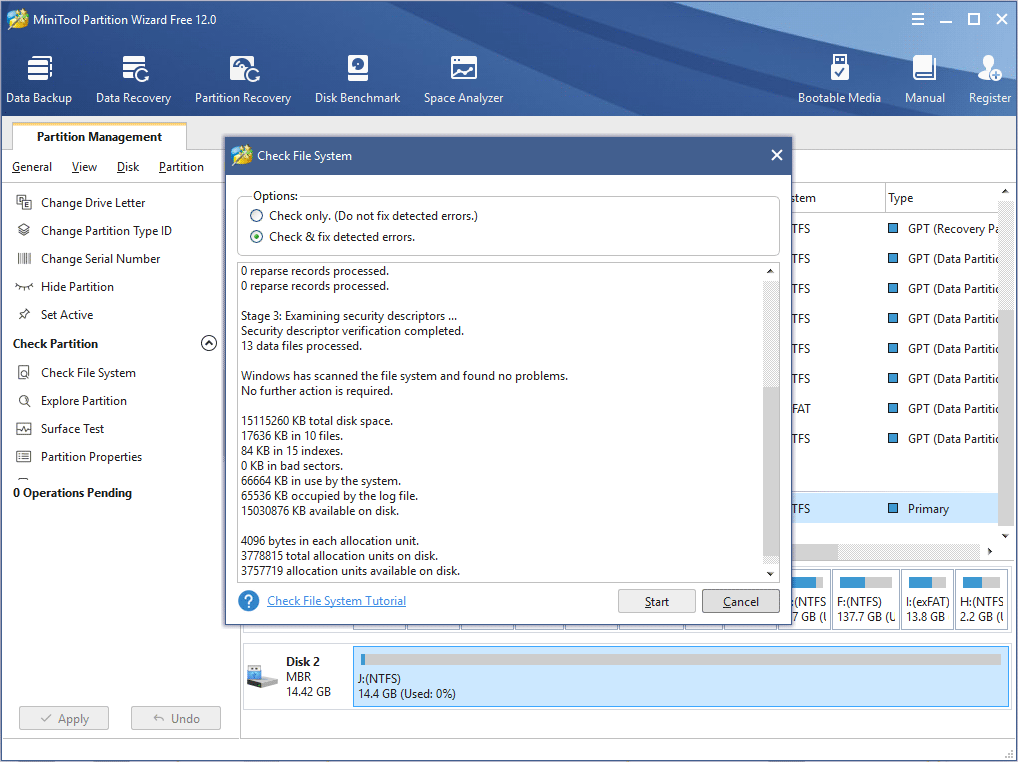
1. On the pop-up window, choose Check & fix detected errors.
- Check only: The software will only scan the drive for issues but will not repair them during the process.
- Check & fix detected errors: The software will scan and fix any detected errors automatically.
2. Click Start button to check and fix file system immediately.
Solution 5. Format the USB drive
If you have recovered files from the USB and the above fixes don’t work, you can format it directly with a professional USB formatting utility.
Step 1. Open Disk Management in Windows 10.
You can follow the two ways to open Disk Management in Windows 10.
- Right-click the Windows Startmenu and select Disk Management.
- Press Win + R key to open Run box and then input msc and hit Enter.
Step 2. Start formatting the USB stick.
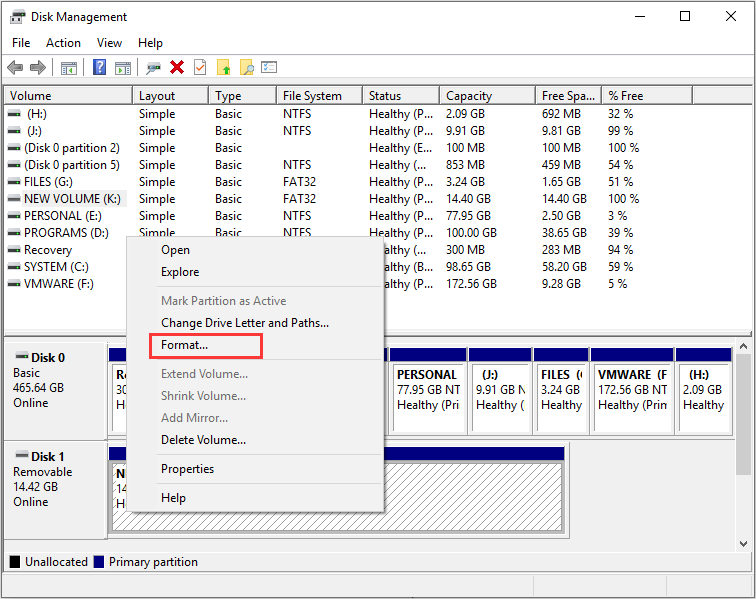
1. Choose the partition that you want to format.
2. And then right-click it to select Format….
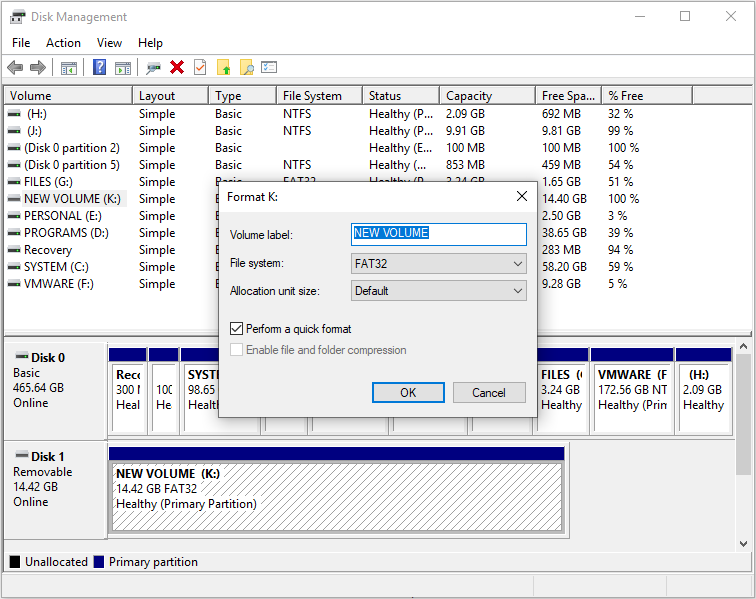
3. Set volume label, file system and allocation unit size and then click OK.
4. Read the warning and click OK to continue.
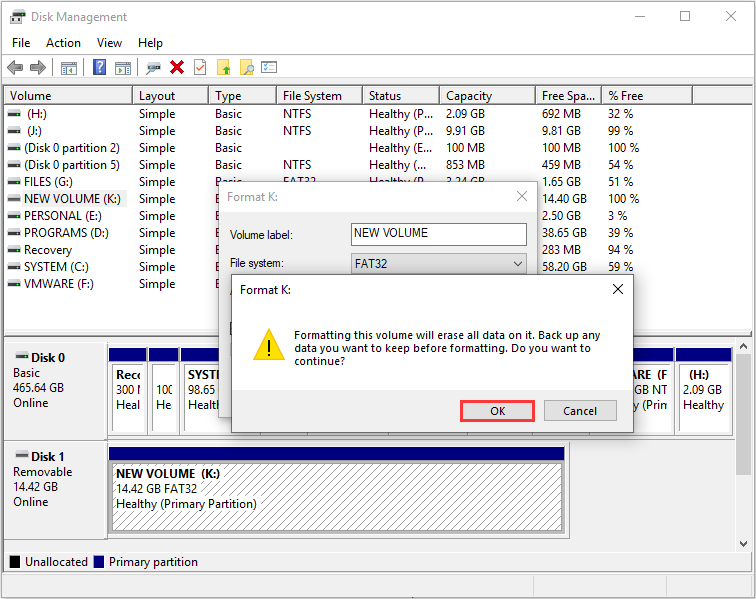
At this time, the hard disk has been formatted and all data on the drive have been cleared. For inaccessible hard drives, they can be used as a normal one again.
After trying the above fixes, you should have fixed the corrupted or unrecognized USB drive. However, if the above solutions do not work, you should consider the case that your drive is physically damaged.
Under this situation, USB stick repair is complicated, as it requires specialized equipment and expertise. So the best storage drive repairs for USB drive with physical damage is to hand over it to some professional. They know how to use professional USB storage repair utility to fix USB drive.
Bottom Line
After reading this post, you must have learned how to recover files from a corrupted USB drive and how to repair USB drive with the above top 5 USB storage device repairs.
If you have any question about how to repair USB drive or recover data from USB with MiniTool Partition Wizard Pro Ultimate, you can leave a message in the following comment zone and we will reply as soon as possible. If you need any help when using MiniTool software, you can contact us via [email protected].
USB Flash Drive Repair FAQ
When a USB storage cannot be recognized on your PC, you can reinstall the driver for your USB in Device Manager.
- Right click Windows Start menu and choose Device Manager.
- Expand Universal Serial Bus controllers.
- Find the target device driver and right-click it to select Uninstall.
- Restart your PC. Then the USB device driver should be automatically reinstalled.
- Launch MiniTool Partition Wizard Free Edition.
- Select the target partition on the corrupted USB drive.
- Choose Check File System from the left action panel.
- Choose Check & fix detected issues on the pop-up window.
- Click Start button to check and fix file system errors without formatting.
If you find your flash drive not working when connecting to your PC, you can try the following methods.
- Try connecting the USB flash drive to your PC via another USB port.
- Reinstall the drive via Device Manager.
- Assign it a drive letter with Disk Management.
- Check its file system error with MiniTool Partition Wizard Free.
- Format the drive if the above fixes don’t work.

User Comments :