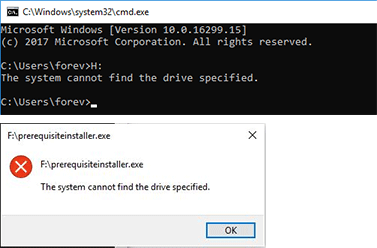
Have you encountered "the system cannot find the drive specified" error? This error may occur in 3 different cases. In this post, MiniTool Partition Wizard offers different solutions corresponding to the 3 cases.
The System Cannot Find the Drive Specified
You may get error “the system cannot find the drive specified” in the following cases:
- After recovering PC from a USB drive or resetting the PC, the PC won’t boot up and this error pops up.
- You may get the error when you try to navigate to a drive. The drive may be a local drive or a shared drive.
- Run a program in Command Prompt. In the command line, you have specified the drive letter (the drive may be a mapped drive or a local drive). But unfortunately, the system cannot find the drive specified.
What will cause this error? The possible reasons are as follows:
- If the issue is related to a shared drive, the possible reason may be related to Windows User Account Control (UAC) and the link between the elevated session and the user session.
- If the issue is related to PC factory reset or recovery, the possible reason may be corrupted system files.
- If the issue is related to a local drive, the possible reason may be drive missing, disk error, etc.
How to solve the problem? You can refer to the following content.
Case 1. The Issue Is Related to a Shared Drive
Many people report that when they sign in to the client, mapped drives are available as expected. But when they run an elevated command prompt as administrator, the mapped drives are unavailable and they will get error “the system cannot find the drive specified”.
If you are also in this case, according to Microsoft, you can try the following methods to solve this problem.
Way 1. Change UAC Using Local Group Policy Editor
- Open Local Group Policy Editor.
- Navigate to Local Computer PolicyWindows SettingsSecurity SettingsLocal PoliciesSecurity Options.
- In the right panel, find the policy User Account Control: Behavior of the elevation prompt for administrators in Admin Approval Mode.
- Right-click this policy, choose Properties, and then configure it to Prompt for consent.
Way 2. Configure the Registry Entry EnableLinkedConnections
- Open Registry Editor.
- Navigate to HKEY_LOCAL_MACHINESOFTWAREMicrosoftWindowsCurrentVersionPoliciesSystem.
- Under this entry, in the right panel, right-click on the blank area and choose New > DWORD (32-bit) Value.
- Name the new registry entry as EnableLinkedConnections.
- Double-click the new registry entry. In the edit window, type 1in the Value data field, and then select OK.
- Exit Registry Editor, and then restart the computer.
The above methods are the most effective ones. But if you can’t accept them, you can try the following ones:
- Map the required drives again in the elevated session.
- If you get the error when running a program from the mapped drive, you can also try giving the logged-on user the necessary privileges to run this program under his user account.
Case 2. The Issue Occurs After PC Factory Reset
Many HP users report that their HP PCs displays error “the system cannot find the drive specified” after they factory reset the PC or recover the PC from a USB drive. What’s more, this error will prevent the PC from booting up.
If you are in this case, you can try the following methods to repair your PC.
Way 1. Rebuild MBR
- On another PC, use the Windows 10 media creation tool from Microsoft to make a Win 10 installer on USB (just choose Create installation for another PC).
- Insert the Windows 10 installation media to the PC that has the issue.
- Power on the PC and press the BIOS key (F2, Delete, etc.) to enter Firmware.
- Change the boot order in BIOS so that USB is first and HDD is second.
- Press F10 to save changes and make the PC to boot from the USB drive.
- On screen after languages, choose Repair your computer, not Install now.
- Navigate to Troubleshoot > Advanced Options > Command Prompt.
- Type “bootrec /RebuildBcd” and press the Enter key.
- Type “bootrec /fixMbr” and press Enter.
- Type “bootrec /fixboot” and press Enter.
Way 2. Repair System Files
In the Command Prompt window, type “sfc /scannow” and press the Enter key. This way is available not only in WinPE, but also in WinRE and in the running Windows system. In addition, if you are in Case 3, you can also try this solution.
Way 3. Reinstall Windows
MBR and system files are all related to system booting process. If the above methods don’t solve the issue, you can try reinstalling Windows. Many people have reported that this method solved their issues.
To reinstall Windows, you should go back to the Install now screen. Then, follow the wizard to install Windows only. To get detailed steps, you can refer to this post: How to Install Windows 10 on a New Hard Drive (with Pictures).
Note: Reinstalling Windows may cause data loss. If there are important files on disk (especially on the C drive), please back up them first.
Case 3. The Issue Is Related to a Local Drive
Like Case 1, in the Case 3, PC runs normally still. In this case, when you try to open a specific drive or run a program in a specific drive, the error “the system cannot find the drive specified” may pop up.
If you are in this case, you can try the following methods. But before you perform these methods, please run an antivirus scan first. This will provide a safe environment for the following solutions.
- Click the Start button and select the Settings icon.
- Go to Security & Update > Windows Defender.
- Click Open Windows Defender Security Center in the right panel.
- Click Virus & threat protection.
- Click Quick scan.
Way 1. Check the Drive’s Status
The method to check the drive’s status is very easy. You just need to open the drive in Windows File Explorer and see whether it can open normally. Then, please make sure you have typed the correct drive letter.
Way 2. Recover the Lost Partition
One of the possible reasons for the error “the system cannot find the drive specified” is that the drive has been lost (it may be deleted mistakenly). If there is no important file on the partition, you can create a new partition on unallocated space using Disk Management.
But if there are some important files on the drive, you can use MiniTool Partition Wizard to recover the lost partition (This requires Pro Deluxe or higher editions). Here is the guide:
MiniTool Partition Wizard DemoClick to Download100%Clean & Safe
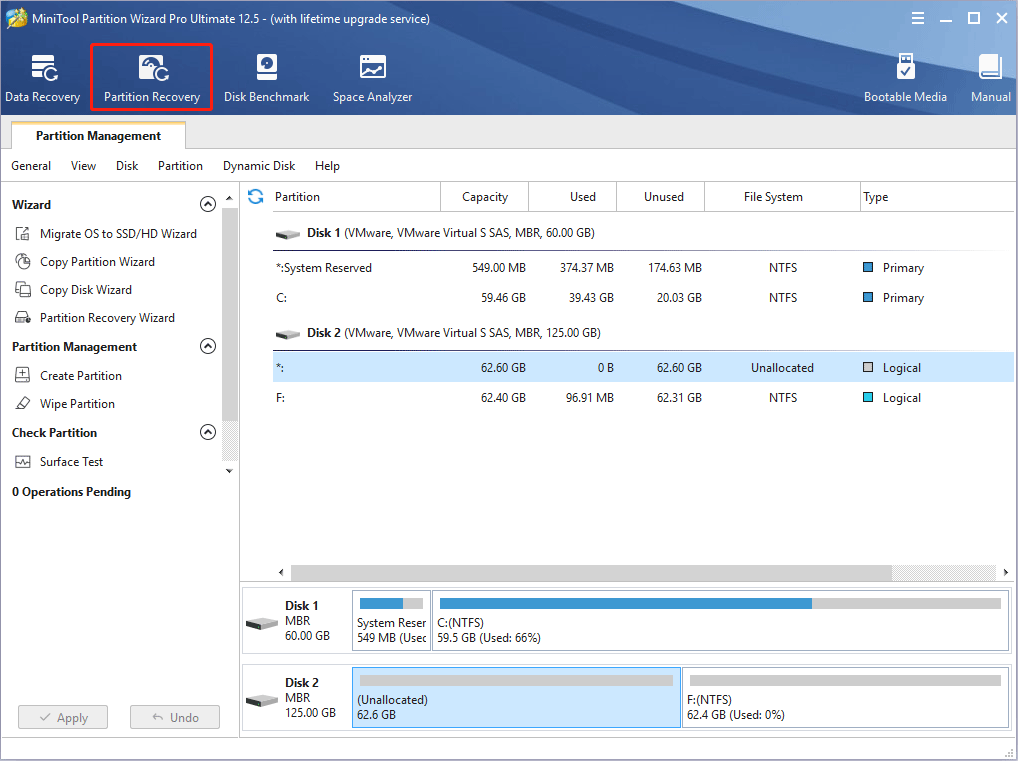
Step 1: Launch MiniTool Partition Wizard and go to its main interface. Click Partition Recovery on the toolbar. Then, click Next button to continue.
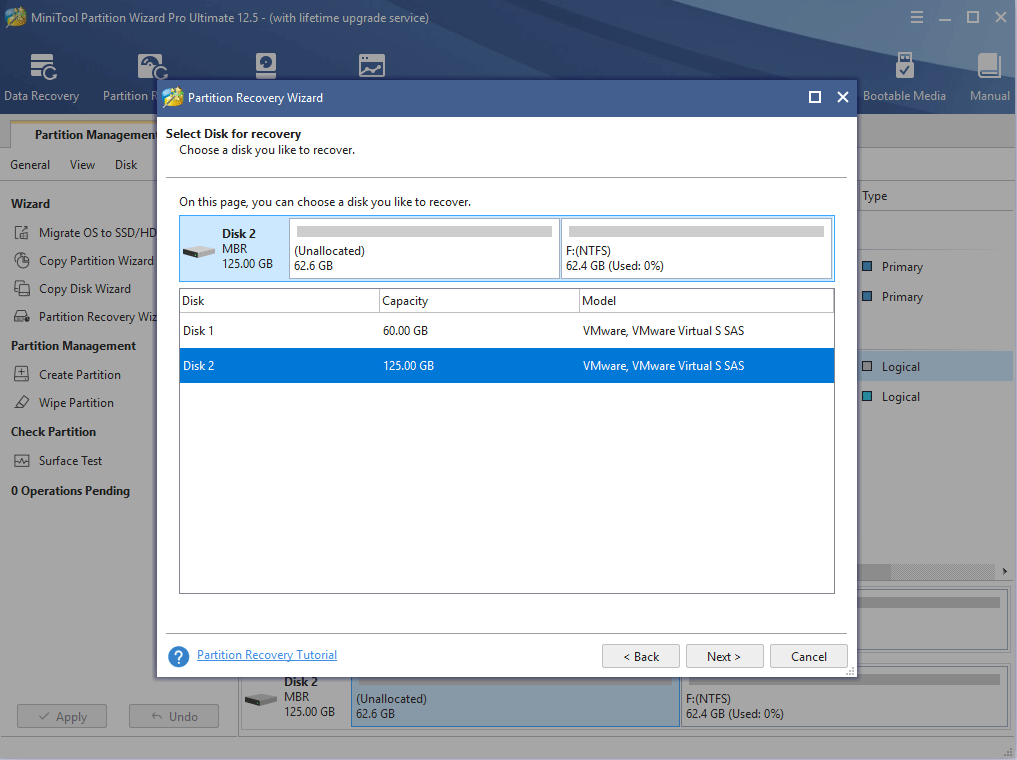
Step 2: Choose the hard drive where the partition is lost. Then, click the Next button.
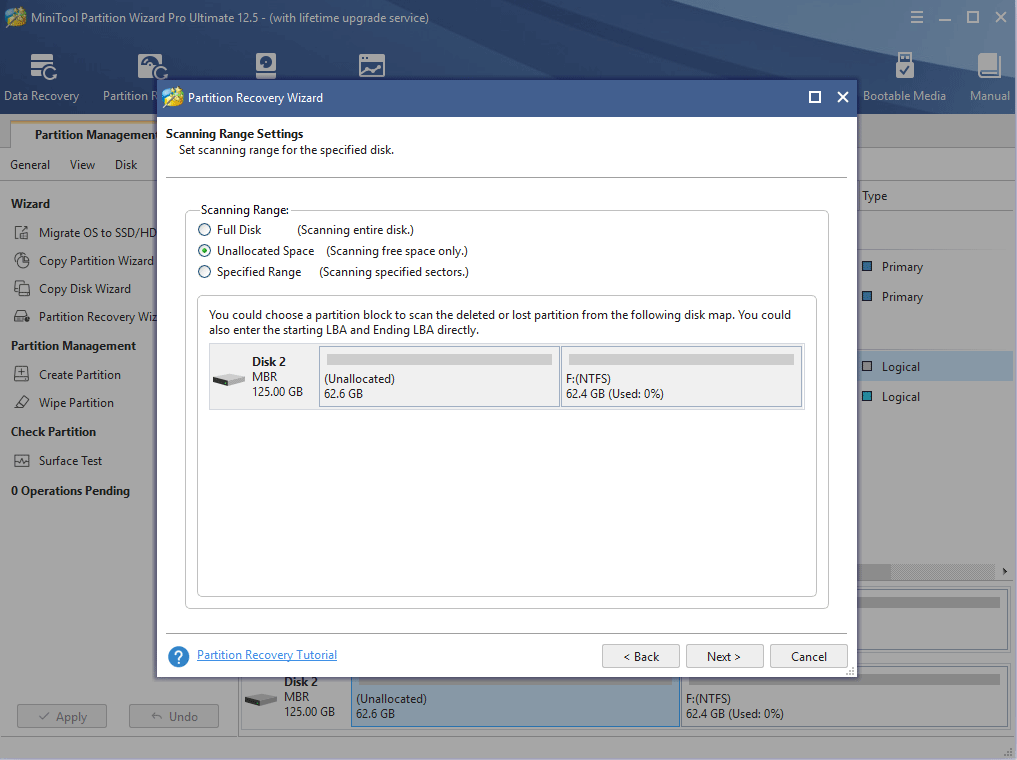
Step 3: Choose a scanning range and click the Next button.
- Full Disk: It will scan the entire disk.
- Unallocated Space: If the lost partition has become unallocated space, this option is recommended.
- Specified Range: You can specify the scanning range by designating the starting sector location and ending sector location.
Step 4: Choose a scanning method and click the Next button. Quick Scan is recommended. But if the Quick Scan cannot find the lost partition, you can then try the Full Scan method.
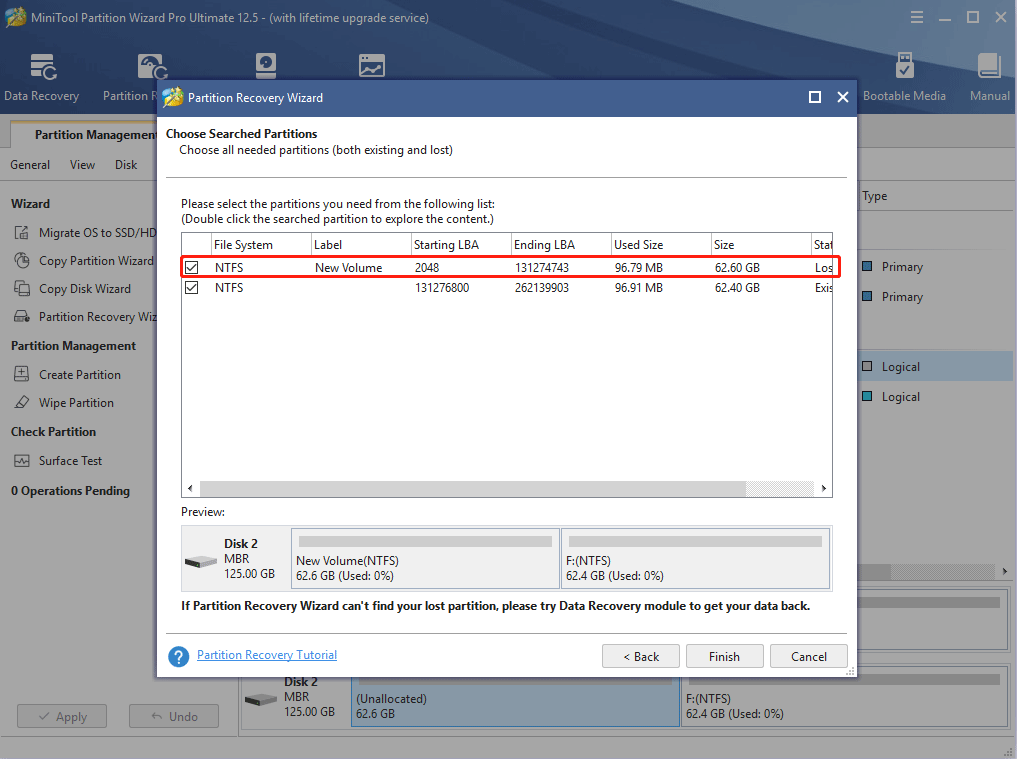
Step 5: Tick the box before the lost partition and click the Finish button. The MiniTool Partition Wizard will display drives’ status as Lost/Deleted or Existing. Do not uncheck the box before an existing partition. Otherwise, the partition will be deleted from the disk.
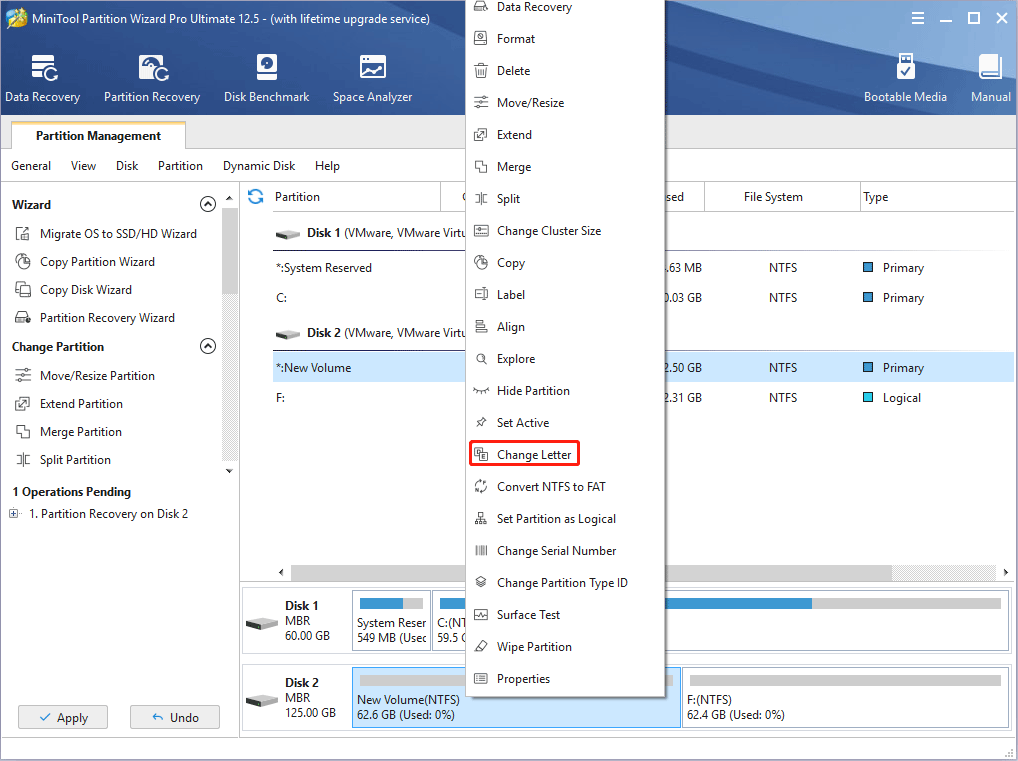
Step 6: The partition to be recovered has no drive letter and you should assign a new one to it. Please right-click on the partition and then choose Change Letter. Then, choose a drive letter and click the OK button.
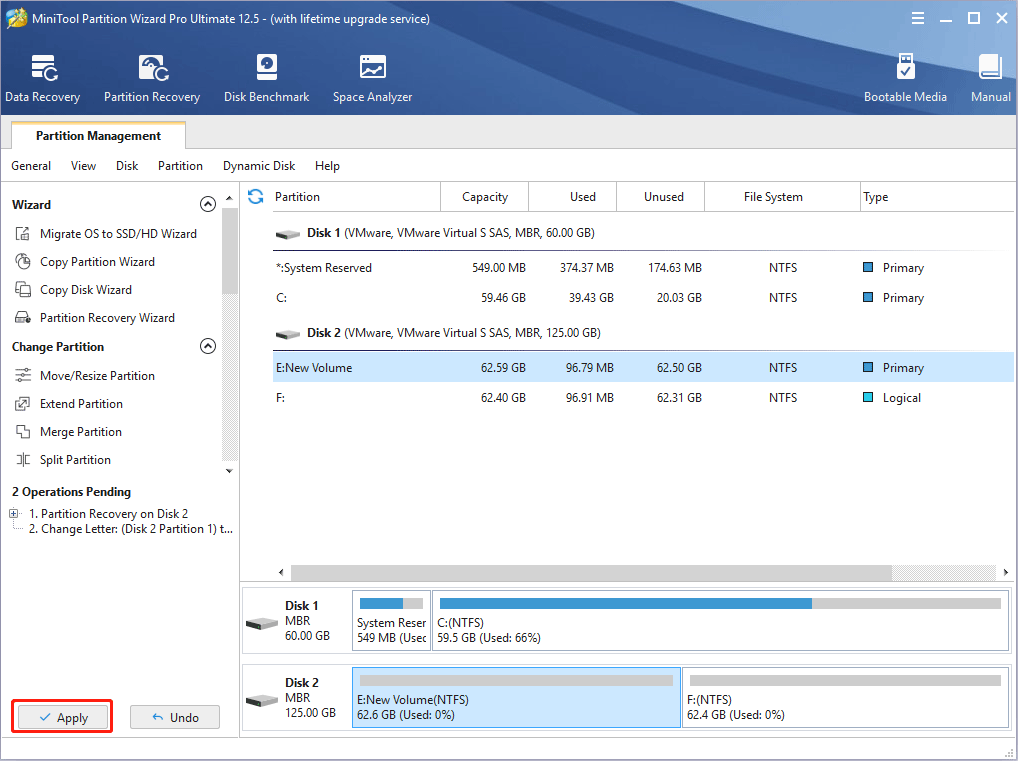
Step 7: Click the Apply button to execute pending operations.
Way 3. Check the Permission of the Drive
If you don’t have the necessary permissions to access the specific drive, you may also get the error “the system cannot find the drive specified”. In this case, you can solve the problem by changing the drive’s permission.
- Open File Explorer and highlight This PC.
- In the right panel, right-click on the problematic drive and choose Properties.
- Skip to Security tab and click the Advanced button.
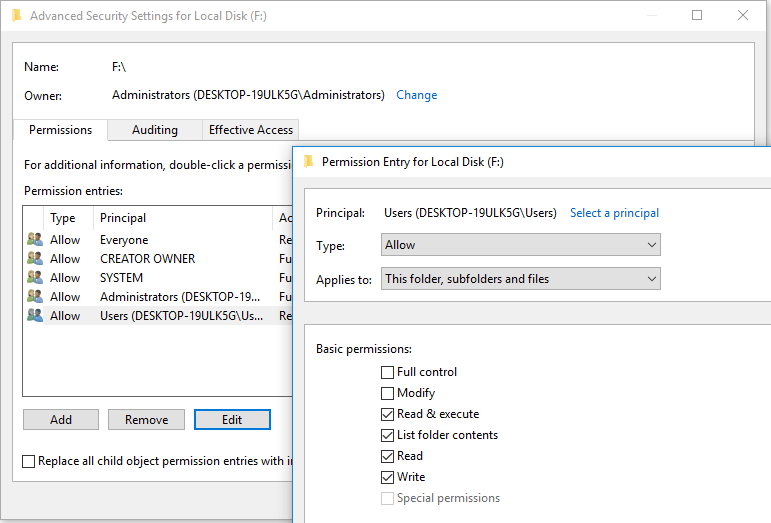
- In the new window, highlight Users and click the Change permissions button.
- Choose the Users again and click Edit.
- Under Basic permissions, check Full control and click the OK button.
Way 4. Check File System
- Open File Explorer and highlight This PC.
- In the right panel, right-click on the problematic drive and choose Properties.
- Skip to Tools tab and click the Check button under the Error checking This tool will check the drive for errors.
In addition to the above methods, some people may also suggest you use other methods like updating Windows, cleaning temporary files, and uninstalling newly-installed software. You can try them if the above methods don’t work for you.
Bottom Line
Is this post useful to you? Have you encountered “the system cannot find the drive specified” error in other cases? Do you know other methods that can solve this issue? Please leave a common for sharing. In addition, if you have difficulty in recovering data or partition, please contact us via [email protected]. We will get back to you as soon as possible.


User Comments :