Sometimes, you might want to delete the confidential data saved in your system and restore your Windows settings to the default status for some special reasons.
For the saved system data, you can remove them by deleting all in File Explorer or directly wiping the system drive. But you have to reinstall your Windows to make your computer running properly again.
For the changed Windows settings, you can set them back to the default values one by one. But actually, you might have personalized plenty of system settings and you cannot remember all of them.
So, you might wonder if there is any simple and convenient approach to erase saved data and restore default settings. The best way is to reset Windows and choose the remove files and clean the drive option.
About Windows 10 Reset
When your computer is running slow, working incorrectly, or having some other odd issues related to your system, you can reset your Windows 10 to the default settings. This is a feature named Reset this PC included in Windows 10 Recovery options.
If you reset Windows 10, your computer will start fresh with a new installation, but also let you choose to whether keep your files or remove them, providing two resetting options Keep my files and Remove everything.
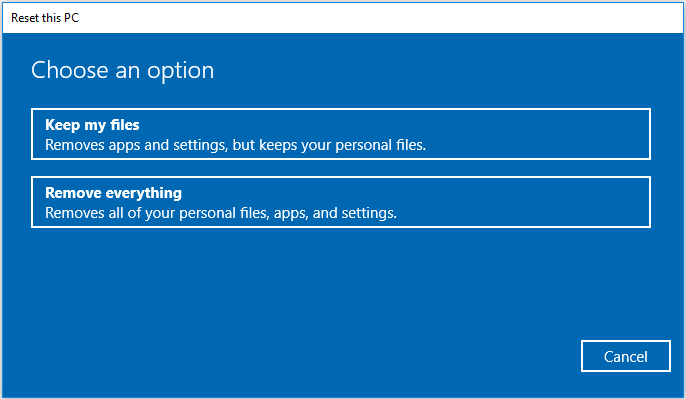
Which option should you choose? Keep on your reading to get detailed information about these two options.
Keep My Files
“Keep my files” option will remove your installed apps, programs, and personalized settings but keep your saved personal files. This option was previously known as Refresh your PC.
After you choose this option, you will see the current resetting settings. You can click Change settings to enable or disable the Preinstalled apps option to configure whether to restore preinstalled apps/settings or not. If it is on, your computer will restore apps/settings which came with this PC. Otherwise, all the apps including those your PC manufacturer installed will be removed.
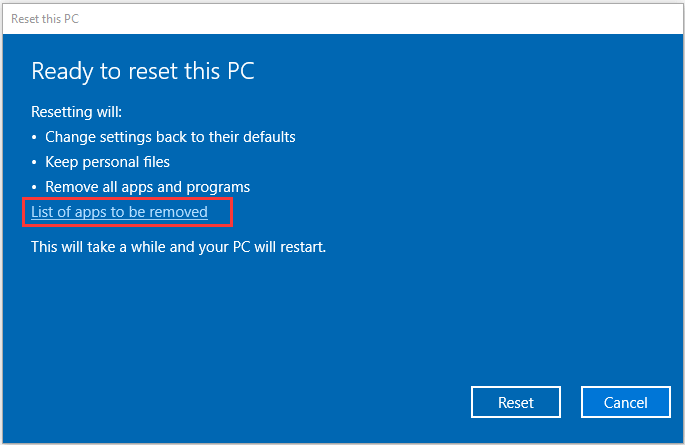
Then, you will be informed about what exactly resetting Windows do. Apart from whether to restore the preinstalled apps, your computer will do the following operations:
- Remove changes you have made to system settings.
- Install a fresh copy of Windows 10 and keeps your personal files.
- Remove apps, programs, and drivers you have installed.
It is worth mentioning that you can click List of apps to be removed to figure out the affected items.
Related article: Windows 10 Reset VS Clean Install VS Fresh Start, Detailed Guide!
Remove Everything
As its name indicates, the “Remove everything” option will remove all your personal files, apps, drivers and personalized settings, and then perform a clean install for your Windows 10. If you want to remove all the data and start using your computer from scratch, this resetting option should be a good choice.
Similar to the former option, you can also click Change settings to configure some additional settings after selecting “Remove everything”. There are two settings available: Data erasure and Data drives. You can enable or disable them according to your needs.
- Data erasure (On) removes files and clean the drive. This may take hours, but will make hard to recover files.
- Data erasure (Off) just removes your files. This is quicker, but less secure.
- Data drives (On) removes all files from all existing drives on your disk.
- Data drives (Off) removes all files only from the drive where Windows is installed.
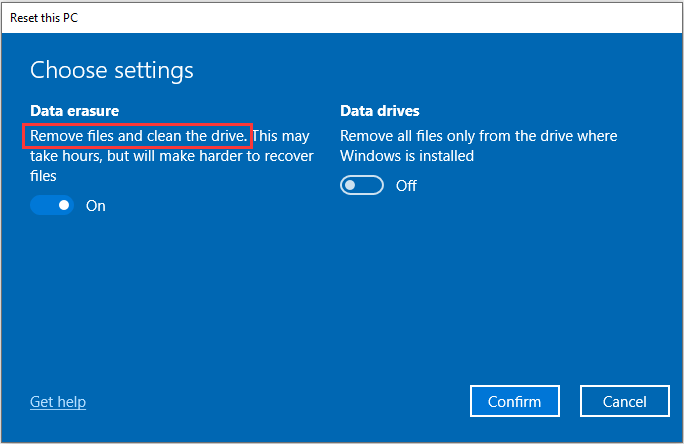
If you are running Windows 10 1809 or any earlier versions, you might be unable to access these two settings by clicking Change settings. Instead, you will sequentially get the following interfaces that require you to respectively choose to remove all files from system drive only or all drives and whether to clean the drives.

About “Remove Files and Clean the Drive”
As mentioned before, “Remove files and clean the drive” is one of the options available when you choose “Remove everything” to reset Windows 10. It is different from the “Just remove my files” option.
If you choose “Just remove my files” option, Windows reset will delete everything saved on the drive/drives by performing a quick format. You cannot access the data normally, but the data still exits on the drive actually and you are able to recover the data with certain data recovery software.
If you choose “Remove files and clean the drive”, Windows reset will not only erase the saved data but also fully clean the drive/drives. This option makes it harder to restore the deleted data and helps avoid leakage of important information. So, it’s more secure to choose this option if you want to sell or donate your computer.
Why do You Need to Remove Files and Clean the Drive
For users who want to reset Windows 10, the “Just remove my files” is enough in most cases. But there are still some situations where you are recommended to completely erase your data and fully clean the drive. You might need to choose “Remove files and clean the drive” in following cases:
- Your Windows runs into certain problems and “Just remove my files” reset feature doesn’t work.
- Your hard drive is running slow and you need a deep wiping to make it runs efficiently again.
- You decide to sell, donate or threw away your computer but worry about personal data being recovered intentionally by others.
- You want to have a fresh start of your computer.
How to Remove Files and Clean the Drive
After learning about Windows reset and the “Remove files and clean the drive” reset feature, it’s time to check the detailed steps. Although this is an easy operation, some users still have no idea about how to do it and bring unrecoverable damage to the needed data.
In this part, I will introduce how to remove files and clean the drive safely in two different cases. Just follow the instructions below to perform the operation by yourself.
Case 1. Reset Windows 10 Just to Erase Data
The instruction in this case will be helpful if you won’t use this computer anymore and want to completely erase the data on the hard drive. As fully cleaning the drive will make it hard to recover the erased data, so you are recommended to back up your hard drive to an external storage device before you start.
To do that, you can employ MiniTool Partition Wizard, a professional disk manager. To back up the disk where the operating system is installed, you have to use a paid edition of this program.
After installing MiniTool Partition Wizard on your computer and registering to a paid edition, you can follow the steps below to back up your hard drive.
Step 1: Prepare a storage device (like USB drive and external hard drive) that is large enough to save all the data on your disk, and connect it to your computer.
Step 2: Launch MiniTool Partition Wizard to get the main interface.
Step 3: Right-click your system disk and hit Copy. You can also choose Copy Disk feature from the left pane after selecting the disk.
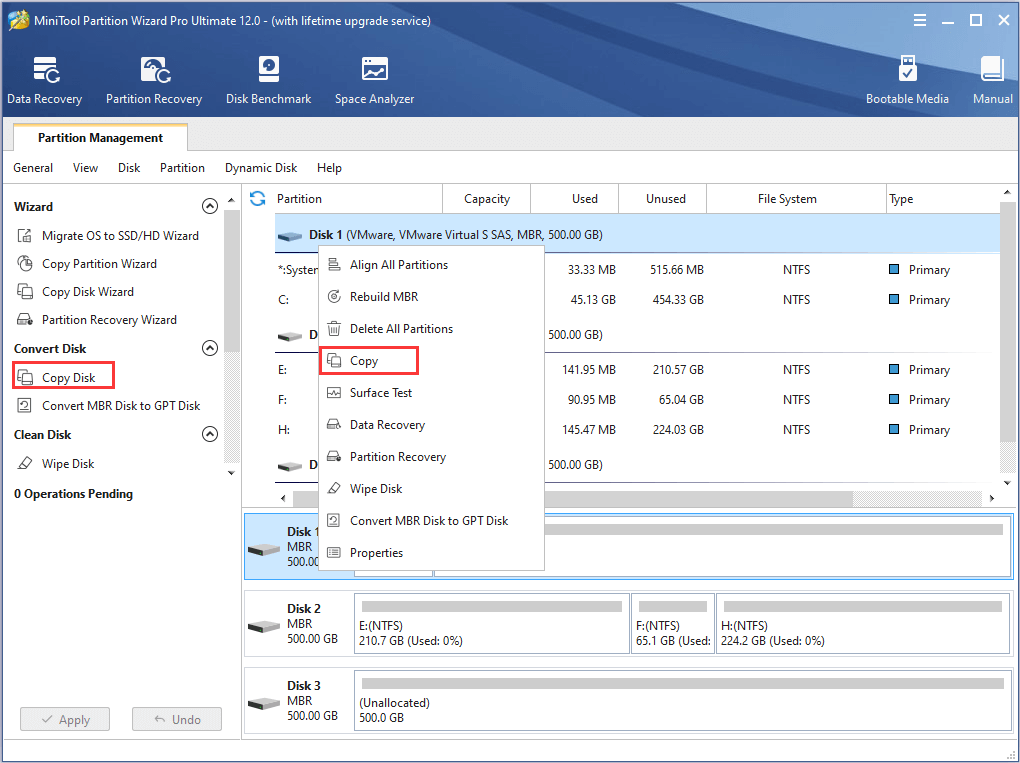
Step 4: Choose the connected storage device as the target disk and click Next to continue.
Step 5: Choose Copy Options and configure the layout of the copied disk according to your needs, and click Next button.
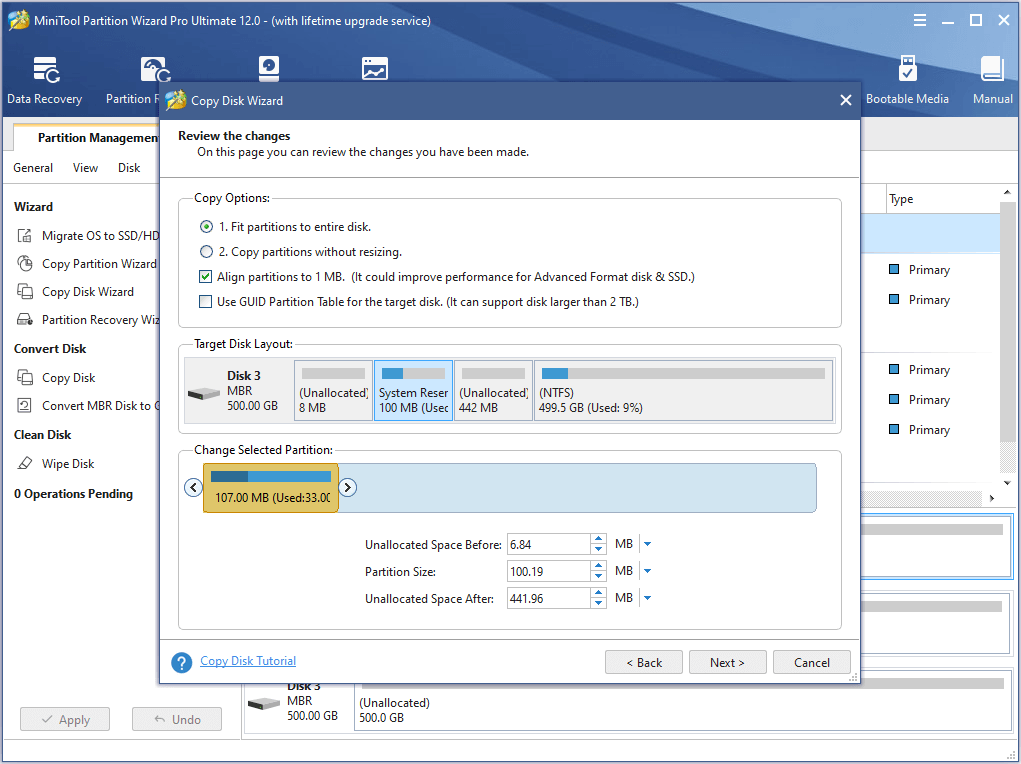
Step 6: Read the message about how to boot from the new disk and click Finish button to back to the main interface.
Step 7: Click Appy button to execute all the pending operations.
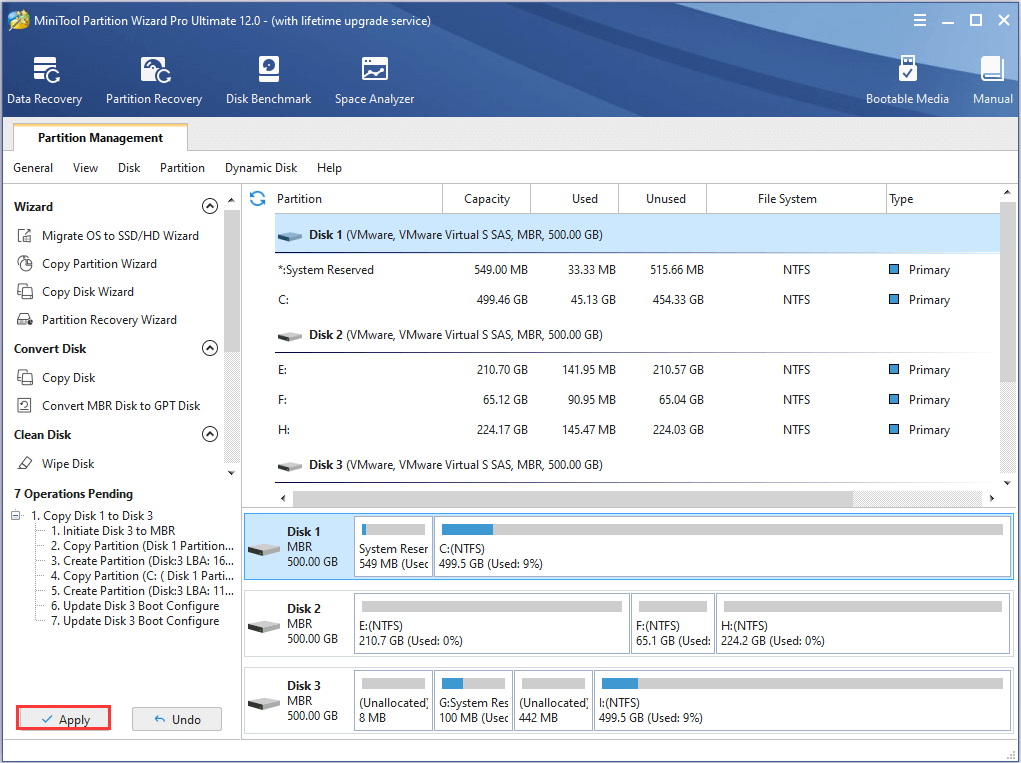
After backing up your data, you can disconnect the external storage device and go to remove files and clean the drive without any worries. Here’s a simple guide:
- Press Windows + I to open Settings
- Go to Update & Security > Recovery.
- Click Get started button in Reset this PC
- Choose Remove everything.
- Click Change settings, enable both Data erasure and Data drives, and click Next. (For Windows 1809 and earlier versions, choose All drives and Remove files and clean the drive respectively in the following screens.)
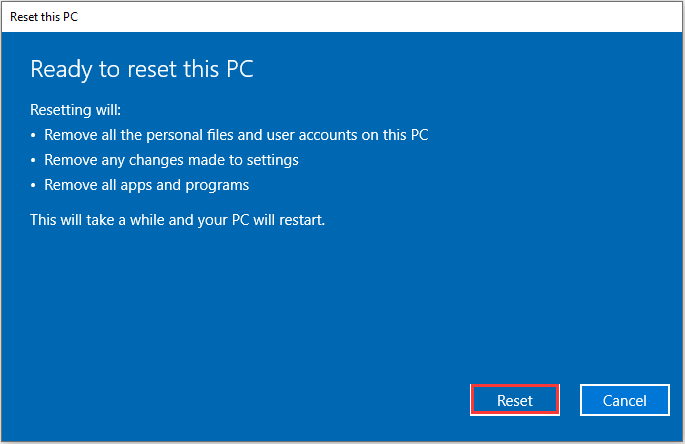
- Click Reset button and wait for your Windows 10 to finish resetting.
Case 2: Reset Windows 10 to Fix System Issues
When you are experiencing certain issues that prevent your Windows from running properly, it is a nice choice to reset Windows with cleaning the system drive.
As mentioned in Case 1, you have to back up your data in advance, but this may be not enough in this case. Most system issues are likely to cause data loss on your hard drive. So, you need to restore data before cleaning the drive. You can also use MiniTool Partition Wizard to achieve this goal.
Step 1: After launching the program, select the system partition and choose Data Recovery feature in the left Action Panel.
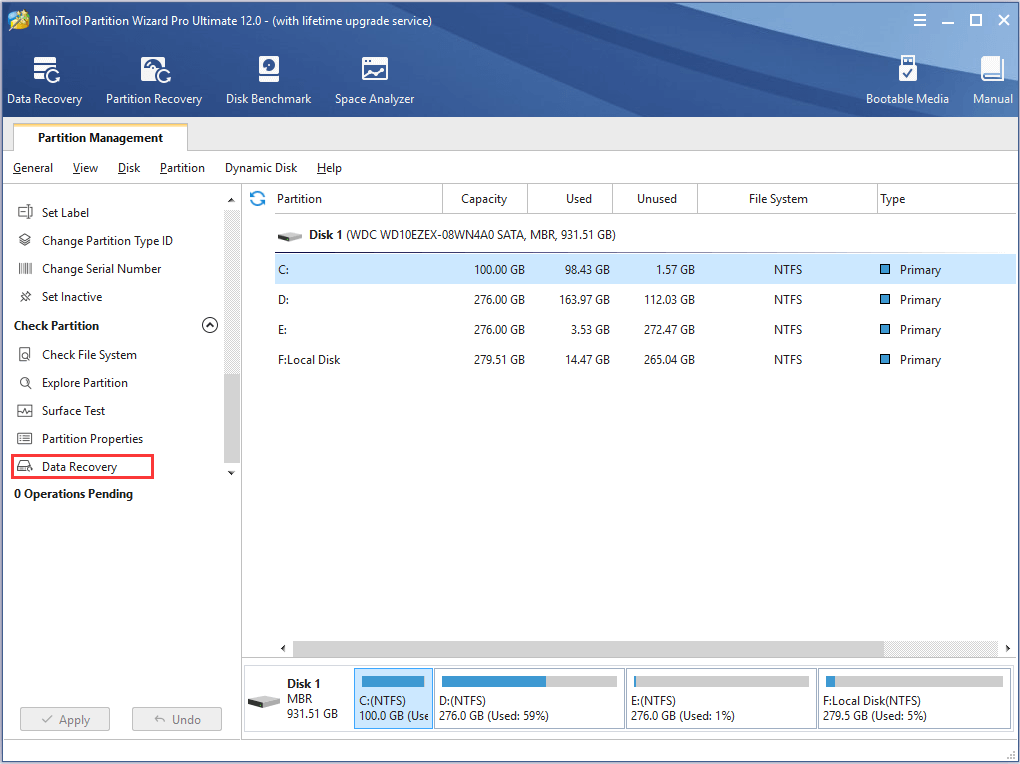
Step 2: Wait for the scanning process to finish. Select the data you need and click Save button. You can quickly find the needed files or folders with the help of Show Lost Files, Find, Filter, and Type options.
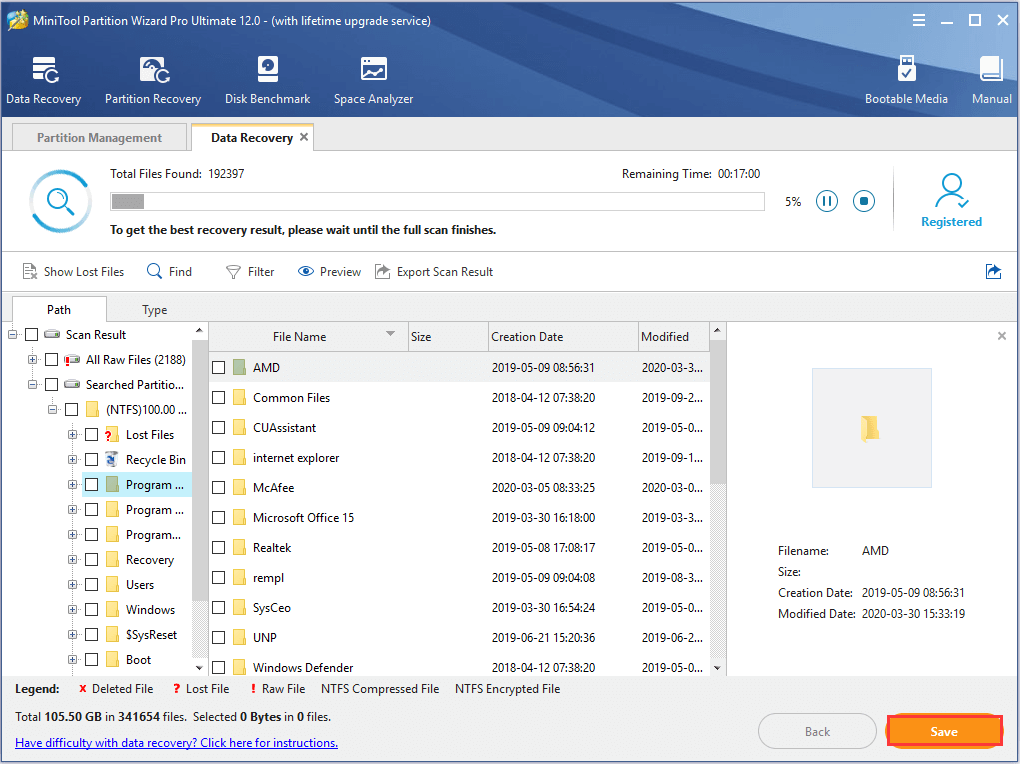
Step 3: Choose a directory on another drive to save the selected data.
Once it’s done, you can clean the system drive. If you can access the desktop normally, just refer to the steps in Case 1 to perform the action. But if you are unable to log into your account or operate in desktop normally, you might need to reset Windows 10 in Windows Recovery Environment. To do that, you need to:
Step 1: Download Windows 10 Media Creation Tool and create an installation media on a normal computer.
Step 2: Boot from the installation media and click Next. In next page, click Repair your computer to enter Recovery Environment.
Step 3: Choose Troubleshoot > Rest this PC > Remove everything.
Step 4: Choose Only the drive where Windows is installed > Fully clean the drive to clean your system partition.
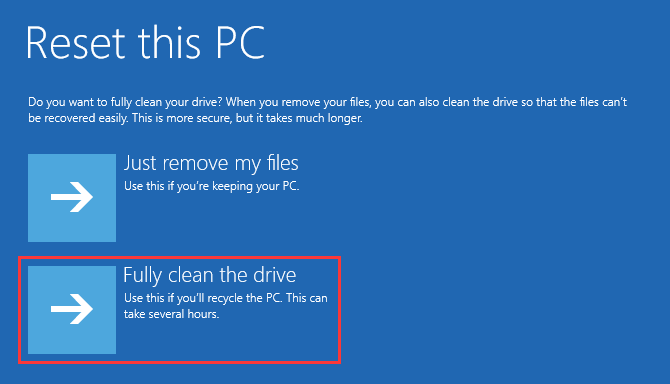
Step 5: Click Reset button to confirm the operation. Then, you just need to wait until the process is completed.
How to remove files and clean the drive safely? Here’s a complete guide.Click to tweet
Bottom Line
This post has developed a detailed introduction about Windows 10 reset and the “Remove files and clean the drive” reset option.
If you have any problems towards this article, just leave a message in the comment zone below. For any questions about how to back up and recover data with MiniTool Partition Wizard, you can contact our support team via [email protected].

User Comments :